Total Pageviews

Friday, 28 August 2020

How to find and remove files from 'Other' on your Mac

That 'Other' space on Mac might be innocuous, but it is still annoying.

You may be wondering what the "Other" storage category is on your Mac and why it's taking up precious storage space. Though it may be frustrating to see this unexplained category in your Mac's storage category, most of the time, it's useful in some way or another.

It's worth noting that these files aren't normally harmful or wasteful to your computer's system; most are intended to help your Mac run efficiently, and ideally, you shouldn't ever have to clear out your Other files. Unfortunately, they can quickly clog up a computer low on storage — especially if you're storing a large number of iPhone or iPad backups.

Whether you're looking to free up space on your hard drive or just want to do some spring cleaning, here are some simple steps to get your Mac free and clear.

A note on what happened to 'Other' space in macOS Sierra and higher
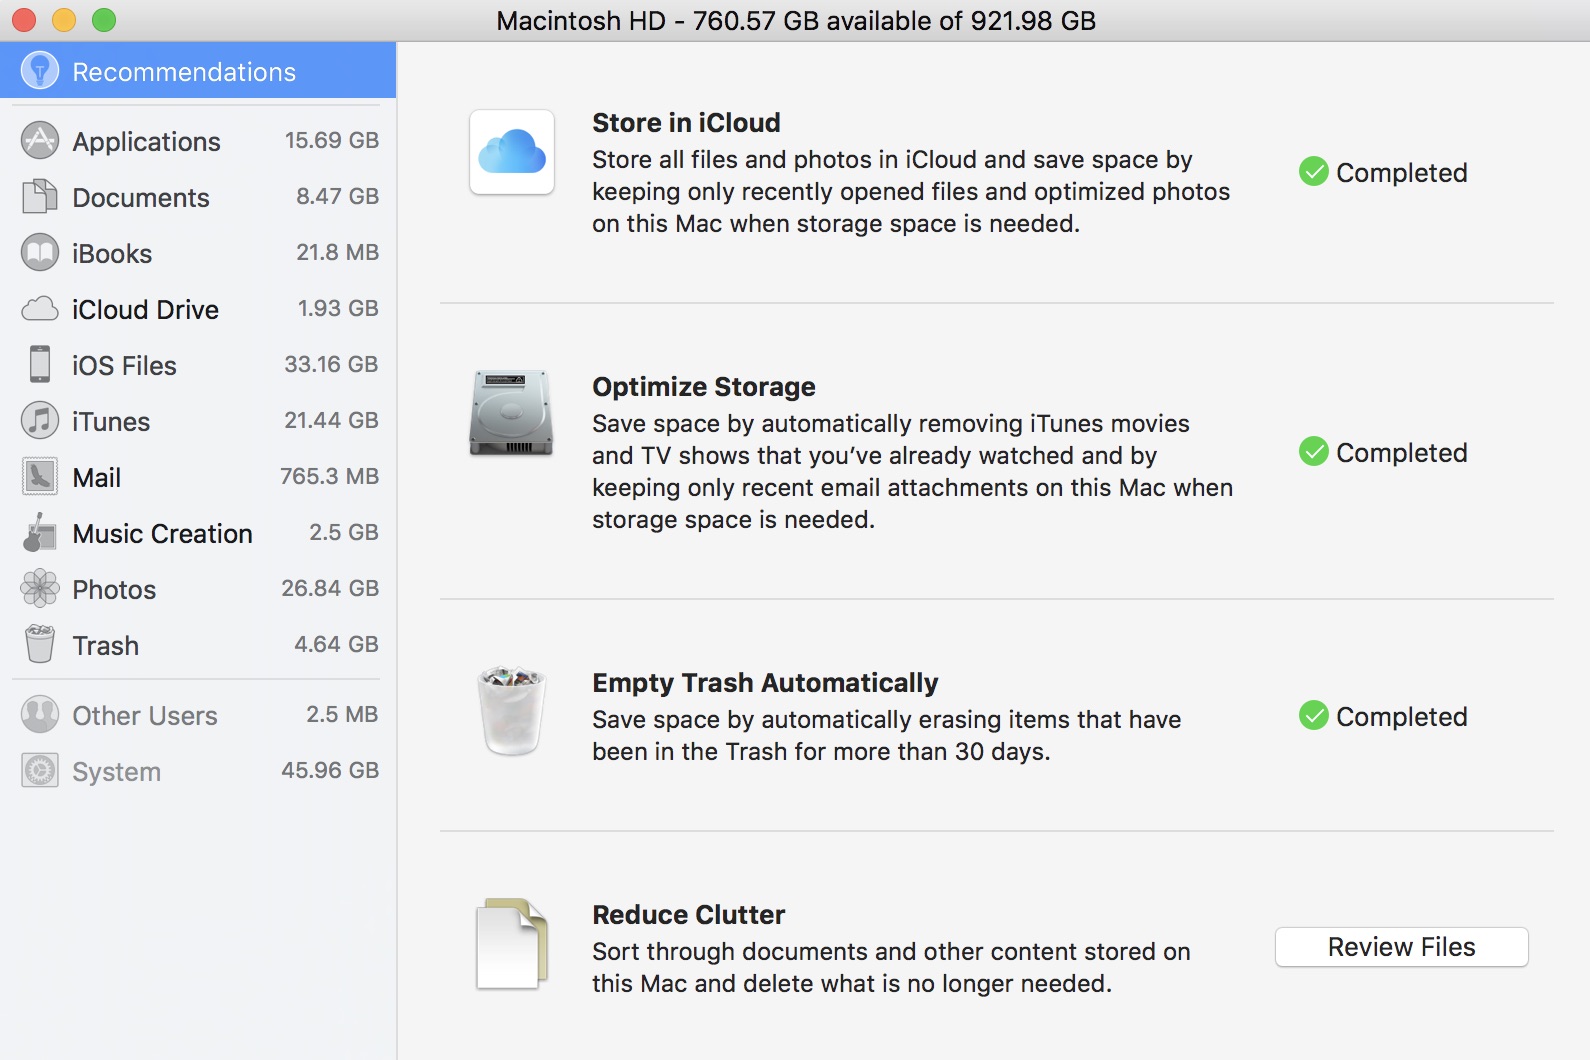
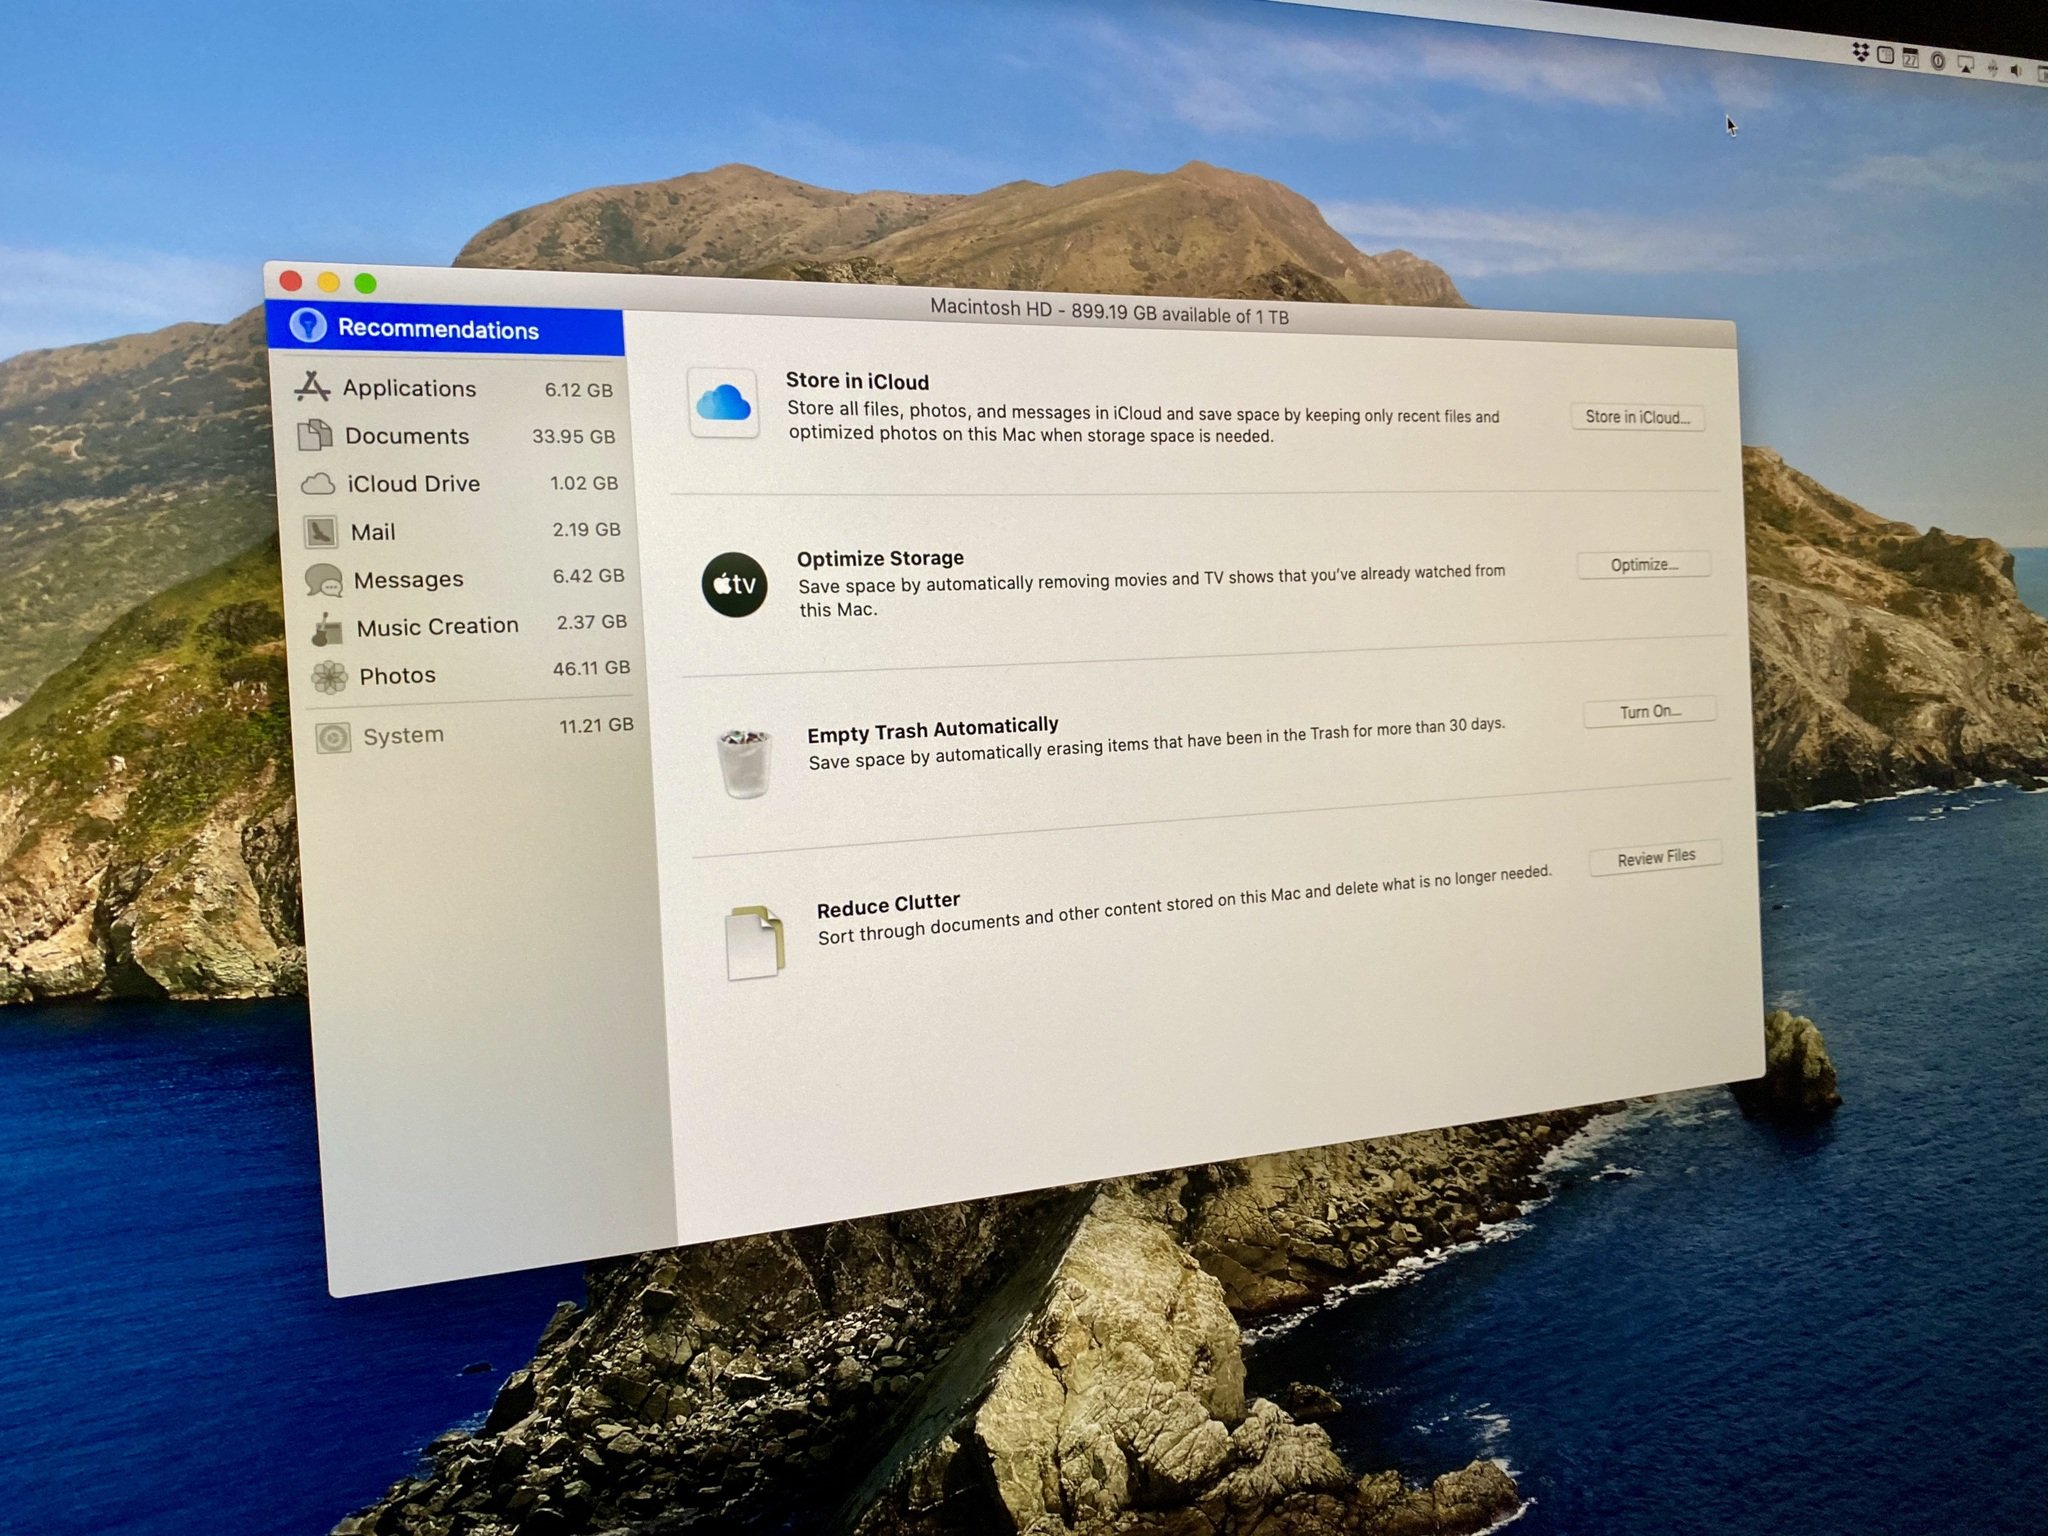
When Apple added its storage management feature to macOS Sierra and newer, called Optimize Storage, it reorganized what "other" storage is and where it's located on the Mac. Much of it has been divided out through other categories so it's easier to find and remove.

The 100GB of Other storage I used to carry on my iMac is whittled down to just 5GB. You can still clean out old and unnecessary content from your Mac by using Optimized Storage, even if your "Other" category storage use isn't all that big.

How to use Optimized Storage on Mac

A lot of the features of Optimized Storage remove content from your Mac and store them in iCloud. If you're concerned with how much storage you're using up in iCloud, you can customize or disable some Optimized Storage features to keep a balance between what's on your Mac and what's in iCloud.

How to customize or disable Optimized Storage on Mac

What's this 'Purgeable' category all about?
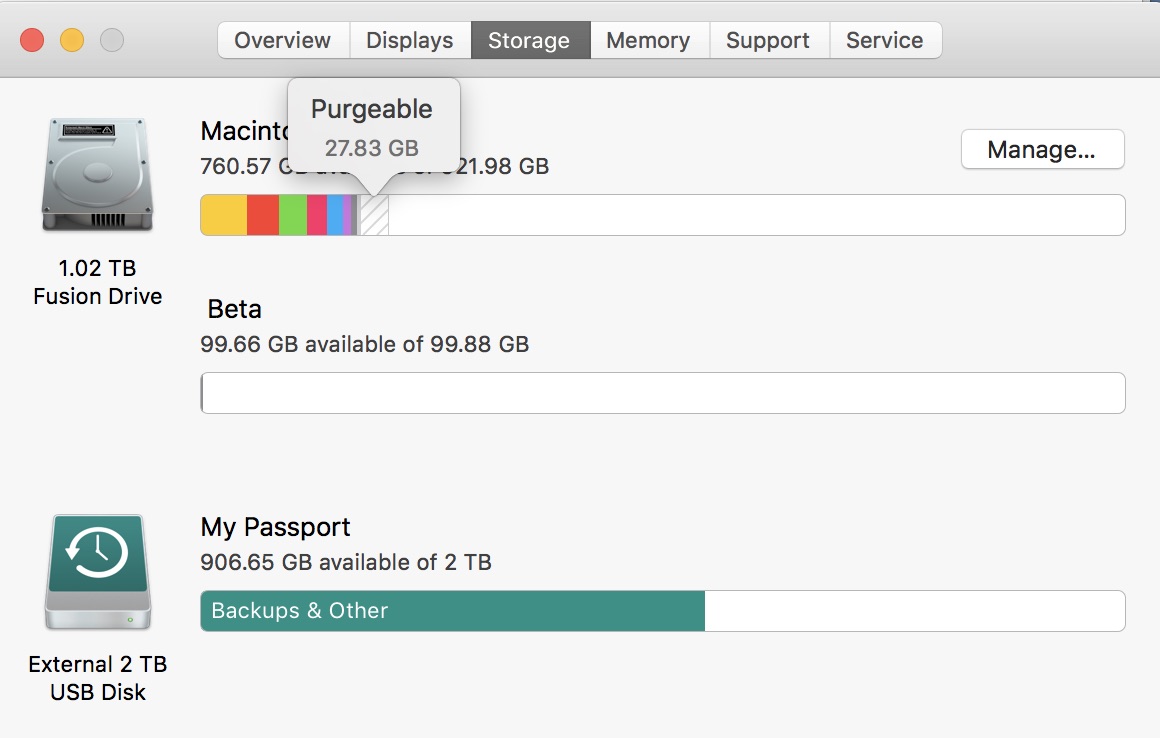
If you check your system storage graph in macOS, you'll probably discover a category called Purgeable. This is part of Apple's Optimized Storage service. When you move your Documents into iCloud (part of the Store in iCloud component) and your hard drive gets low on storage, only recently opened files are kept on your Mac. Older documents are stored in iCloud, while a shortcut icon is kept on your Mac (files are automatically re-downloaded to your Mac as soon as you open them). The Purgeable files are what Optimized Storage will move to iCloud and delete from your hard drive only if your hard drive starts to get full. Purgeable files also include caches and temporary files that used to fit into the Other category, which will also be deleted as your hard drive starts to fill up.

Though your Other storage might have been spread out across categories in macOS Sierra and higher, you can still follow the below steps to manually clean up your Mac and get rid of unnecessary files.

How to check your storage space on your Mac

If you are concerned with how much storage space you have remaining on your Mac computer, you can check its usage folder to see how much space each category is taking up, including Other.

  1. Click on your desktop or the Finder icon from the Dock.
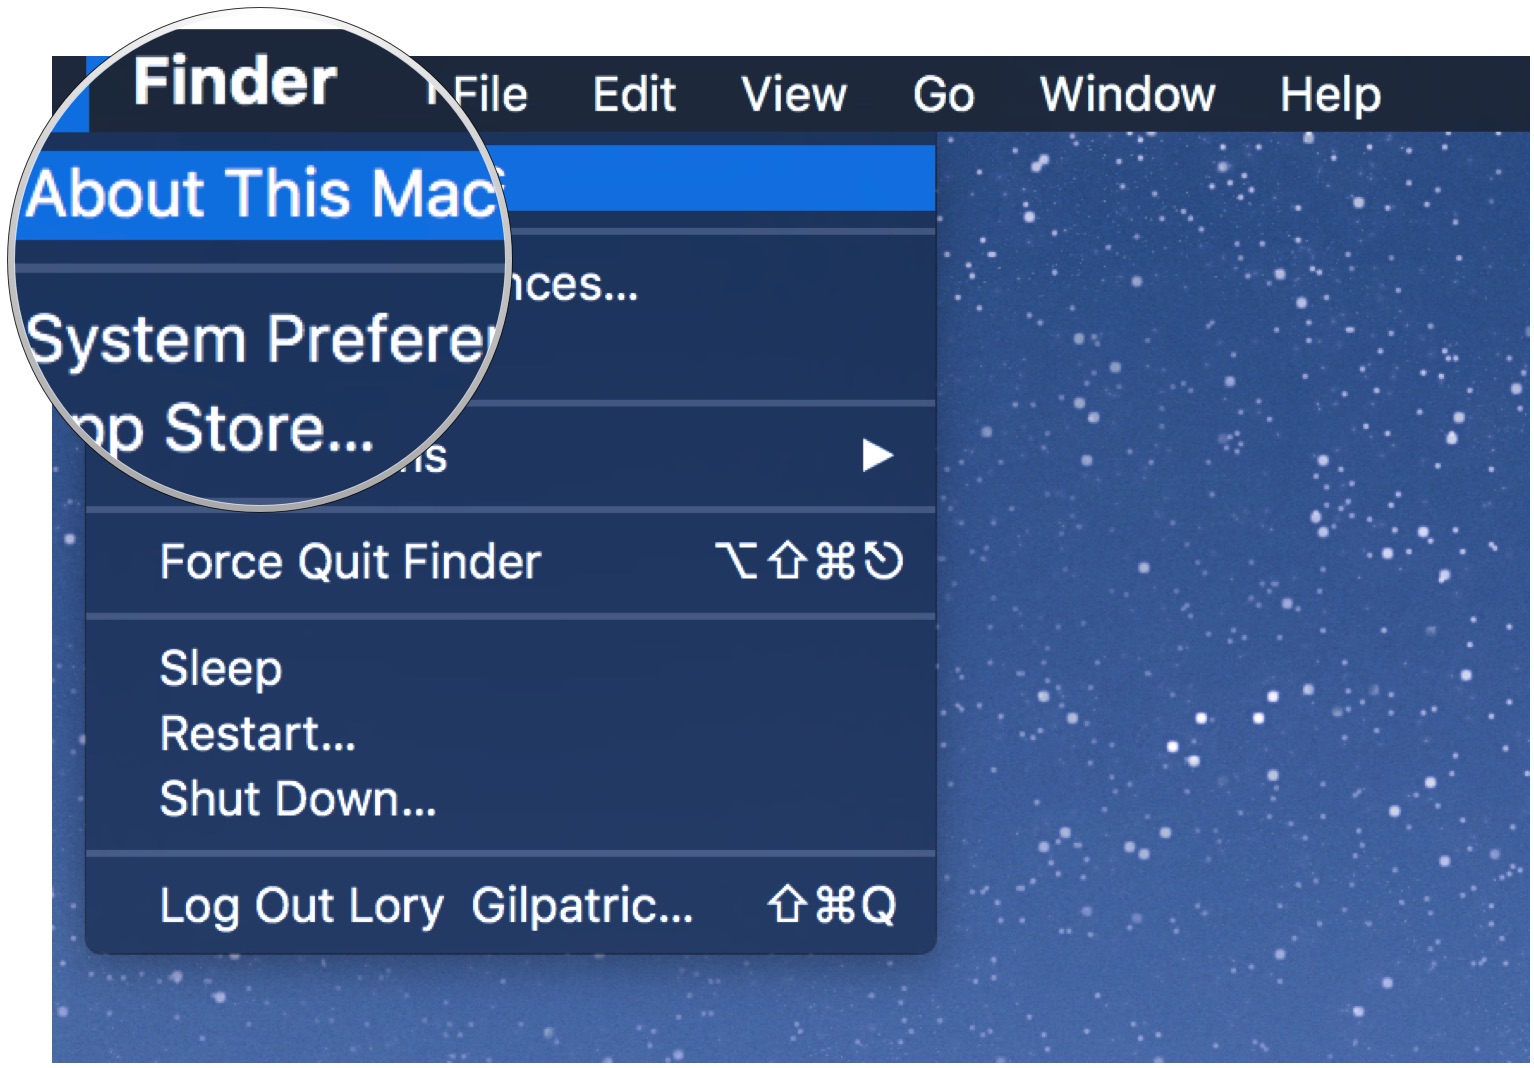
  2. Select the Apple Menu icon in the upper left corner of the screen.
  3. Click on About This Mac.

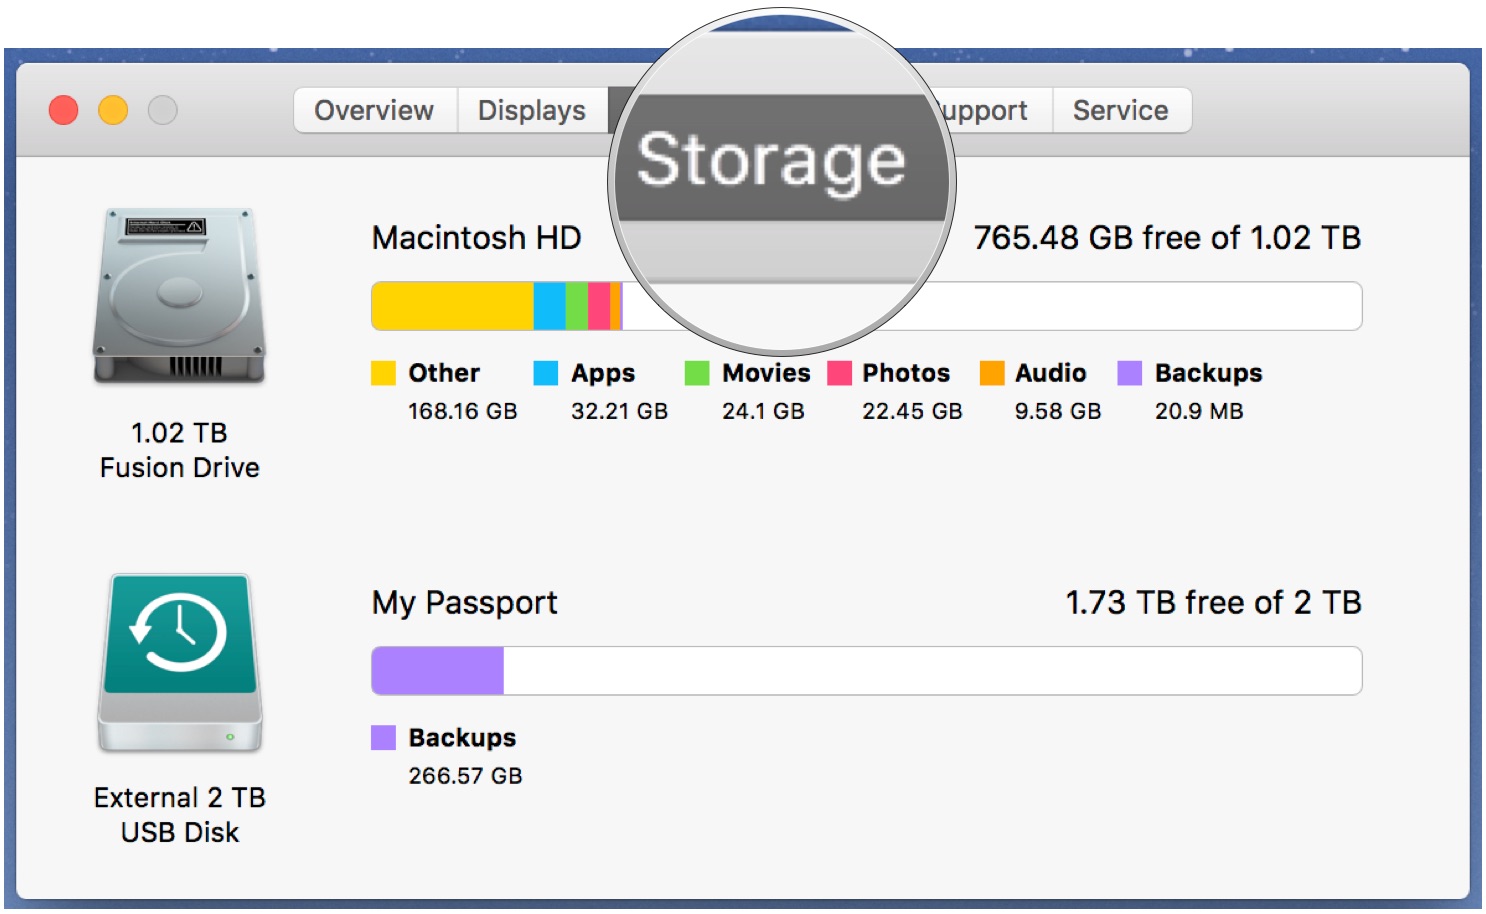
  4. Select Storage.

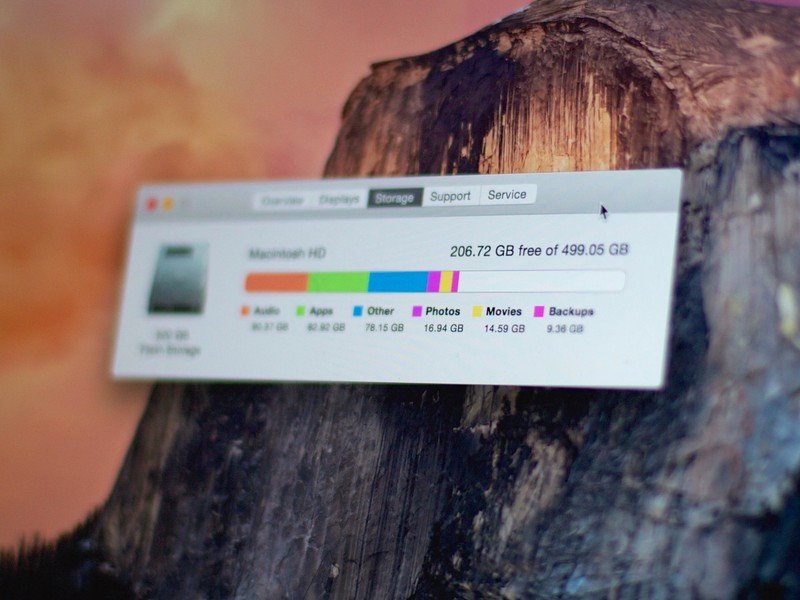
Your Mac breaks down its storage categories as follows: Apps, Movies, Photos, Audio, Backups, and — that annoying, undescriptive category — Other.

How to remove cached files

Now that you know how much space your Other files are taking up, it's time to reduce their footprint on your Mac. You can start by removing items you don't need, including caches for your web browser, saved Apple Music streams, and photo previews.

A note on deleting cache folders: You only want to delete old and unnecessary files, as current cache files store your preferences. We strongly recommend only deleting cache files from old apps.

  1. Click on your desktop or select the Finder icon from the Dock.
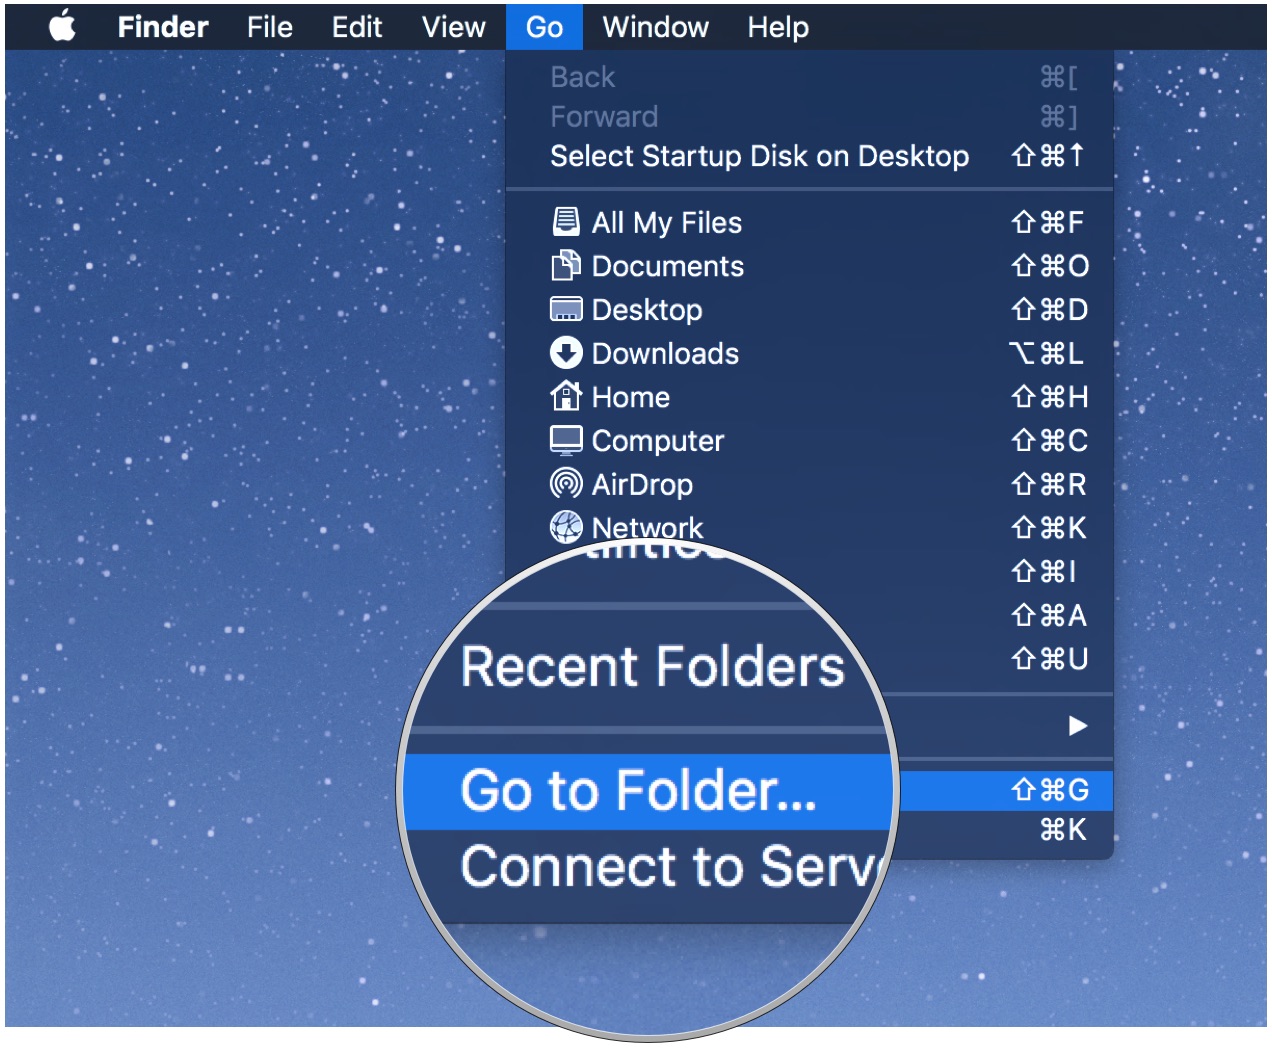
  2. Select the Go menu in the upper left corner of the screen.
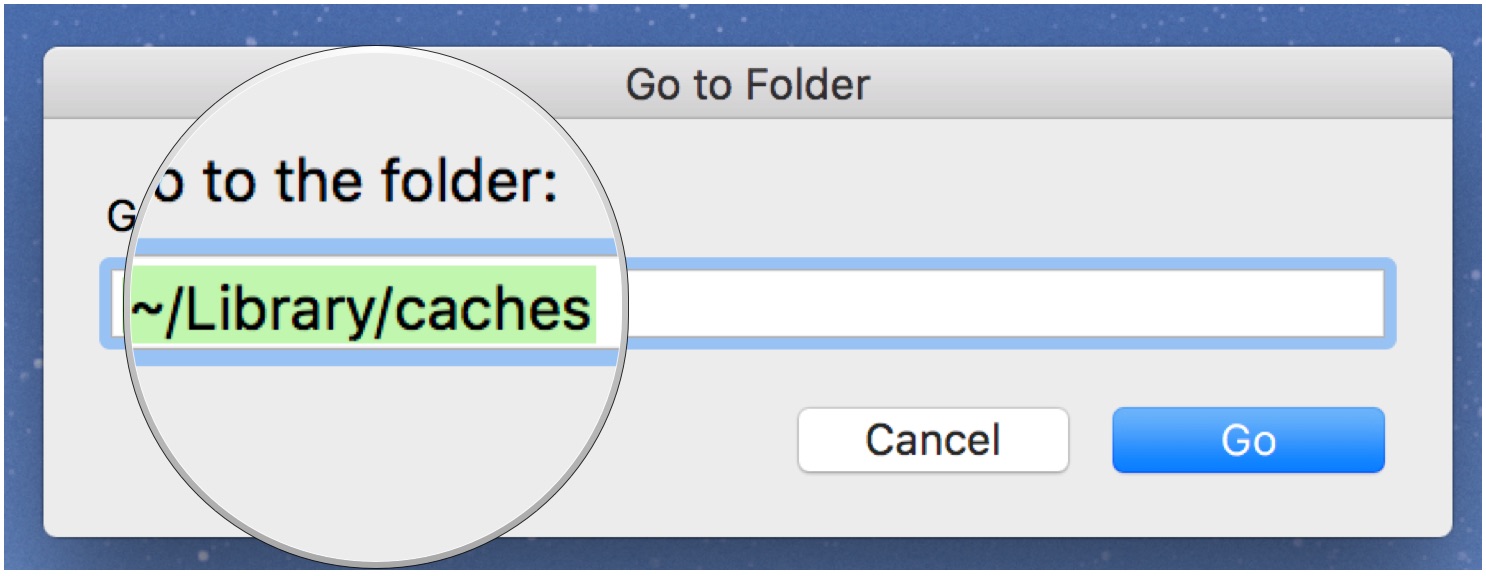
  3. Click on Go to Folder.

  4. Type ~/Library/caches into the text box. A list of caches from active apps will appear on your desktop.
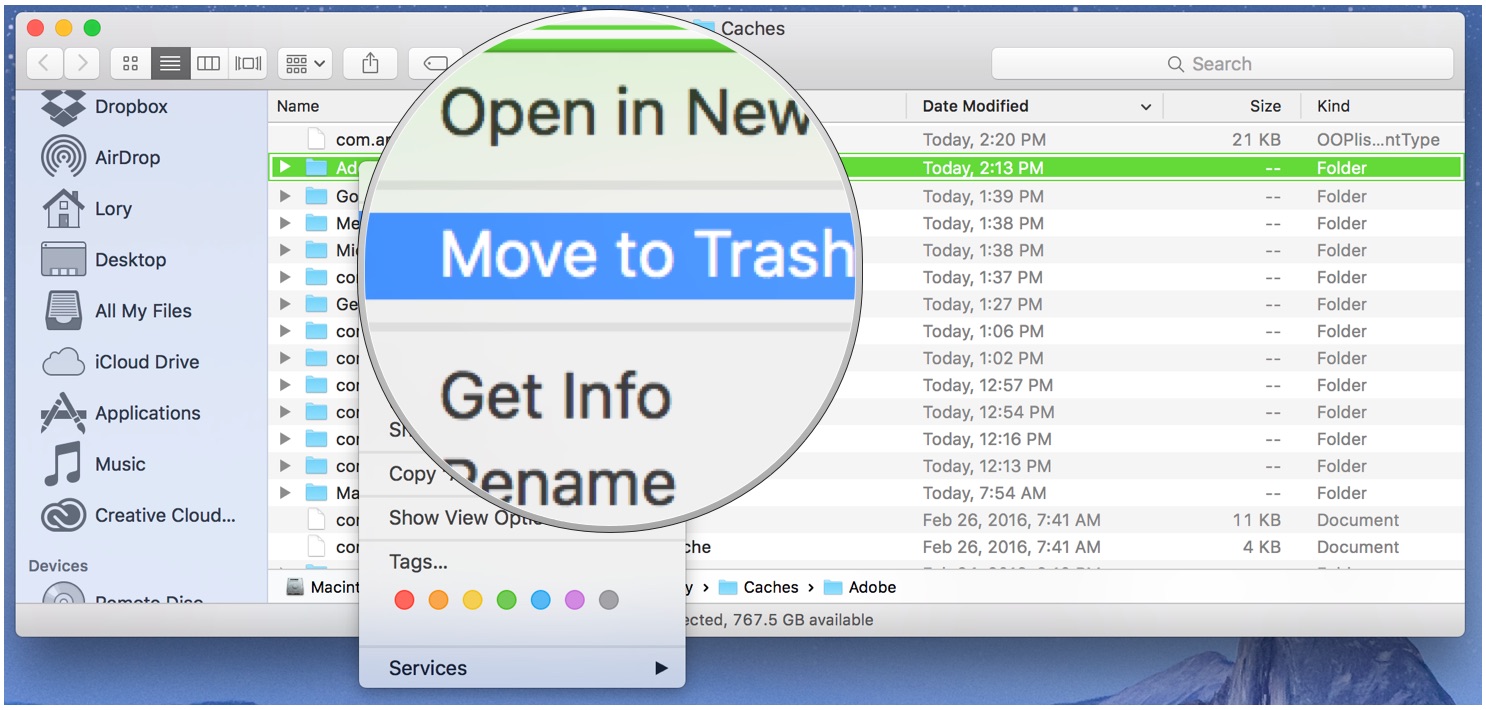
  5. Select the app folder you wish to remove the cache from.
  6. Right-click (or control-click) on the app folder.
  7. Select Move to Trash.

How to remove downloaded files

Chances are, your Downloads folder is stuffed with Other-type files, including installer packages, documents, and folders you have already made copies of somewhere else. If you want to make some room on your Mac, it may be time to clean out your Downloads folder.

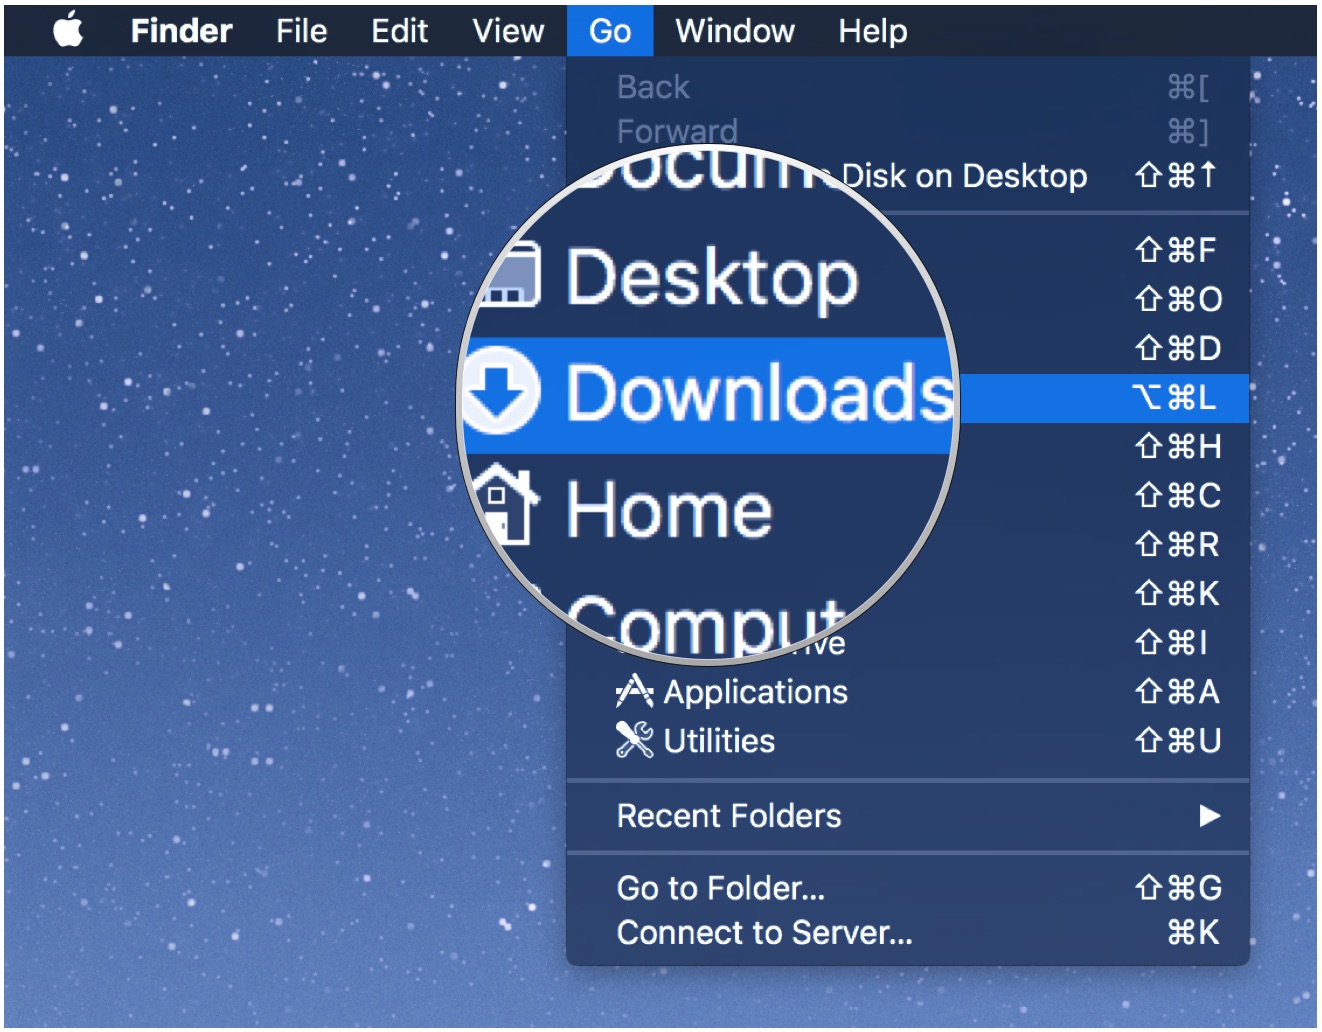
  1. Click on your desktop or select the Finder icon from the Dock.
  2. Select the Go menu in the upper left corner of the screen.
  3. Click on Downloads.

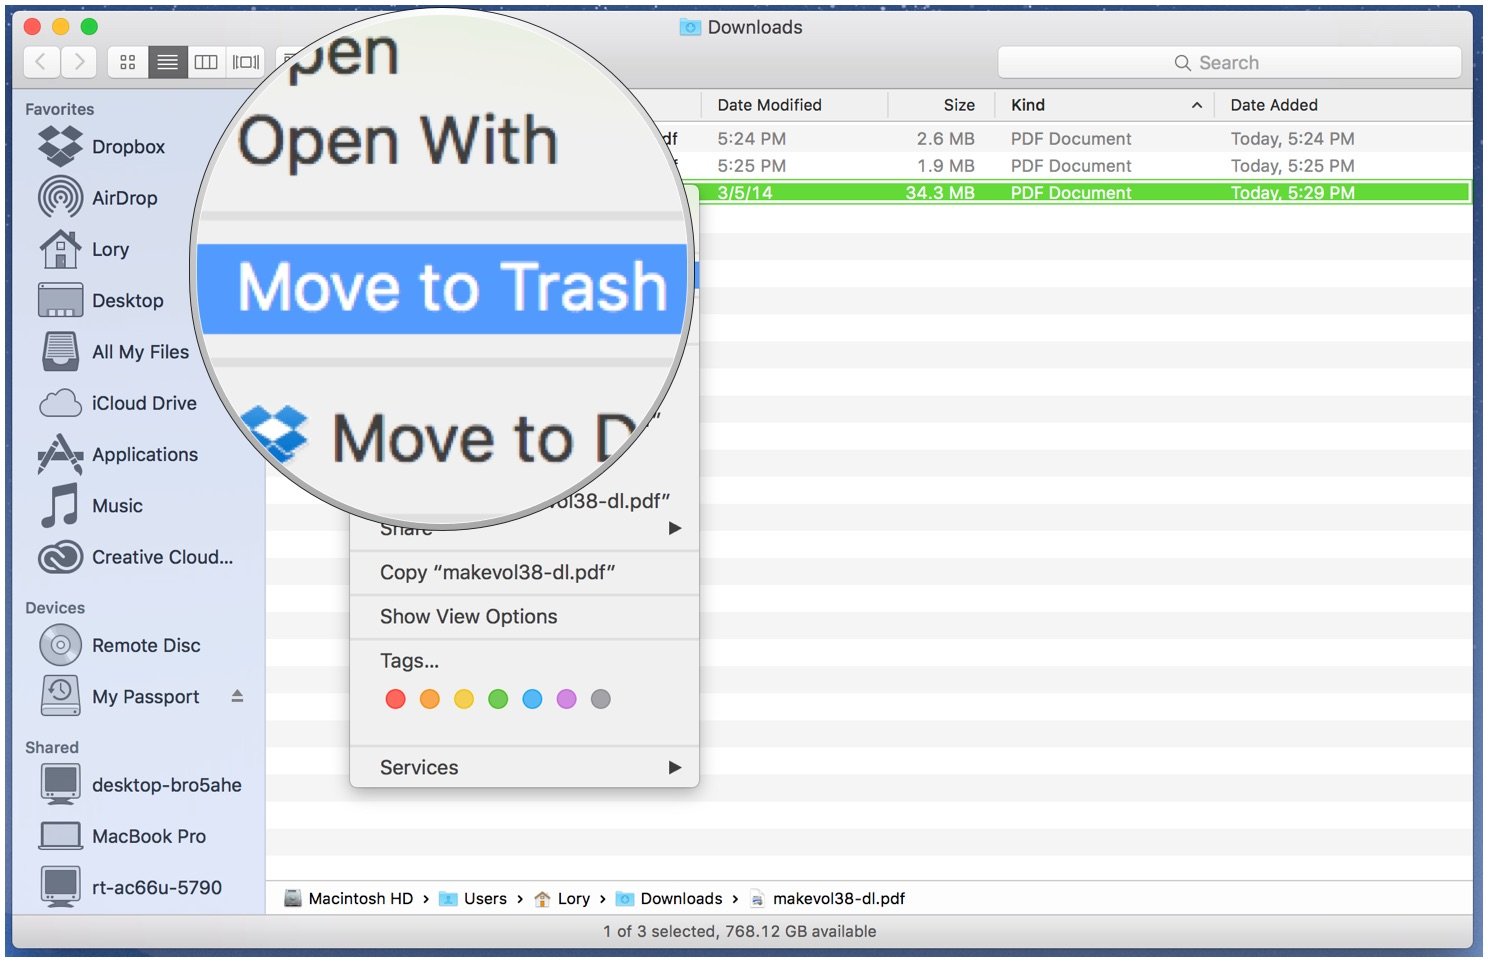
  4. Select the file you wish to remove.
  5. Right-click (or control-click) on the file.
  6. Select Move to Trash.

If you want to save a file from the Downloads folder but don't want it clogging your drive, consider moving it to an external hard drive or flash drive, or uploading it to an online storage option like Dropbox.

How to delete old device backups in iTunes

If you tend to get new iOS devices fairly regularly, you may have unnecessary device backups stored on your computer via iTunes. Backups take up 4-5GB each, on average; there's no need to hold on to older device backups if you no longer have the device or have it stored in iCloud.

How to delete an iPhone or iPad backup from iTunes

Third-party software that can help

While you don't need any third-party app to "clean" your Mac, there are some very handy system access tools out there that make it easier to regularly remove unwanted files.

CleanMyMac 3

With CleanMyMac, you have easy access to a list of features that help you keep your Mac free of unnecessary junk. It scans your entire system and recommends files you should delete based on how old they are and whether they are considered unnecessary to your workflow. It's a lot like Apple's Optimized Storage, but with a few additional features. My favorite is the recommendation to delete all content related to an application. Sometimes, you'll end up with a couple of files left behind by an app when you delete it. CleanMyMac provides a one-button purge of everything associated with that app.

$39.99 - Download Now

DaisyDisk

DaisyDisk scans your Mac and gives you a pie chart that makes it easy to see what files are using up the most space. You can identify files that are in the Other storage category and drag them to the delete box.

$9.99 - Download Now

Onyx

Onyx is a robust Mac system access tool that, in-part, can delete caches, logs, temporary items, and other files that find their way into the Other storage category.

Free - Download Now

Cocktail

Cocktail is another useful system access tool that you can use to clear caches, purge memory, and manage hidden Apple app settings, which might be automatically sending files into the Other category abyss.

$19 - Download Now

Questions?

Still having trouble with Other? Let us know in the comments.


from iMore - The #1 iPhone, iPad, and iPod touch blog https://ift.tt/2gYUz6E
via IFTTT

Here's how to make Optimized Storage on the Mac work best for you

You can customize some of the data that is or isn't stored in iCloud. Strike a balance between hard drive and iCloud storage.

Optimized Storage on the Mac can help reduce the amount of space that data takes up on your hard drive, but it also takes up iCloud storage space. You can adjust some of the settings for what is stored in iCloud in order to save some space in your iCloud storage.

How to stop syncing Desktop and Documents folders in iCloud on your Mac

If you've tried out Desktop and Documents folder syncing in iCloud but decided you don't like it, you can stop syncing. If you disable syncing, Desktop files will no longer appear on a secondary Mac computer's desktop, but they will still be in a file in iCloud Drive, which you can move them out of. Your Documents folder will also still be visible in iCloud Drive, which you can also move.

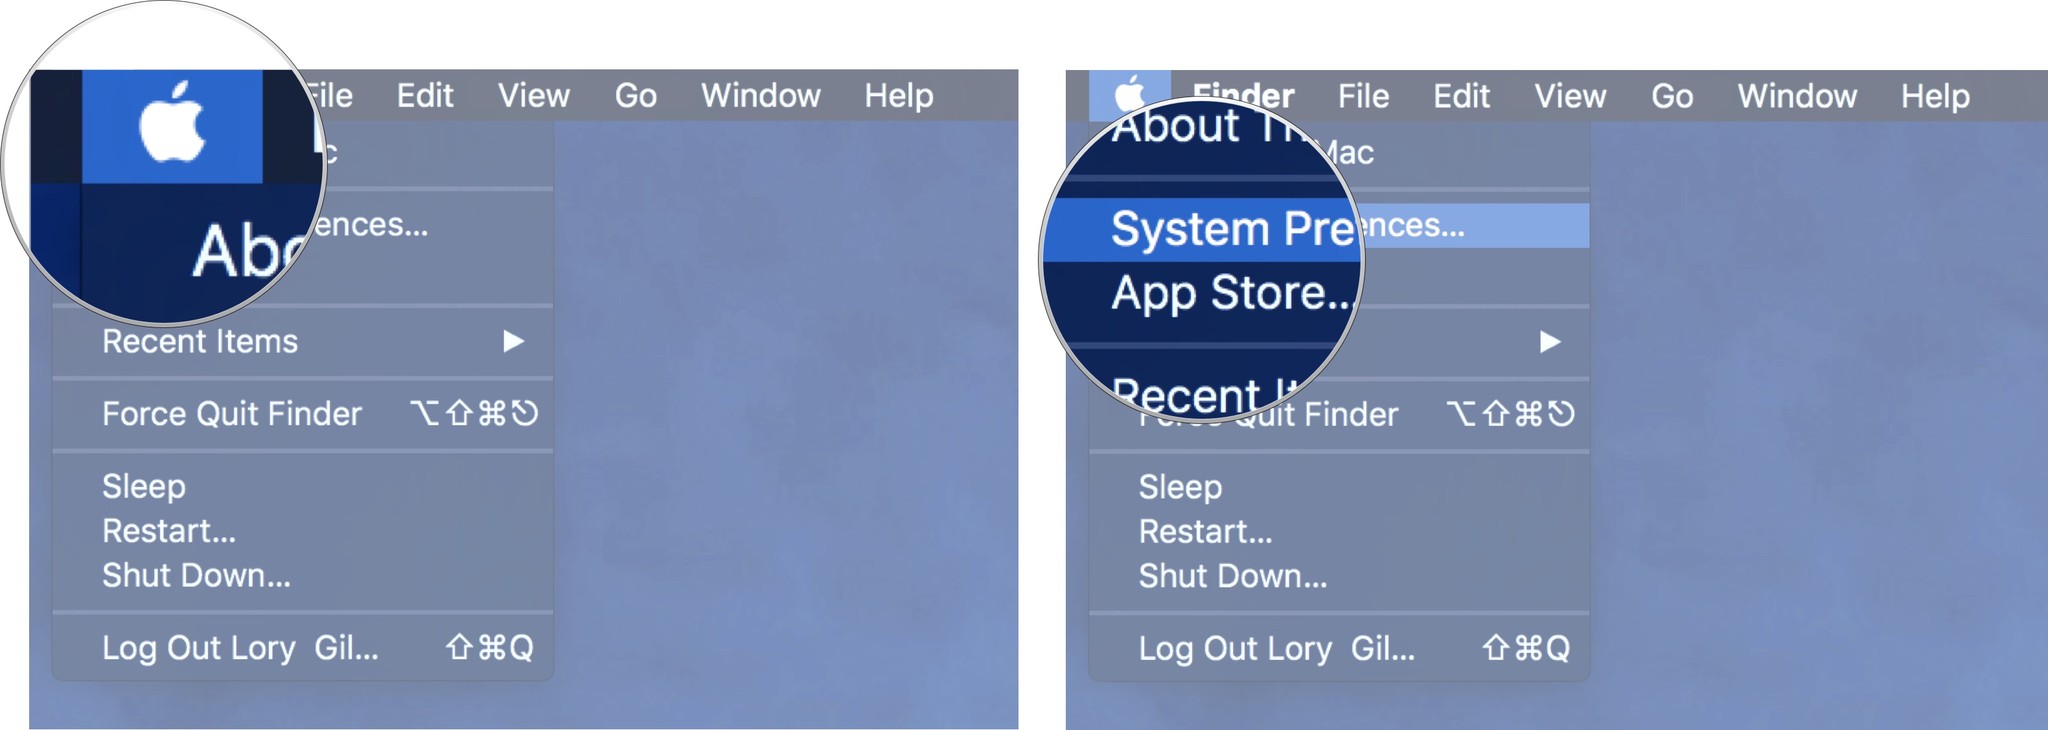
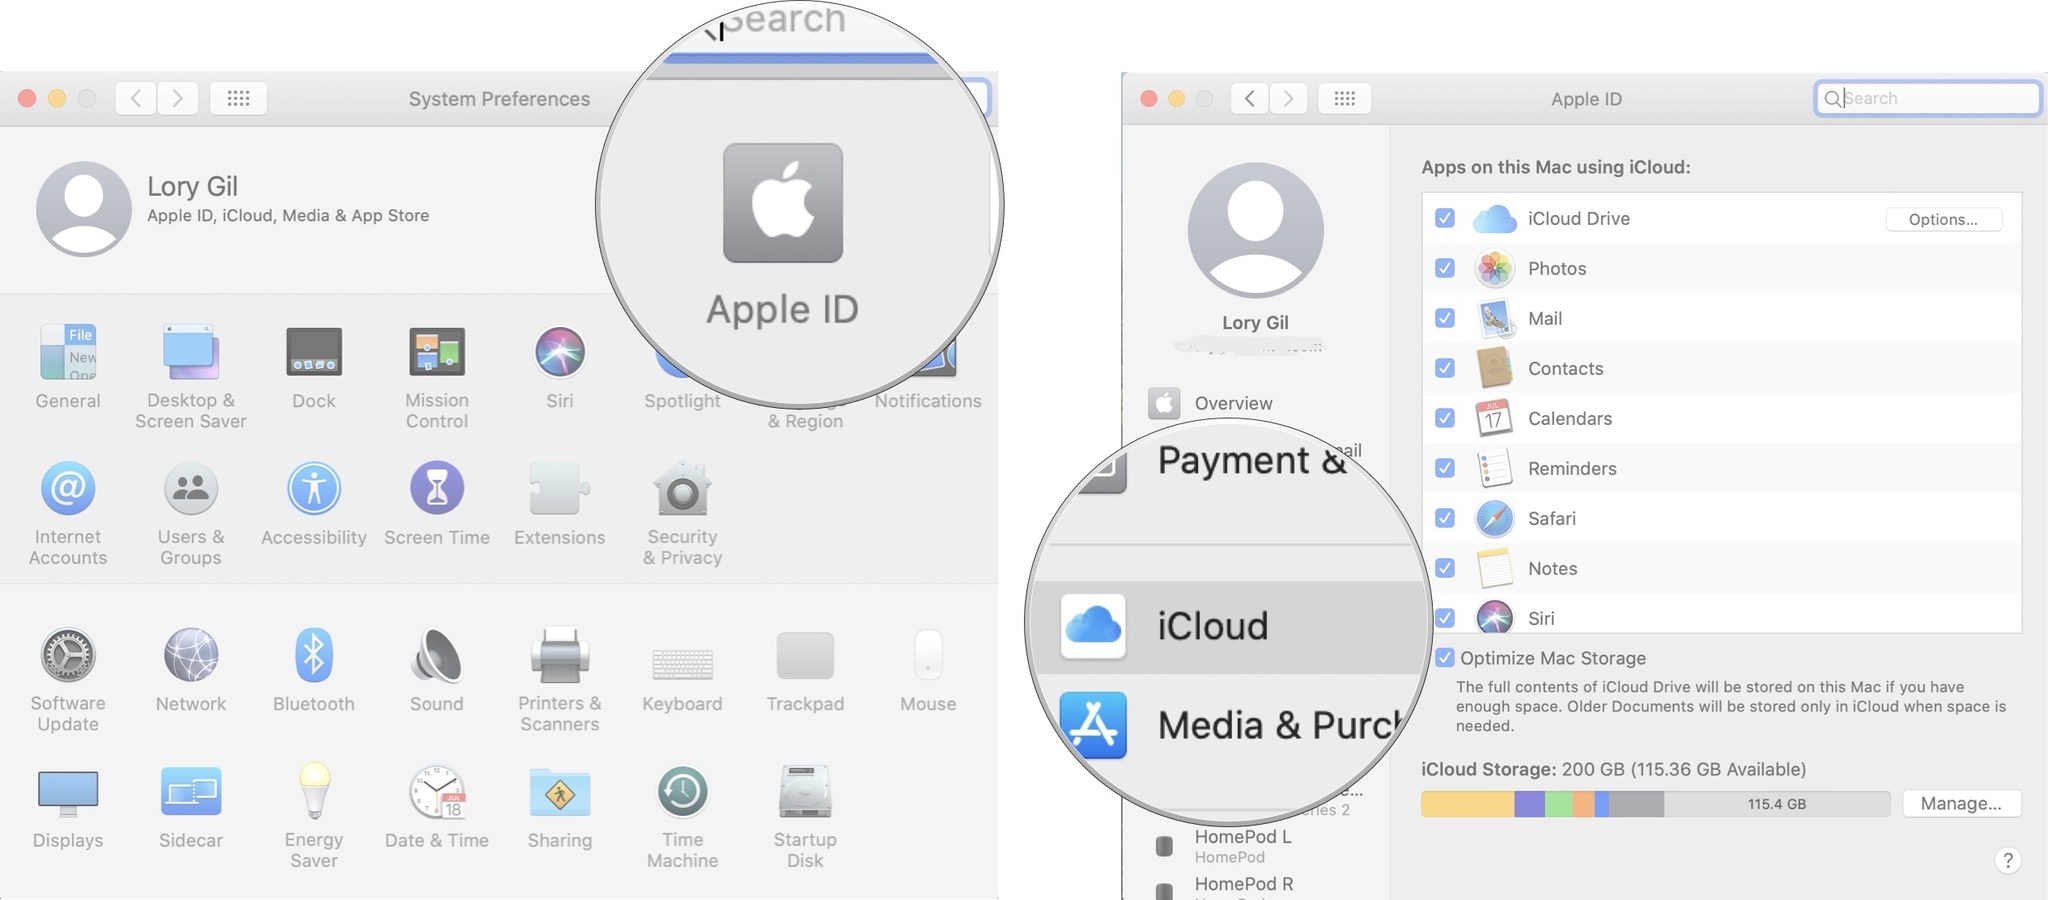
  1. Click the Apple icon in the upper left corner of your Mac's screen.
  2. Click System Preferences in the drop down menu.

  3. Click on Apple ID.
  4. Click on iCloud.

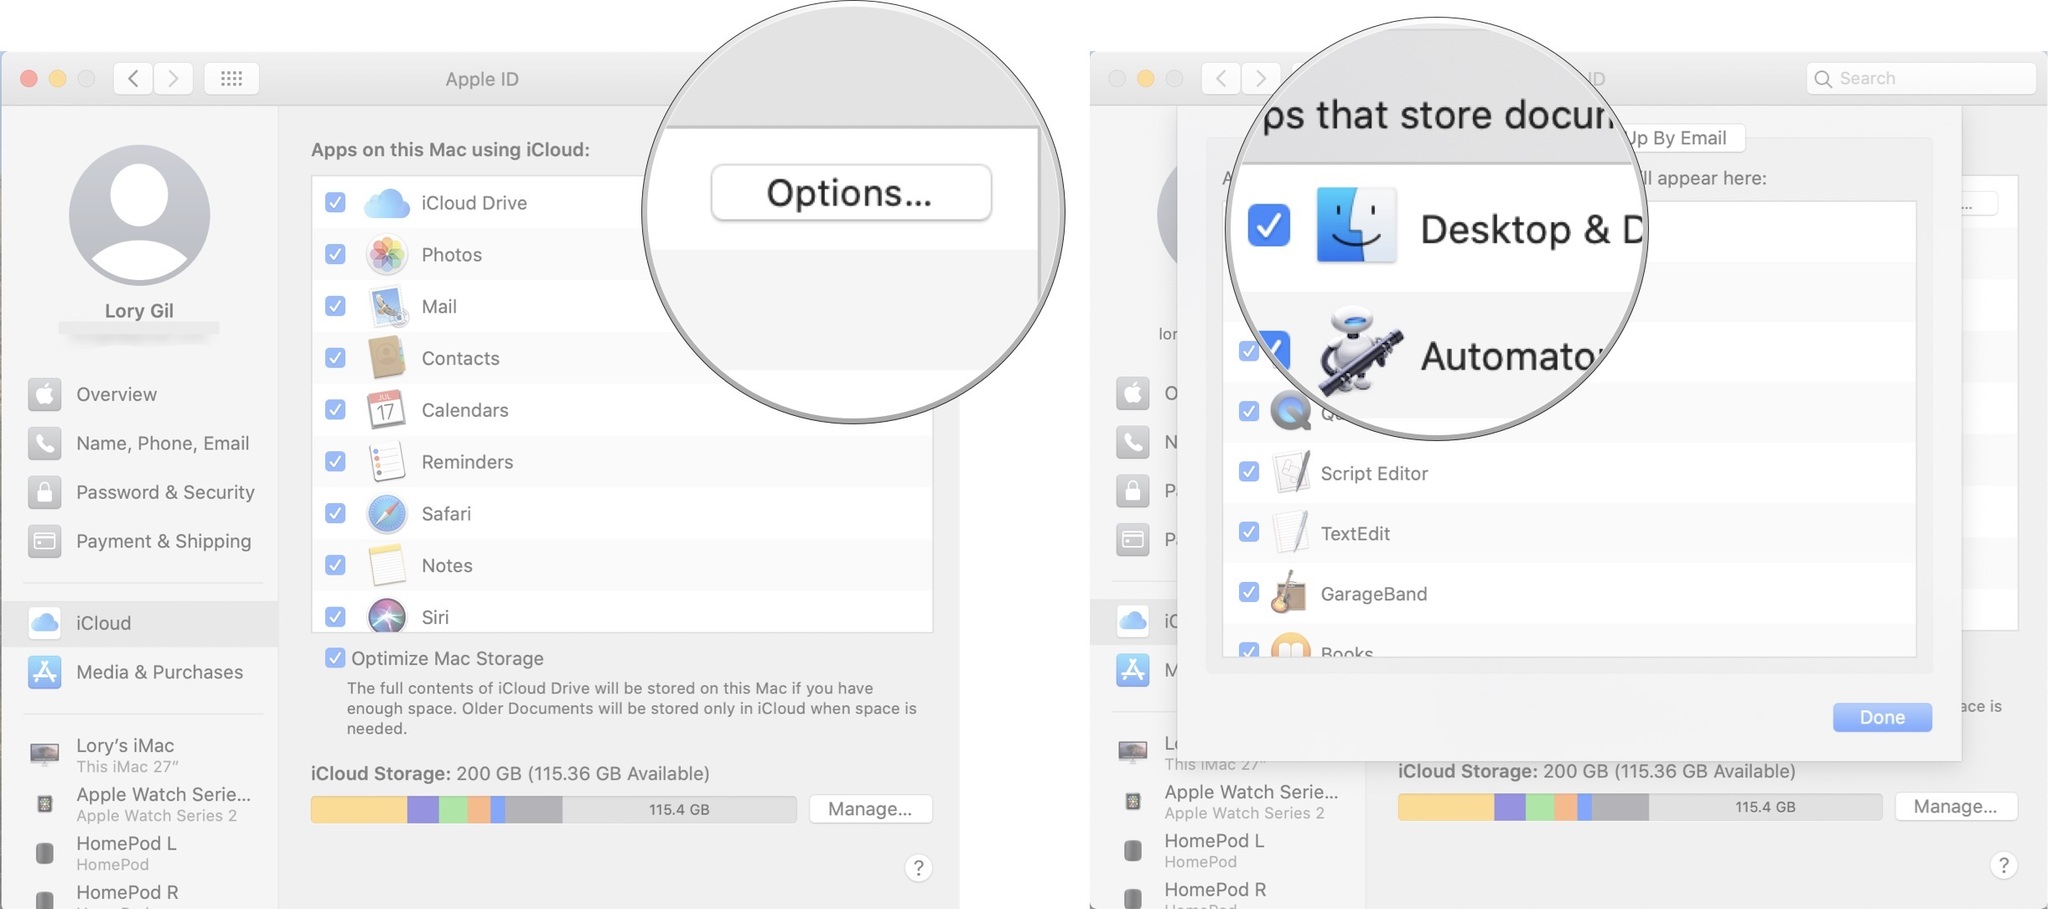
  5. Click on Options next to iCloud Drive.
  6. Click to uncheck the checkbox for Desktop & Documents Folders.

How to disable Optimized Storage on your Mac

Optimized Storage automatically removes iTunes movies and TV shows that you've already watched from your Mac. It also only keeps recent email attachments on your Mac when your hard drive starts to run out of room. If you want to keep your movies and TV shows on your hard drive so you don't have to re-download them every time you want to watch them, you can disable the feature.

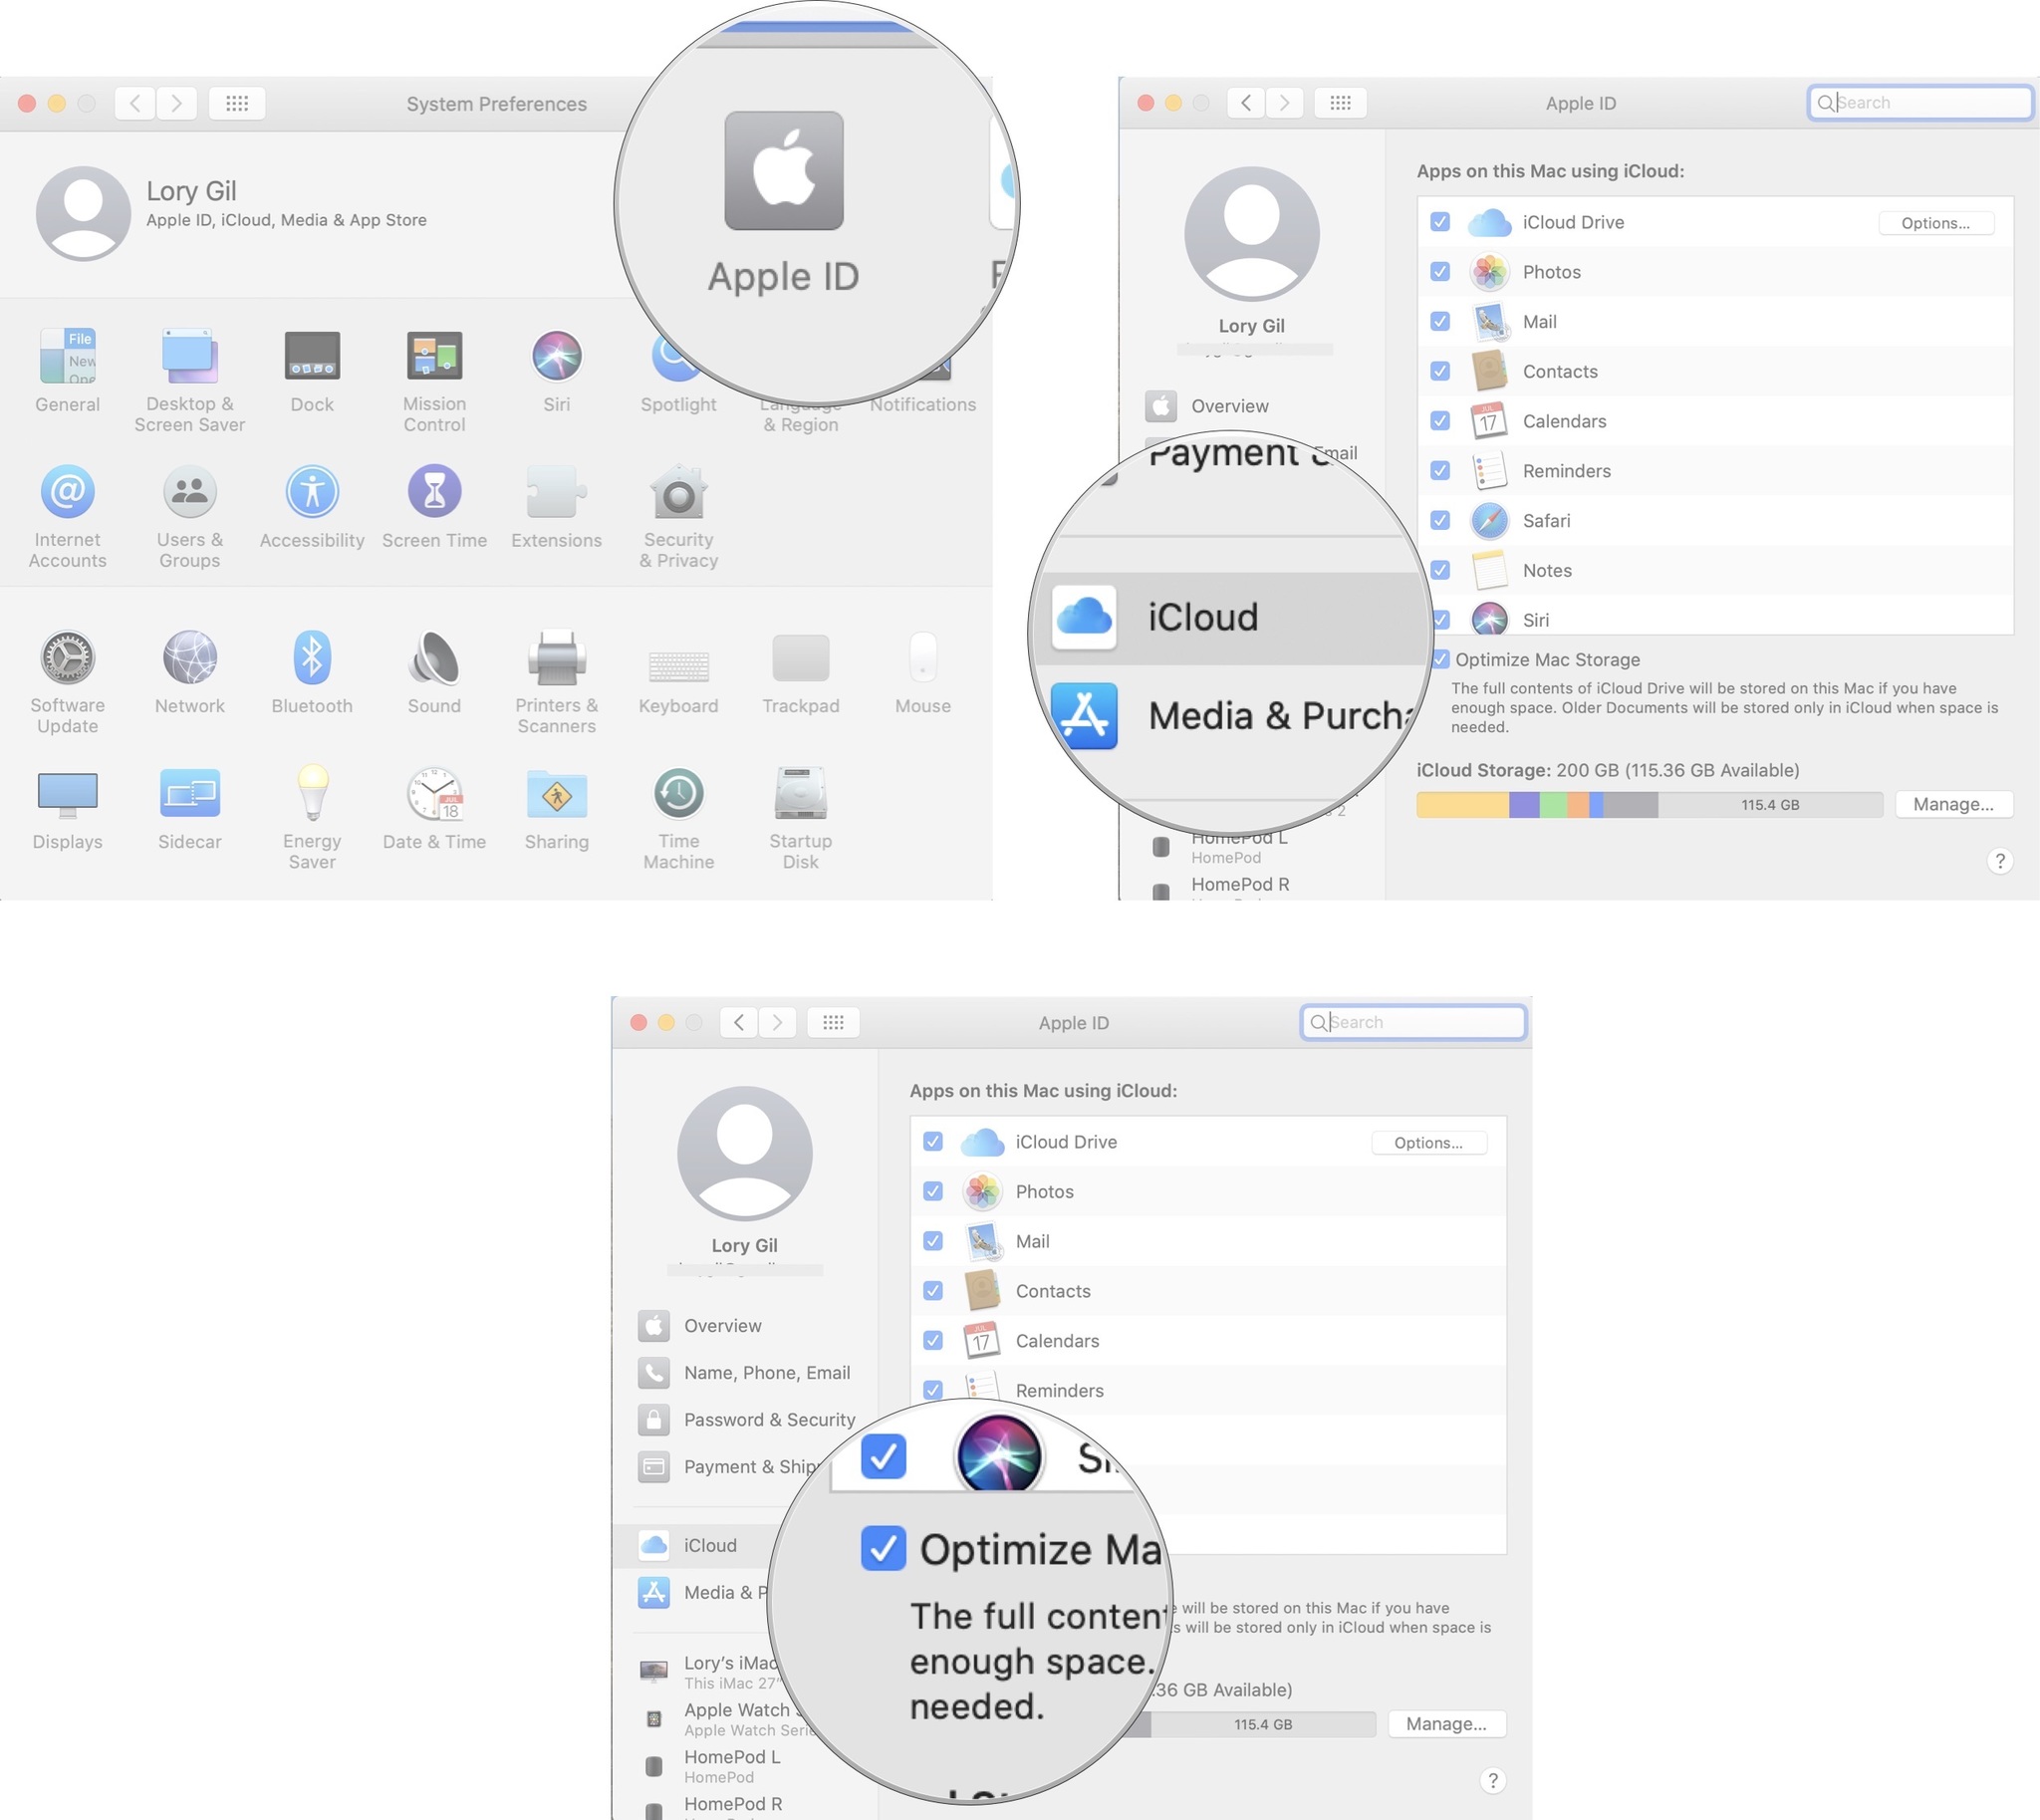
  1. Click the Apple icon in the upper left corner of your Mac's screen.
  2. Select System Preferences from the drop down menu.

  3. Click on Apple ID.
  4. Click on iCloud.
  5. Click to uncheck the checkbox at the bottom of the window for Optimize Mac Storage.

How to disable Empty Trash Automatically on your Mac

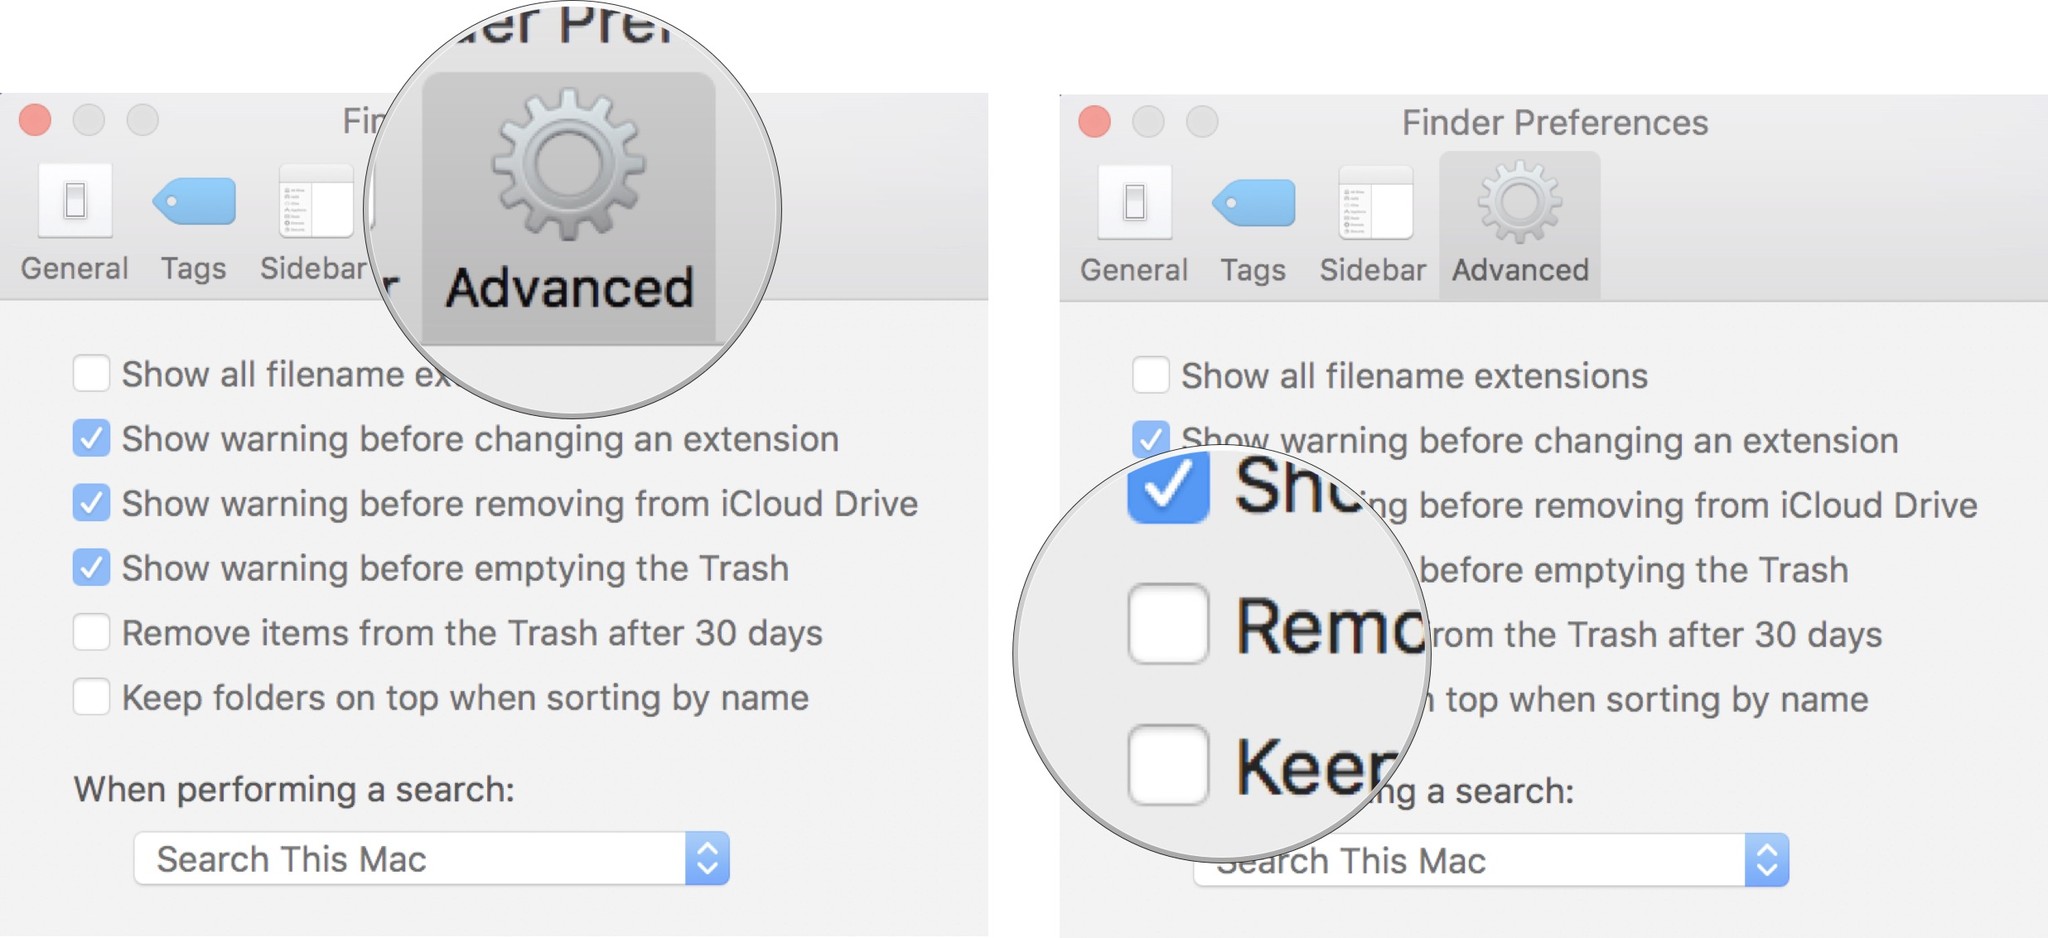
I can't see any reason to not use the Empty Trash Automatically feature, but if you worry that you are going to delete something from your Mac and need it back more than 30 days later, you can disable the feature and go back to manually emptying the trash.

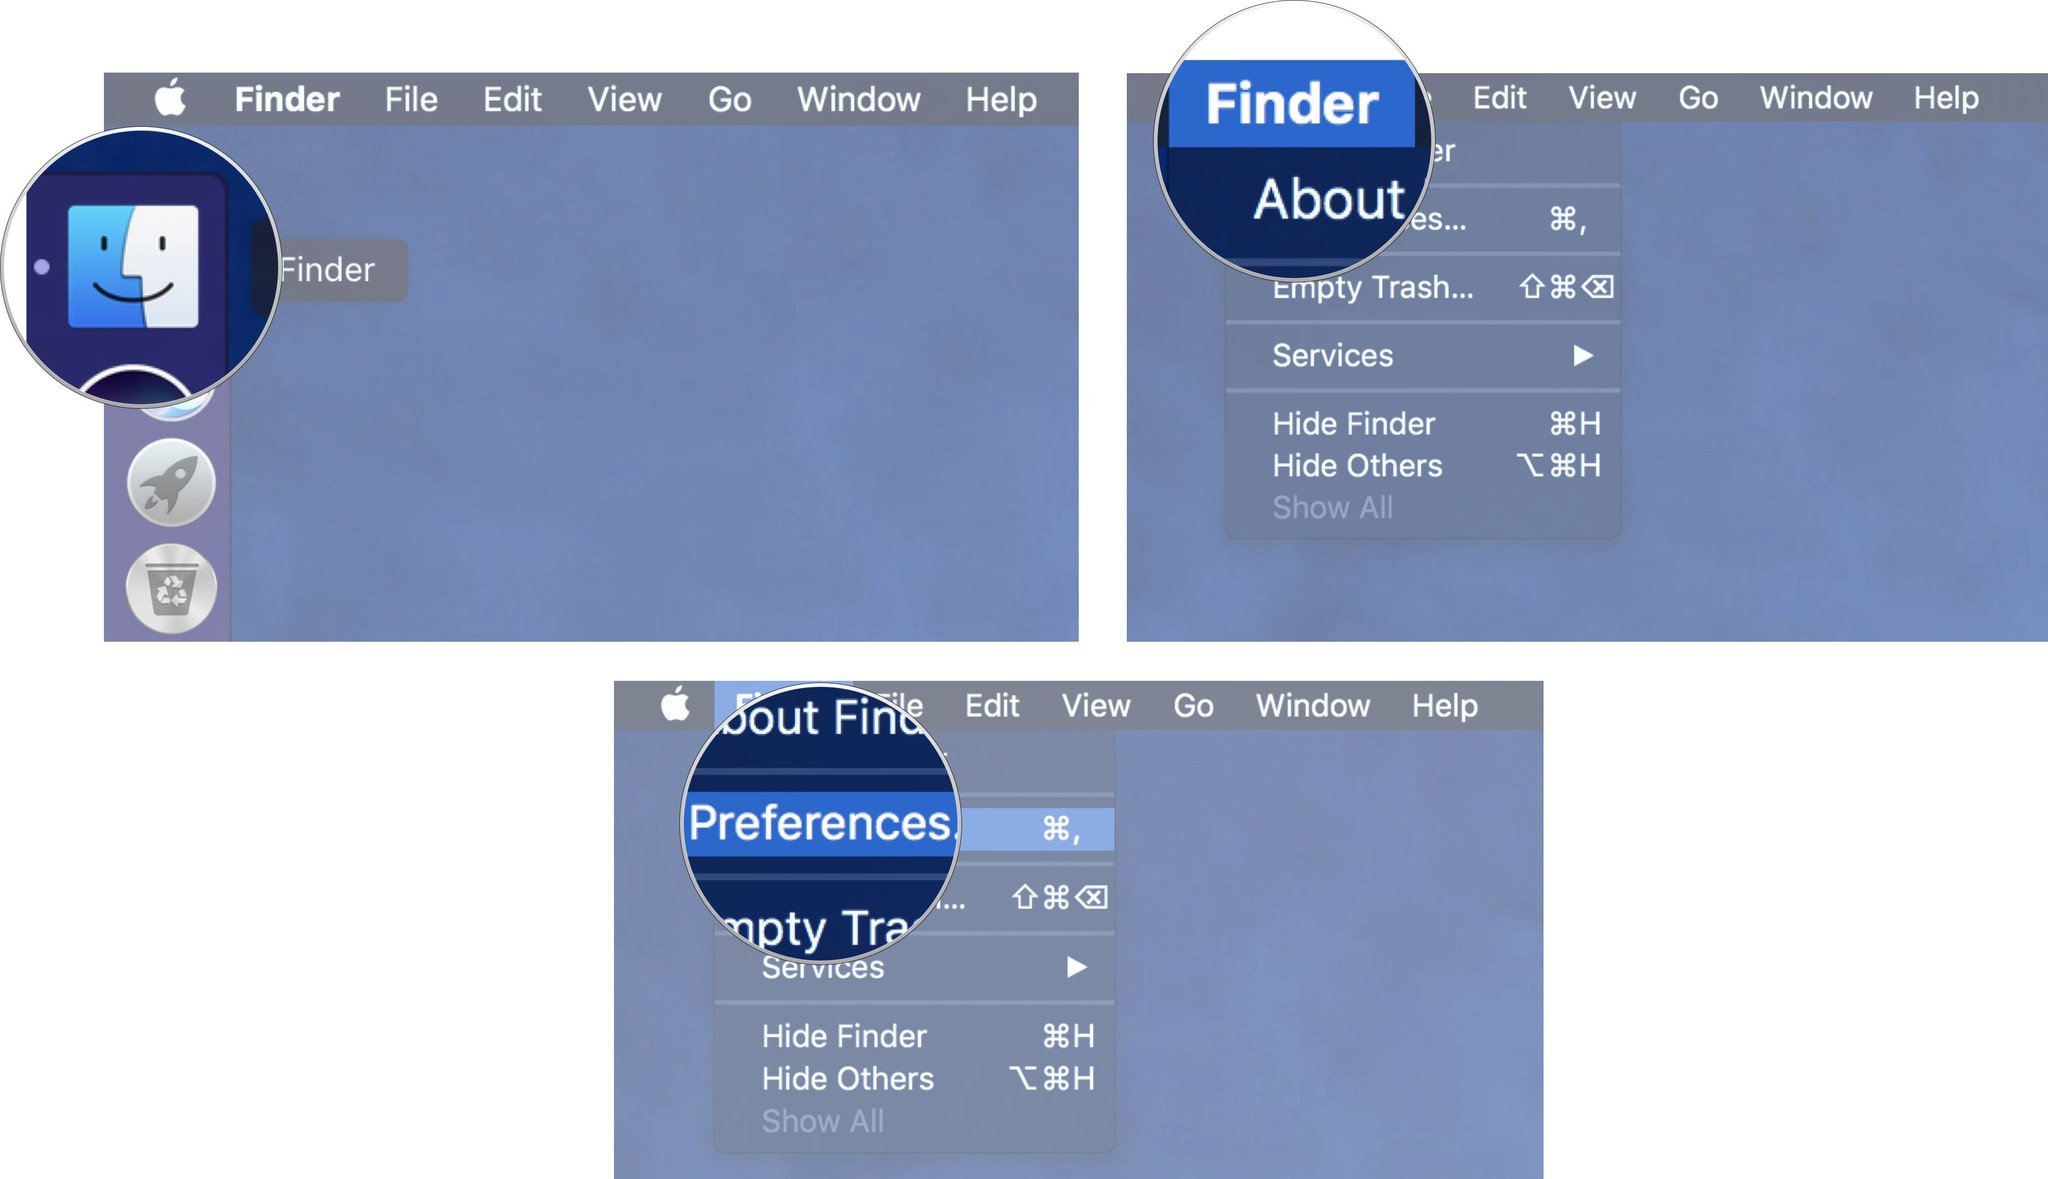
  1. Open a Finder window.
  2. Click on Finder in the upper left corner of your Mac's screen.
  3. Click Preferences in the drop down menu.

  4. Click on Advanced in the Finder Preferences window.
  5. Click to uncheck the checkbox for Remove items from the Trash after 30 days.

How to customize what apps are stored in iCloud on your Mac

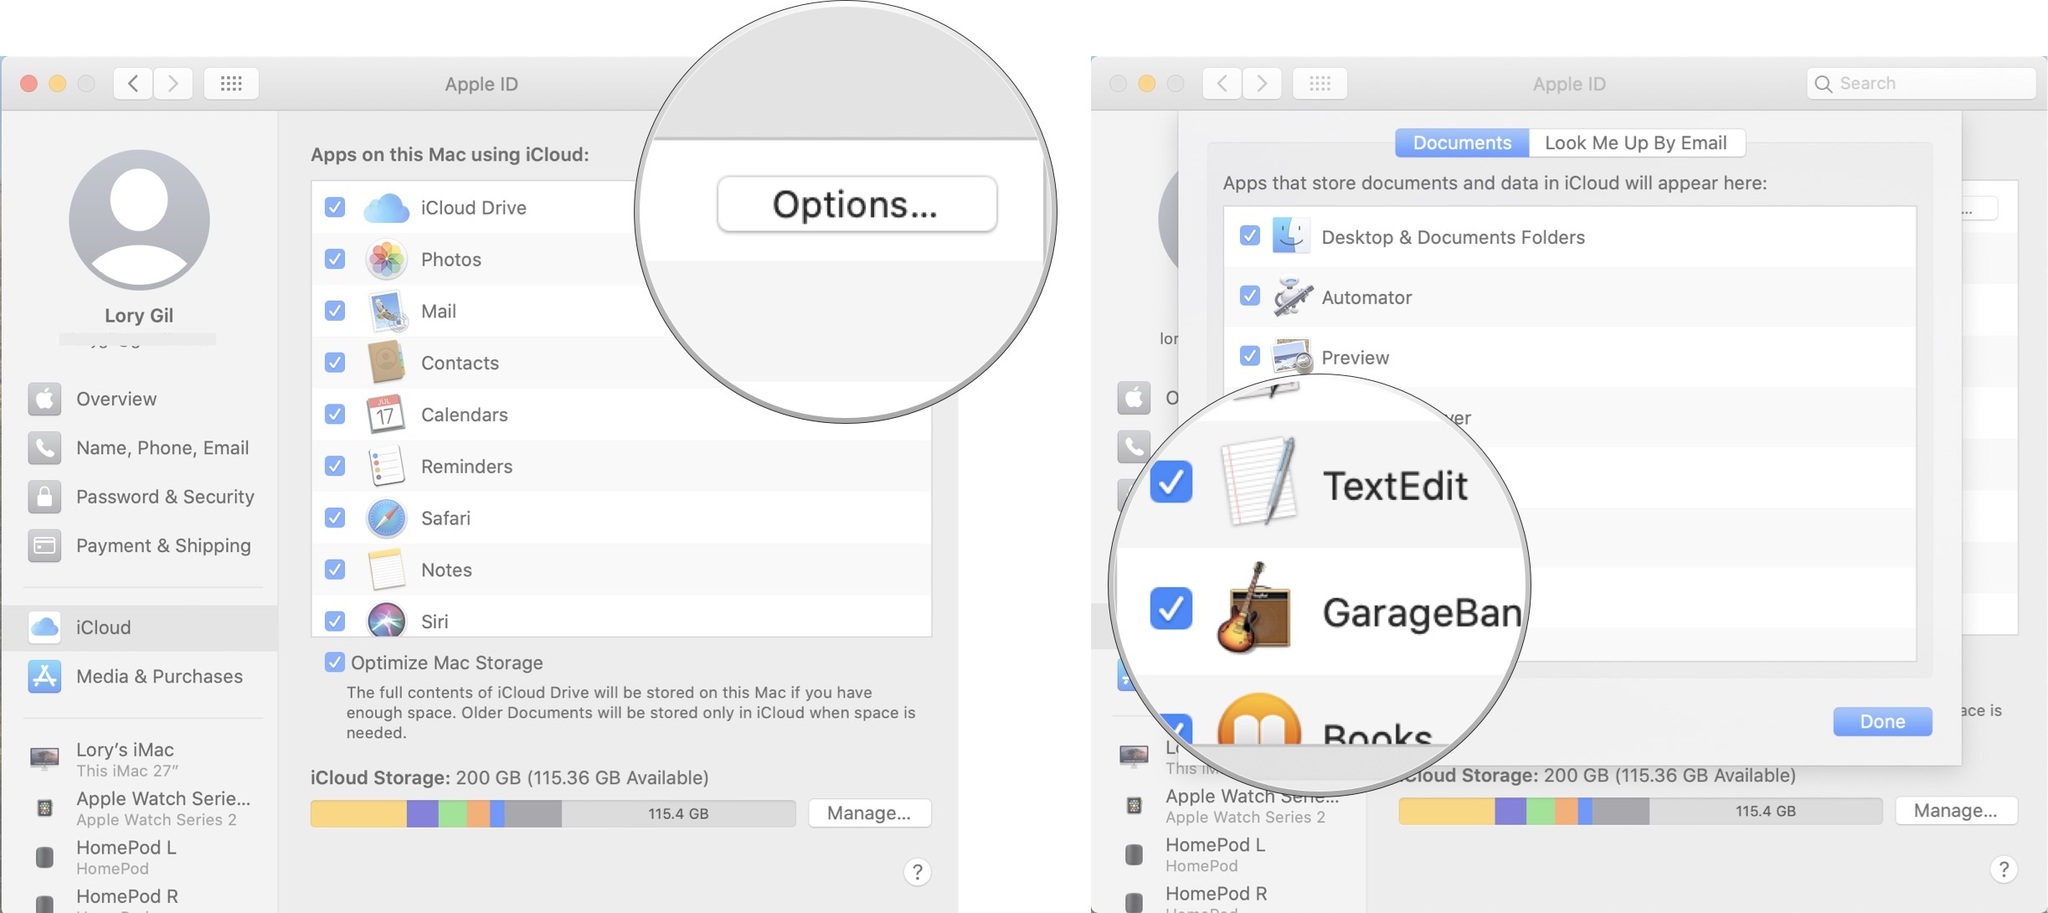
If your iCloud storage is starting to get full, you can select which apps and programs store data, clearing out space for more important data that you need to access all of the time.

  1. Click the Apple icon in the upper left corner of your Mac's screen.
  2. Click System Preferences in the drop down menu.

  3. Click on Apple ID.
  4. Click on iCloud.

  5. Click on Options next to iCloud Drive.
  6. Click to uncheck the checkbox for each app whose data you do not wish to store in iCloud.

Note: Since the apps will no longer sync with iCloud, some features will be disabled, so make sure you want to remove their access to iCloud.

How to manage files and folders stored in iCloud on the Mac

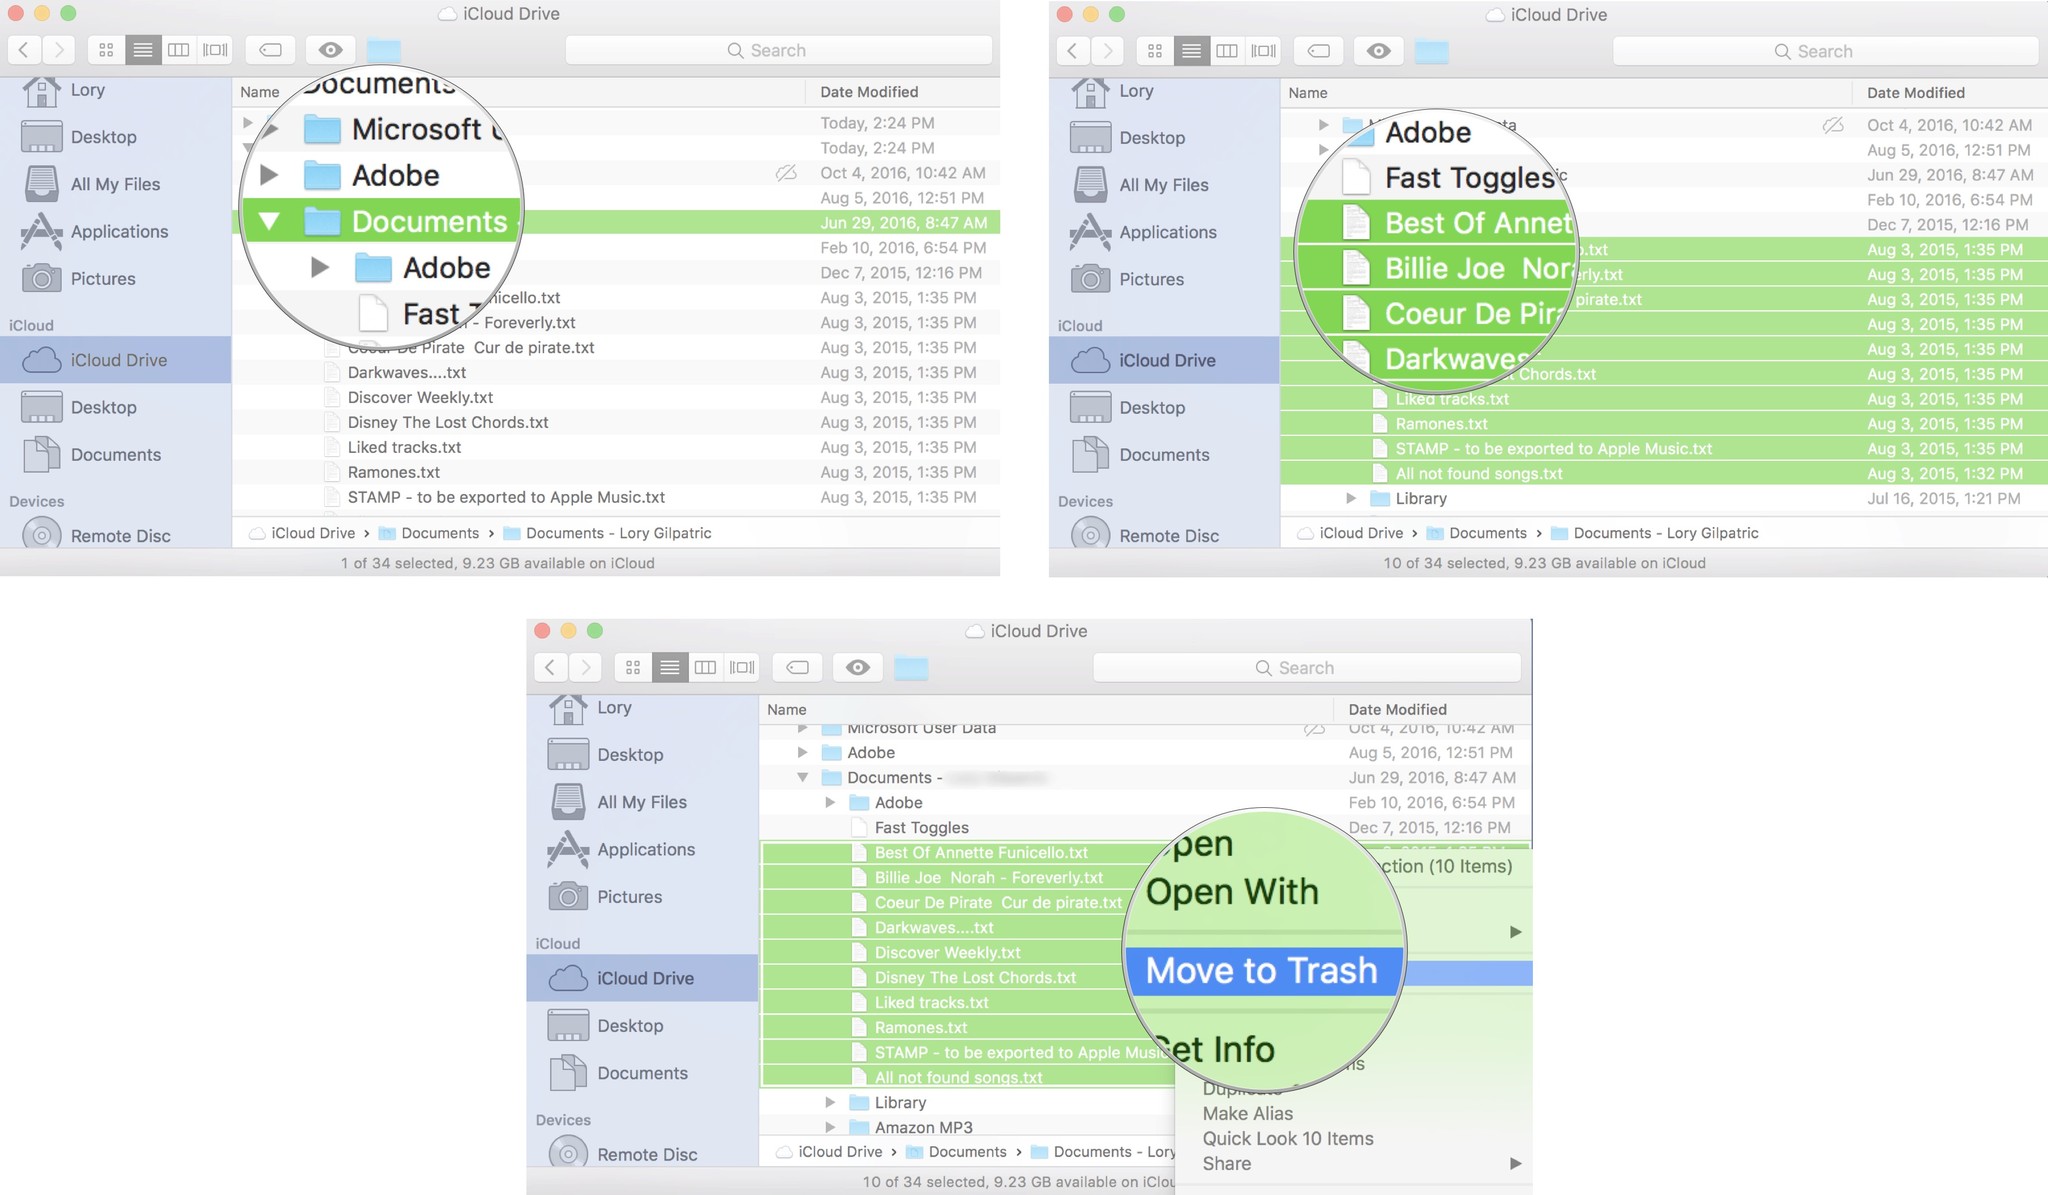
You may want to keep some, or all of your apps synced with iCloud, but don't need to keep all of the files and folders that are saved in them. You can reduce some of the storage used up by removing unneeded data.

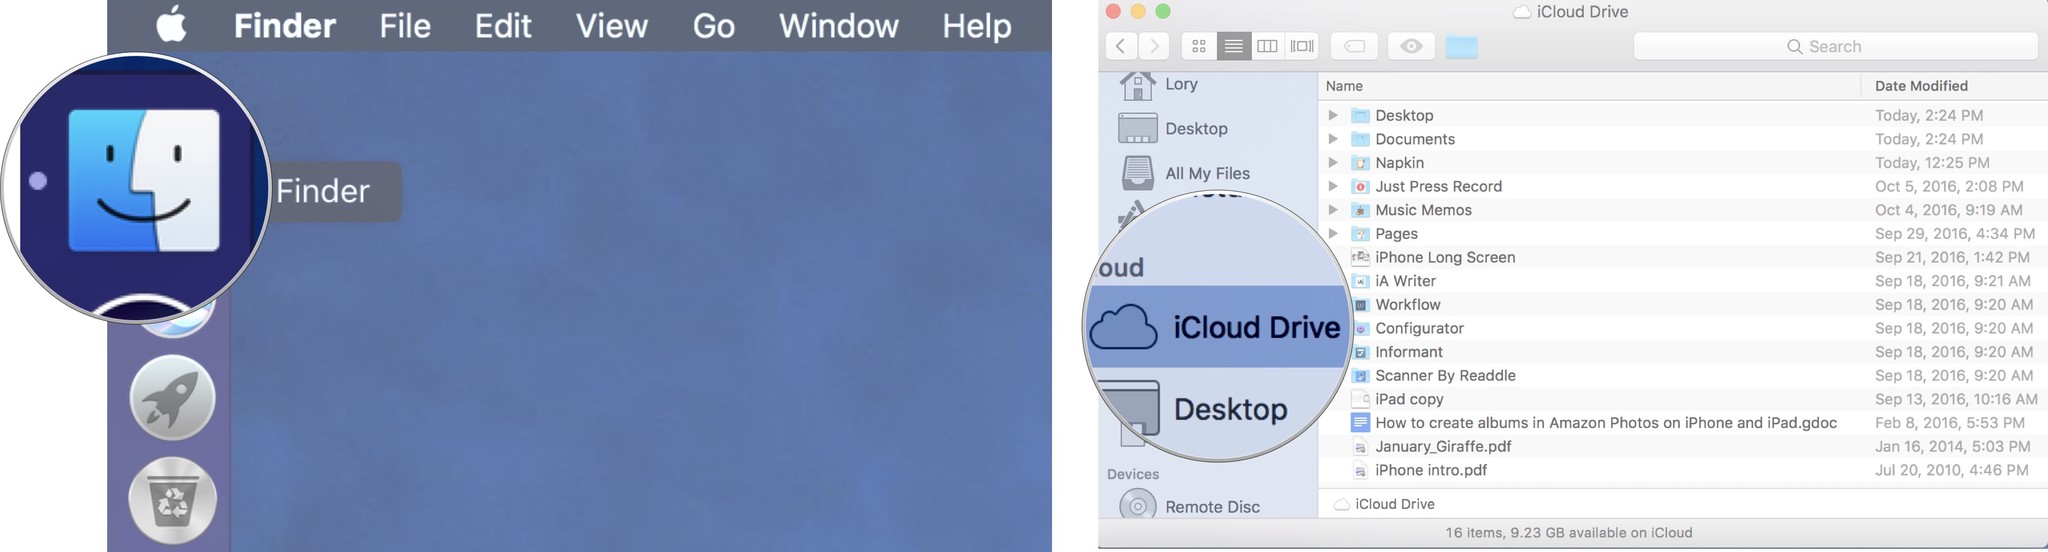
  1. Open a Finder window.
  2. Select iCloud Drive from the sidebar.

  3. Double-click a folder to view its contents.
  4. Select a file that you want to delete. You can select multiple files at once.
  5. Right-click or Control-click on the files.
  6. Select Move to trash to delete them.

You can also move files out of iCloud Drive and into another folder. Just make sure the folder you move files to isn't also being stored in iCloud.

How to stop using iCloud Photo Library on the Mac

For some, the Photo library is the biggest space hog in iCloud. It is incredibly convenient to store your pictures in the cloud and be able to access them from any device without having to use up hard drive space (or in the case of the iPhone and iPad, device storage space), but it is also a burden on your iCloud storage limit. You can turn off iCloud Photo Library on all of your devices, which is inconvenient but frees up a lot of space in iCloud.

  1. Click the Apple icon in the upper left corner of your Mac's screen.
  2. Select System Preferences from the drop down menu.

  3. Click on Apple ID.
  4. Click on iCloud.

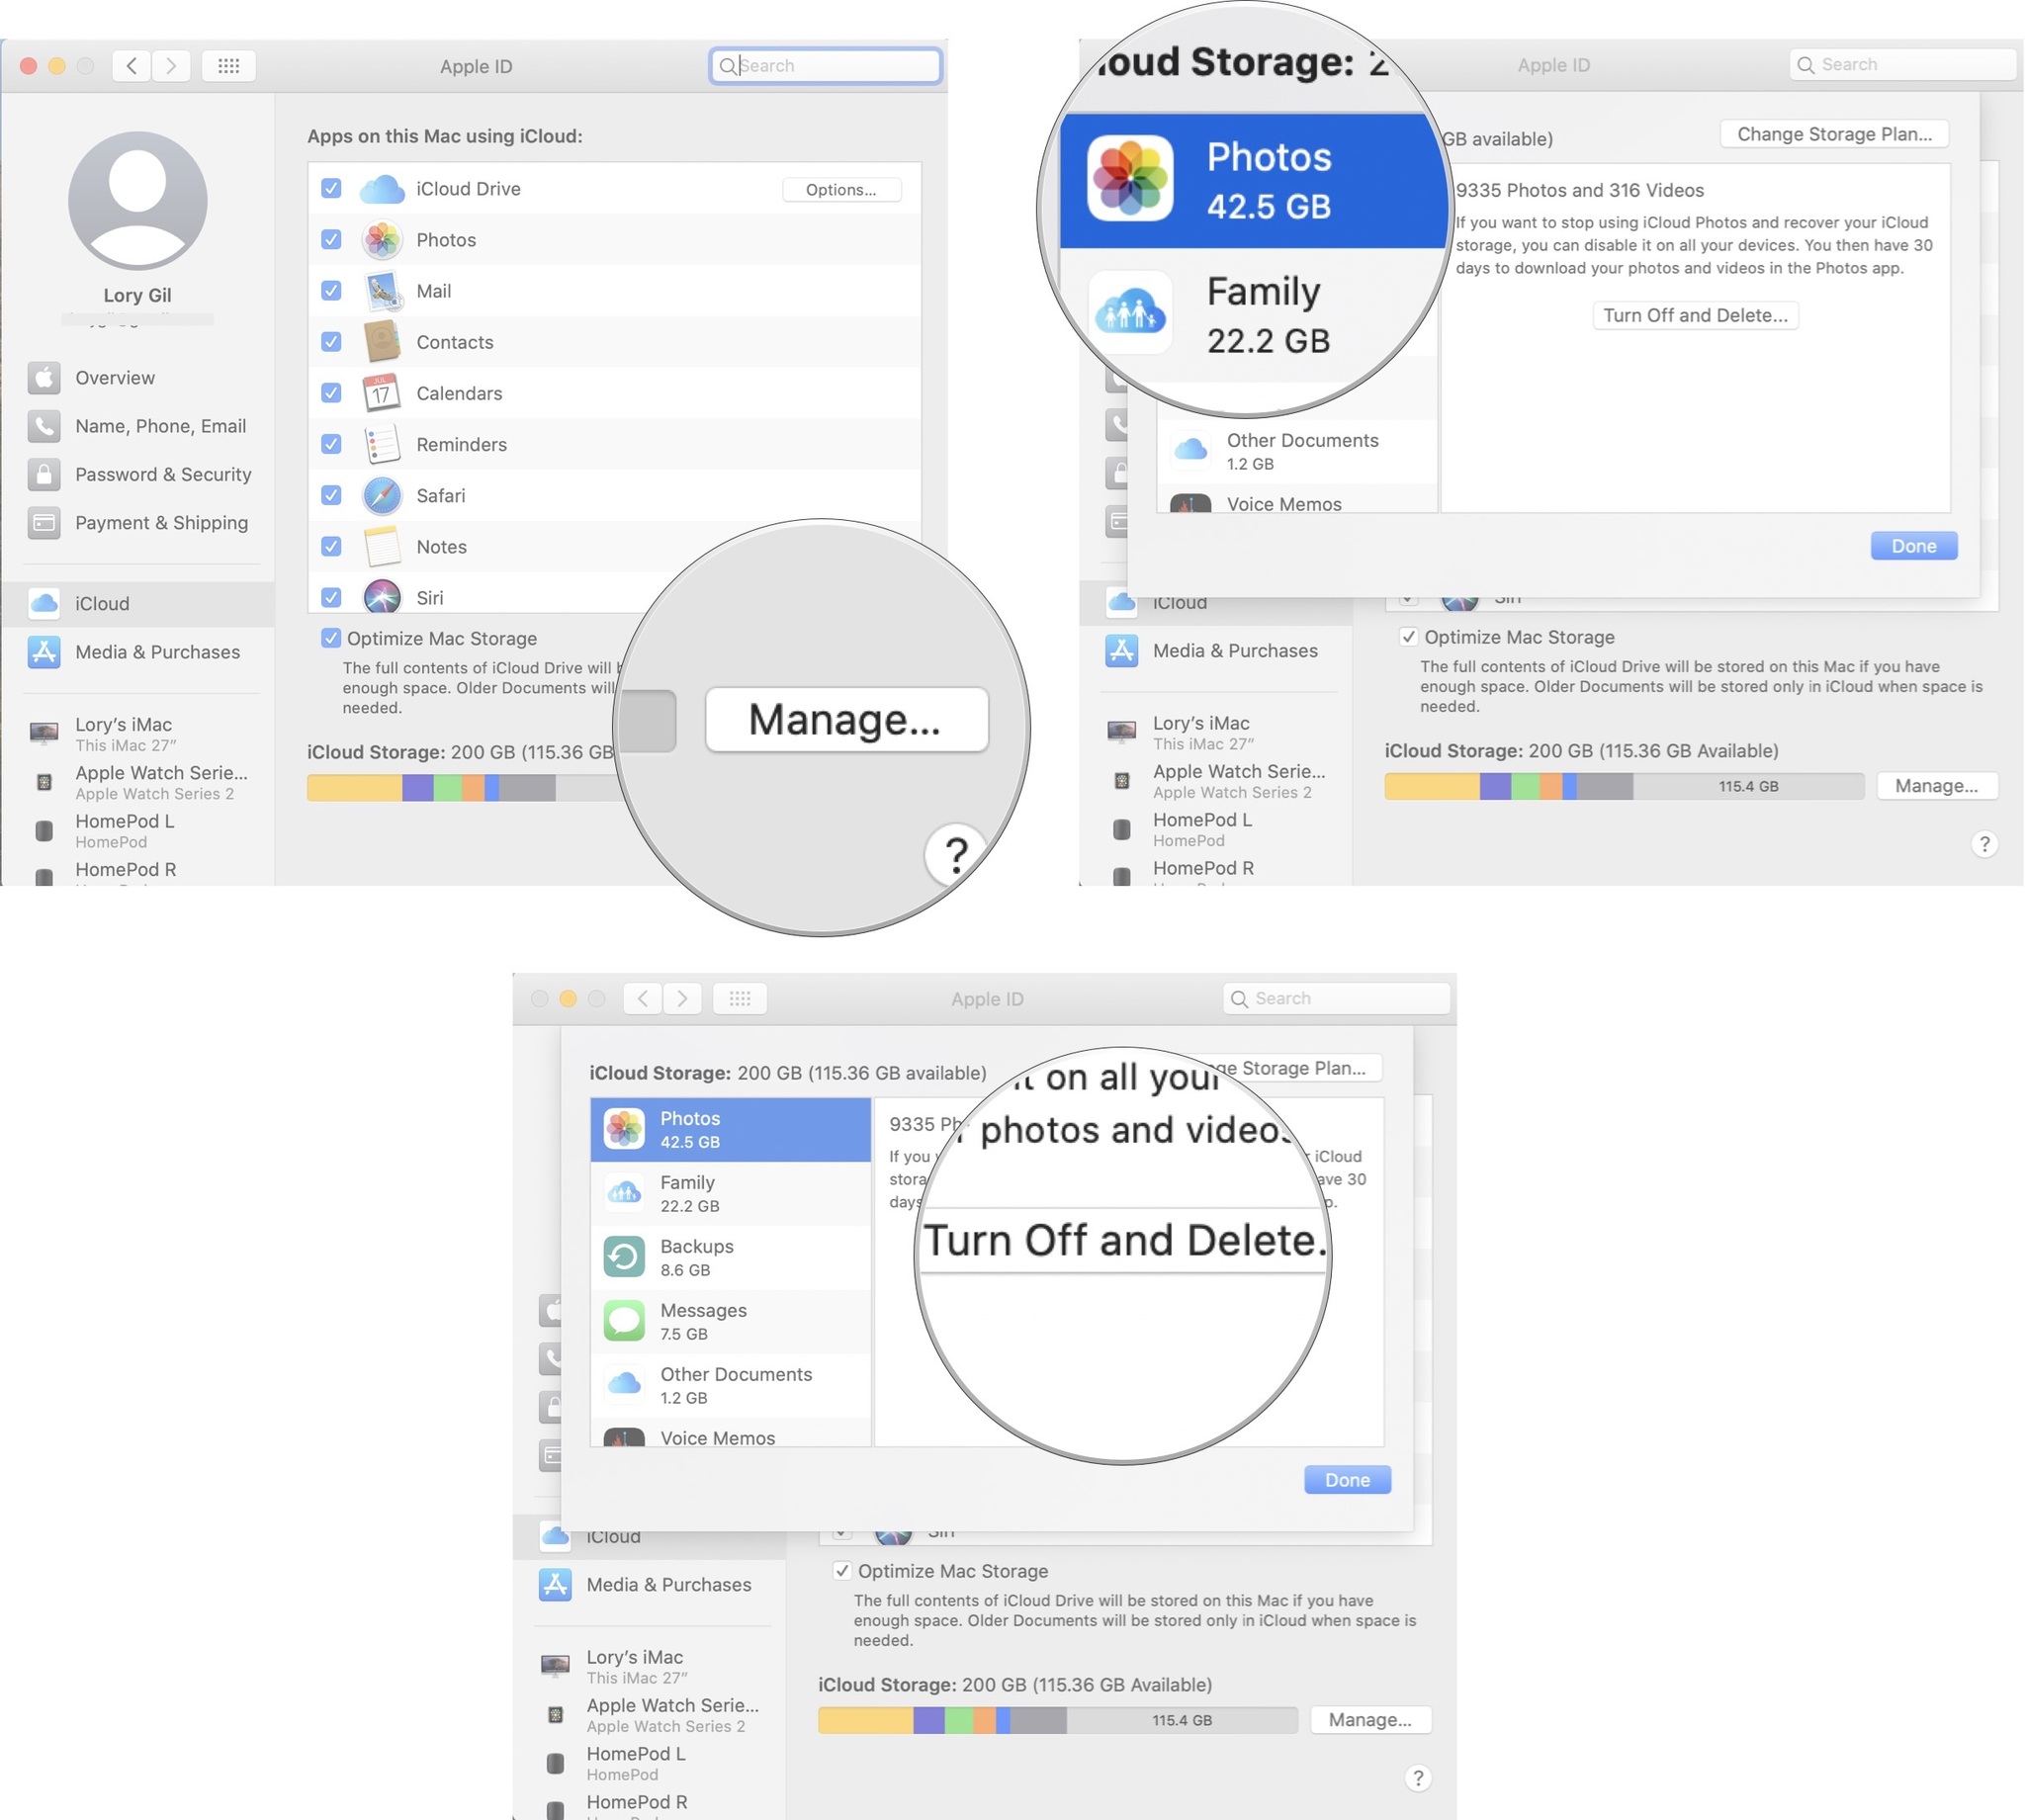
  5. Click on Manage in the bottom right corner of the iCloud window.
  6. Click on Photo Library from the sidebar.
  7. Click on Turn off and Delete.

How to download photos and videos from iCloud

You'll have to manually download content that you previously stored in the iCloud Photo Library. You will have 30 days to download all of your photos and videos from iCloud Drive onto your Mac (you can also download them directly onto your iPhone or iPad, but I don't suggest doing that since they take up so much space).

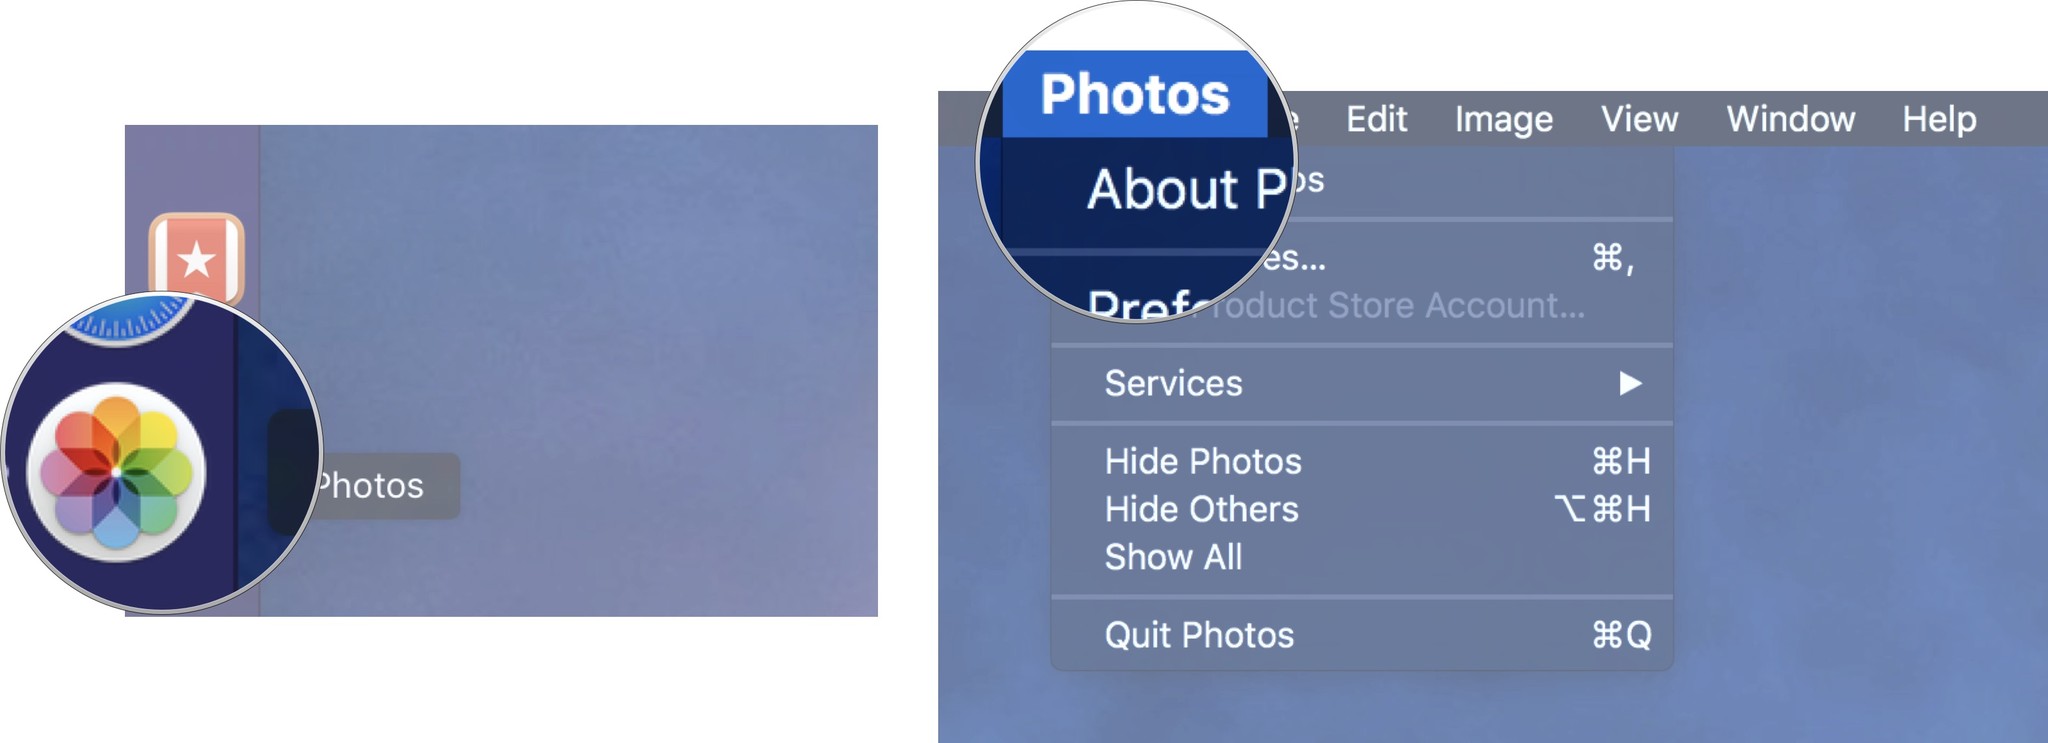
  1. Launch the Photos app.
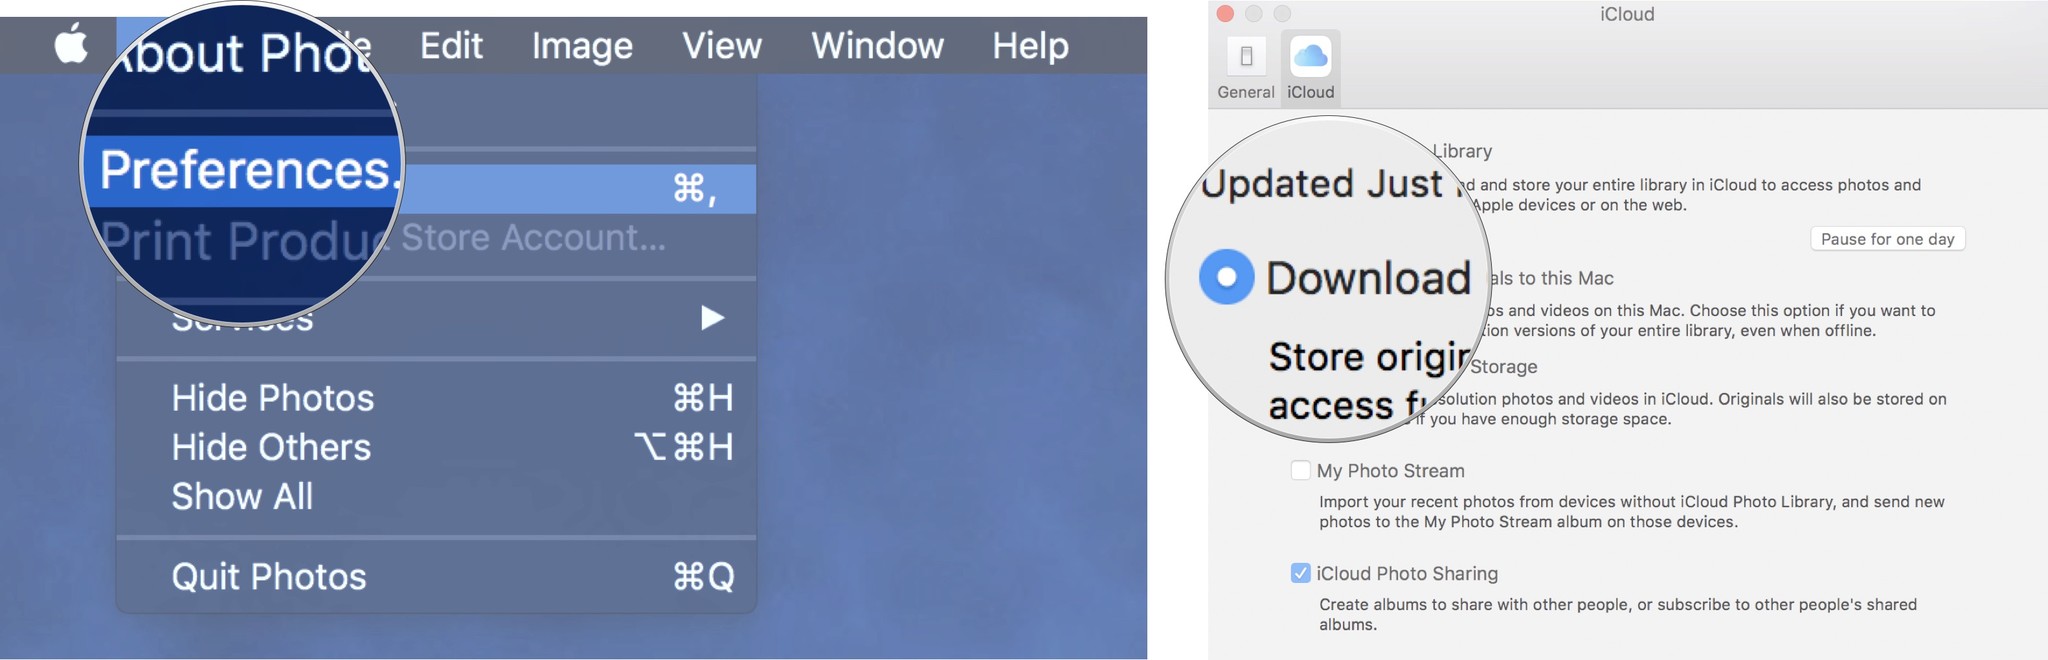
  2. Click on Photos in the upper left corner of your Mac's screen.

  3. Click Preferences in the drop down menu.
  4. Click on Download Originals to this Mac.

How to delete iPhone and iPad iCloud backups on the Mac

When you back up your iPhone or iPad in iCloud, the most recent backups are stored there. Backups take up a few GB of space each, which can add up if you have multiple iOS devices. You can, instead, backup your device to your computer using iTunes. If you choose to save your backups on your computer, you can delete them from iCloud.

Note: When you delete a backup from iCloud, you will also be turning off the ability to use iCloud to back up your device. You will have to switch back to iCloud backups if you change your mind later.

  1. Click the Apple icon in the upper left corner of your Mac's screen.
  2. Click System Preferences in the drop down menu.

  3. Click on Apple ID.
  4. Click iCloud.

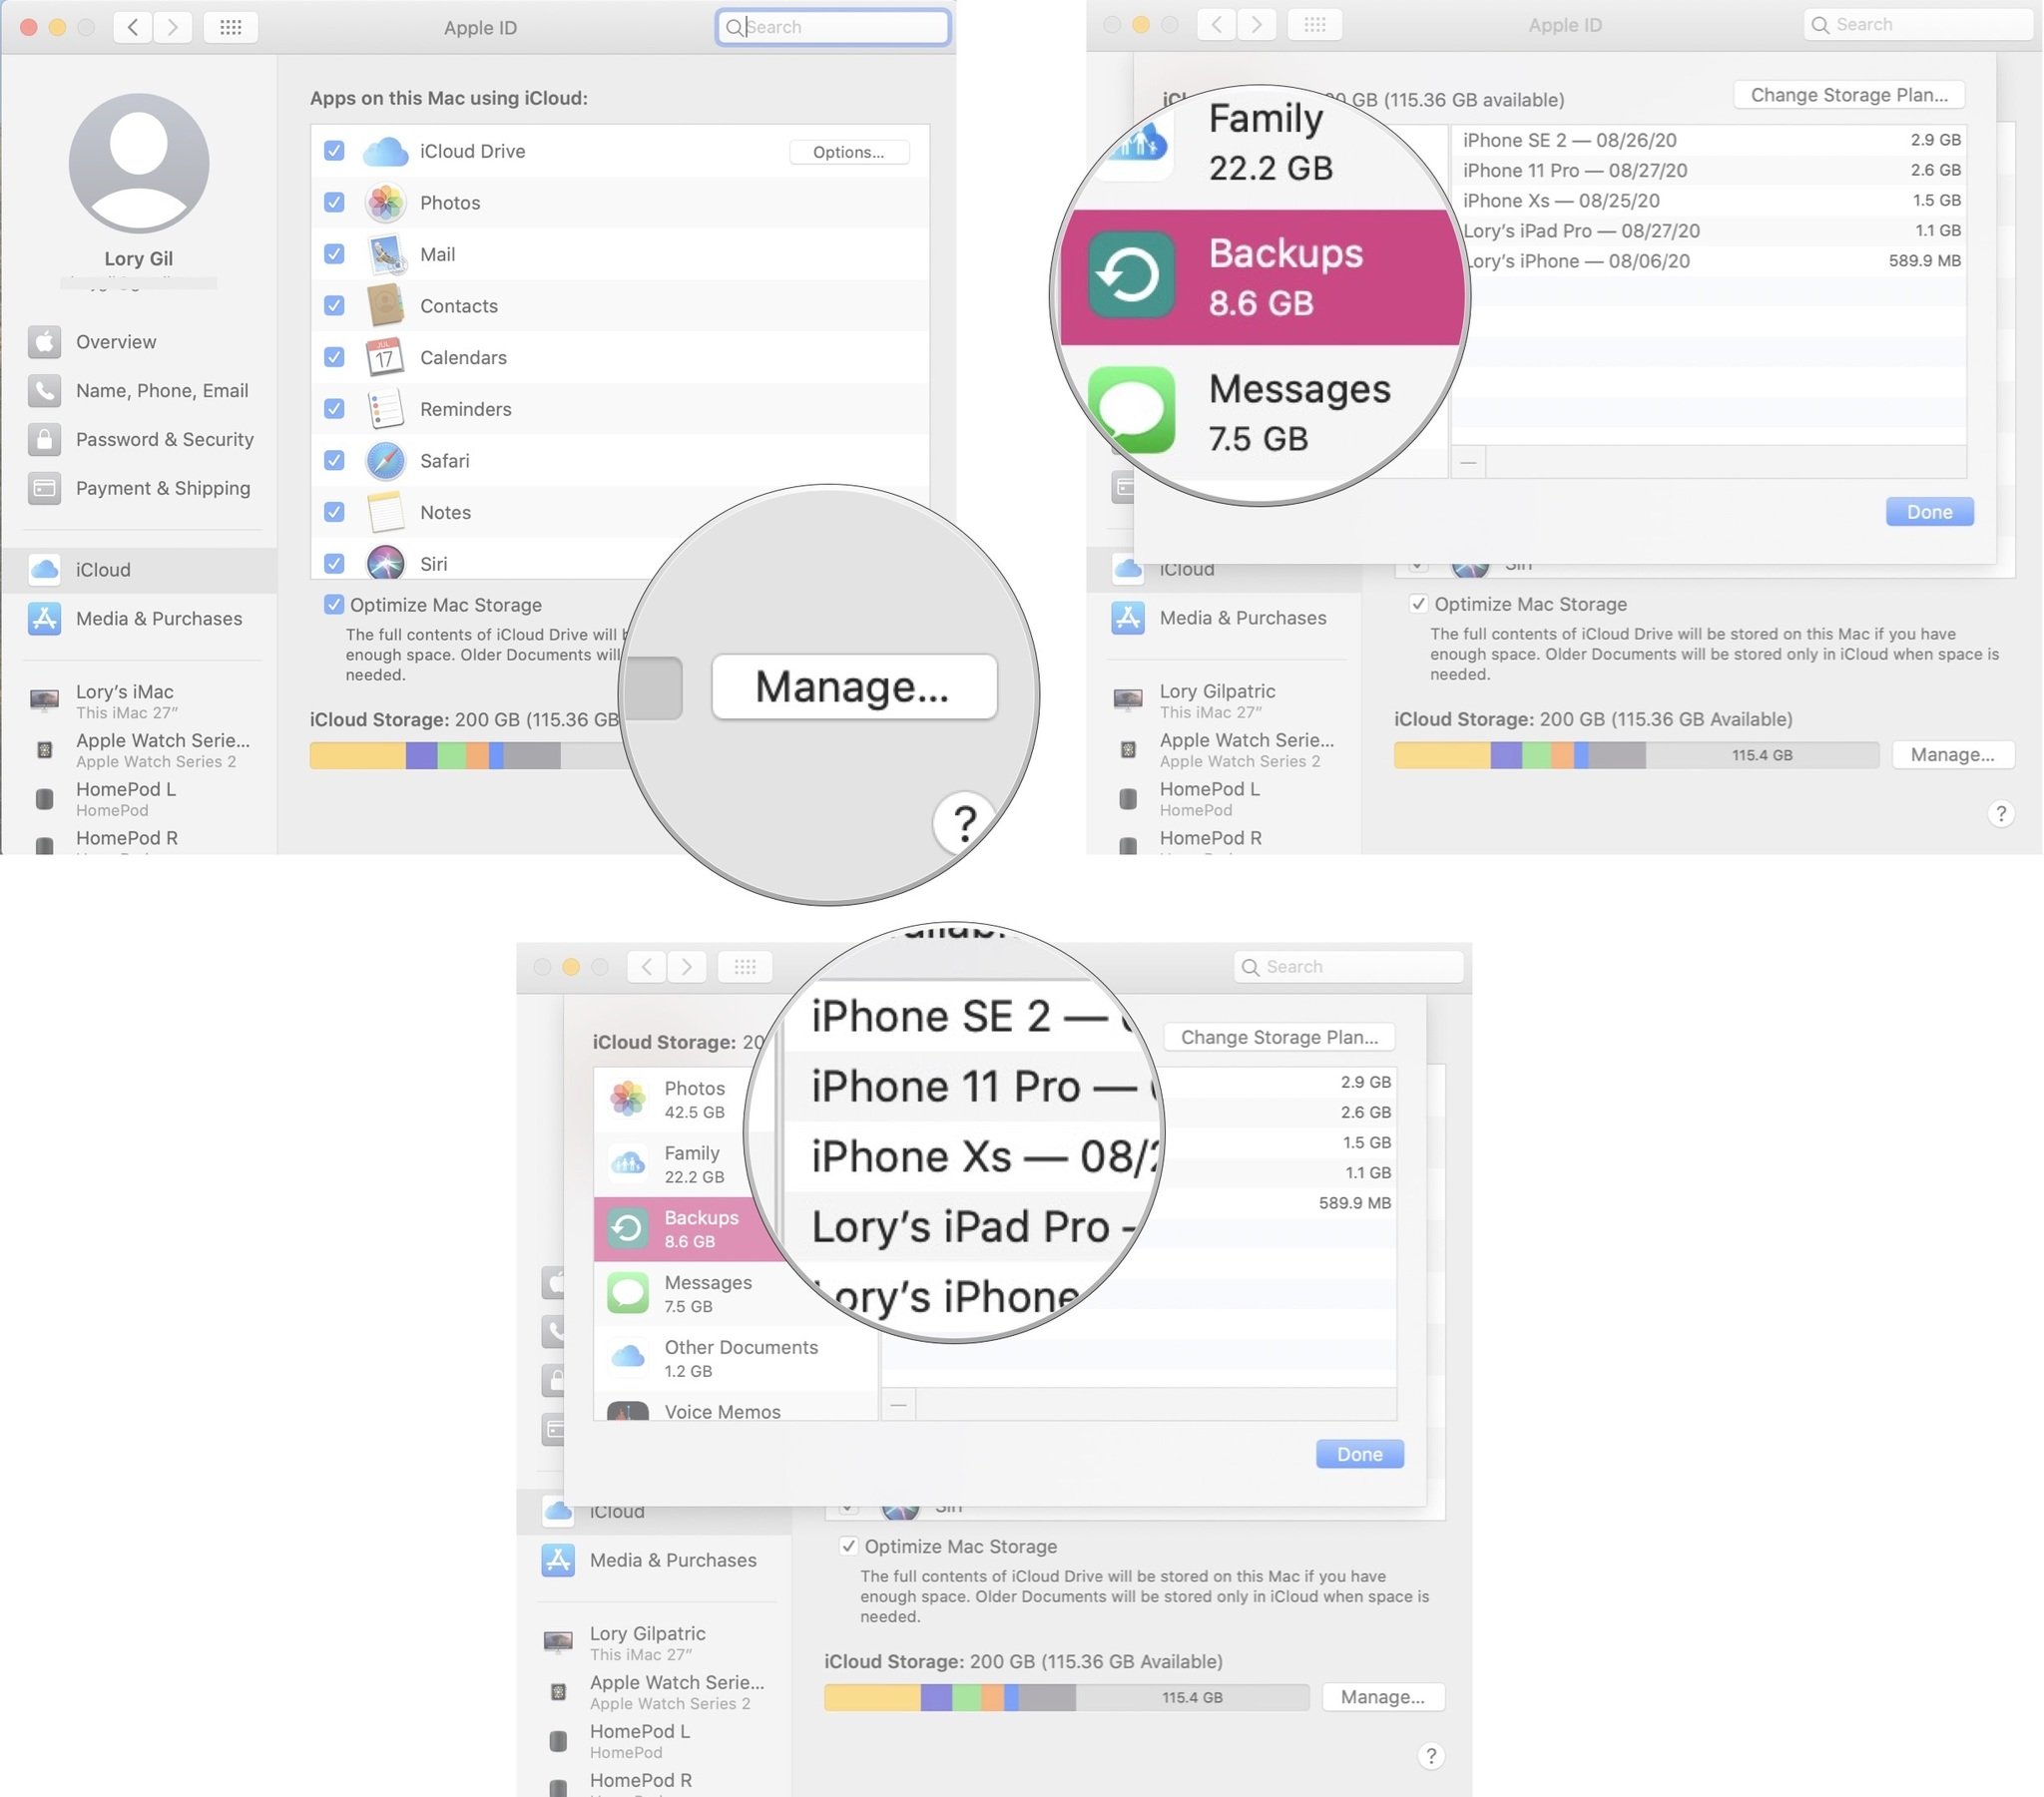
  5. Click Manage in the bottom right corner of the iCloud window.
  6. Click Backups from the sidebar.
  7. Select a backup to delete.
  8. Click Delete.
  9. Click Delete when prompted to confirm that you wish to delete the backup and turn off iCloud back ups.

How to free up space used by the Mail app on the Mac

If you use the built-in Mail app on your Mac, you might be clogging up your iCloud storage with useless junk and deleted mail. You can quickly clear out some space by erasing the old stuff.

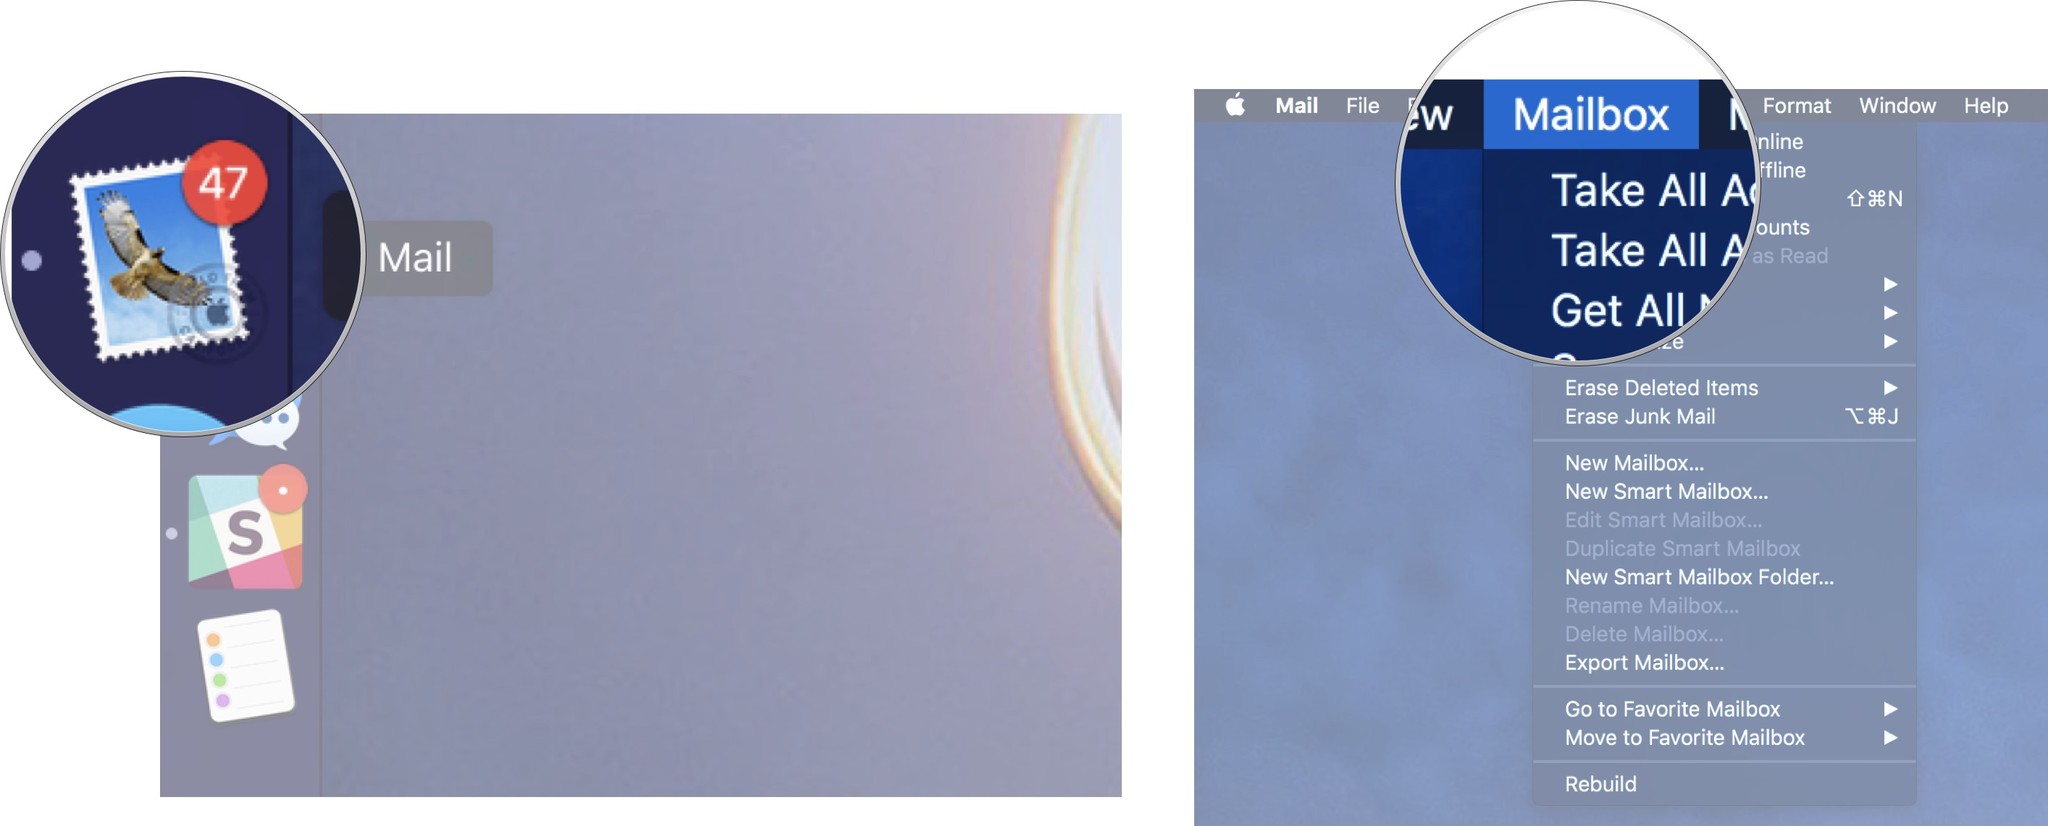
  1. Launch the Mail app on your Mac.
  2. Click on Mailbox in the upper left side of your Mac's screen.

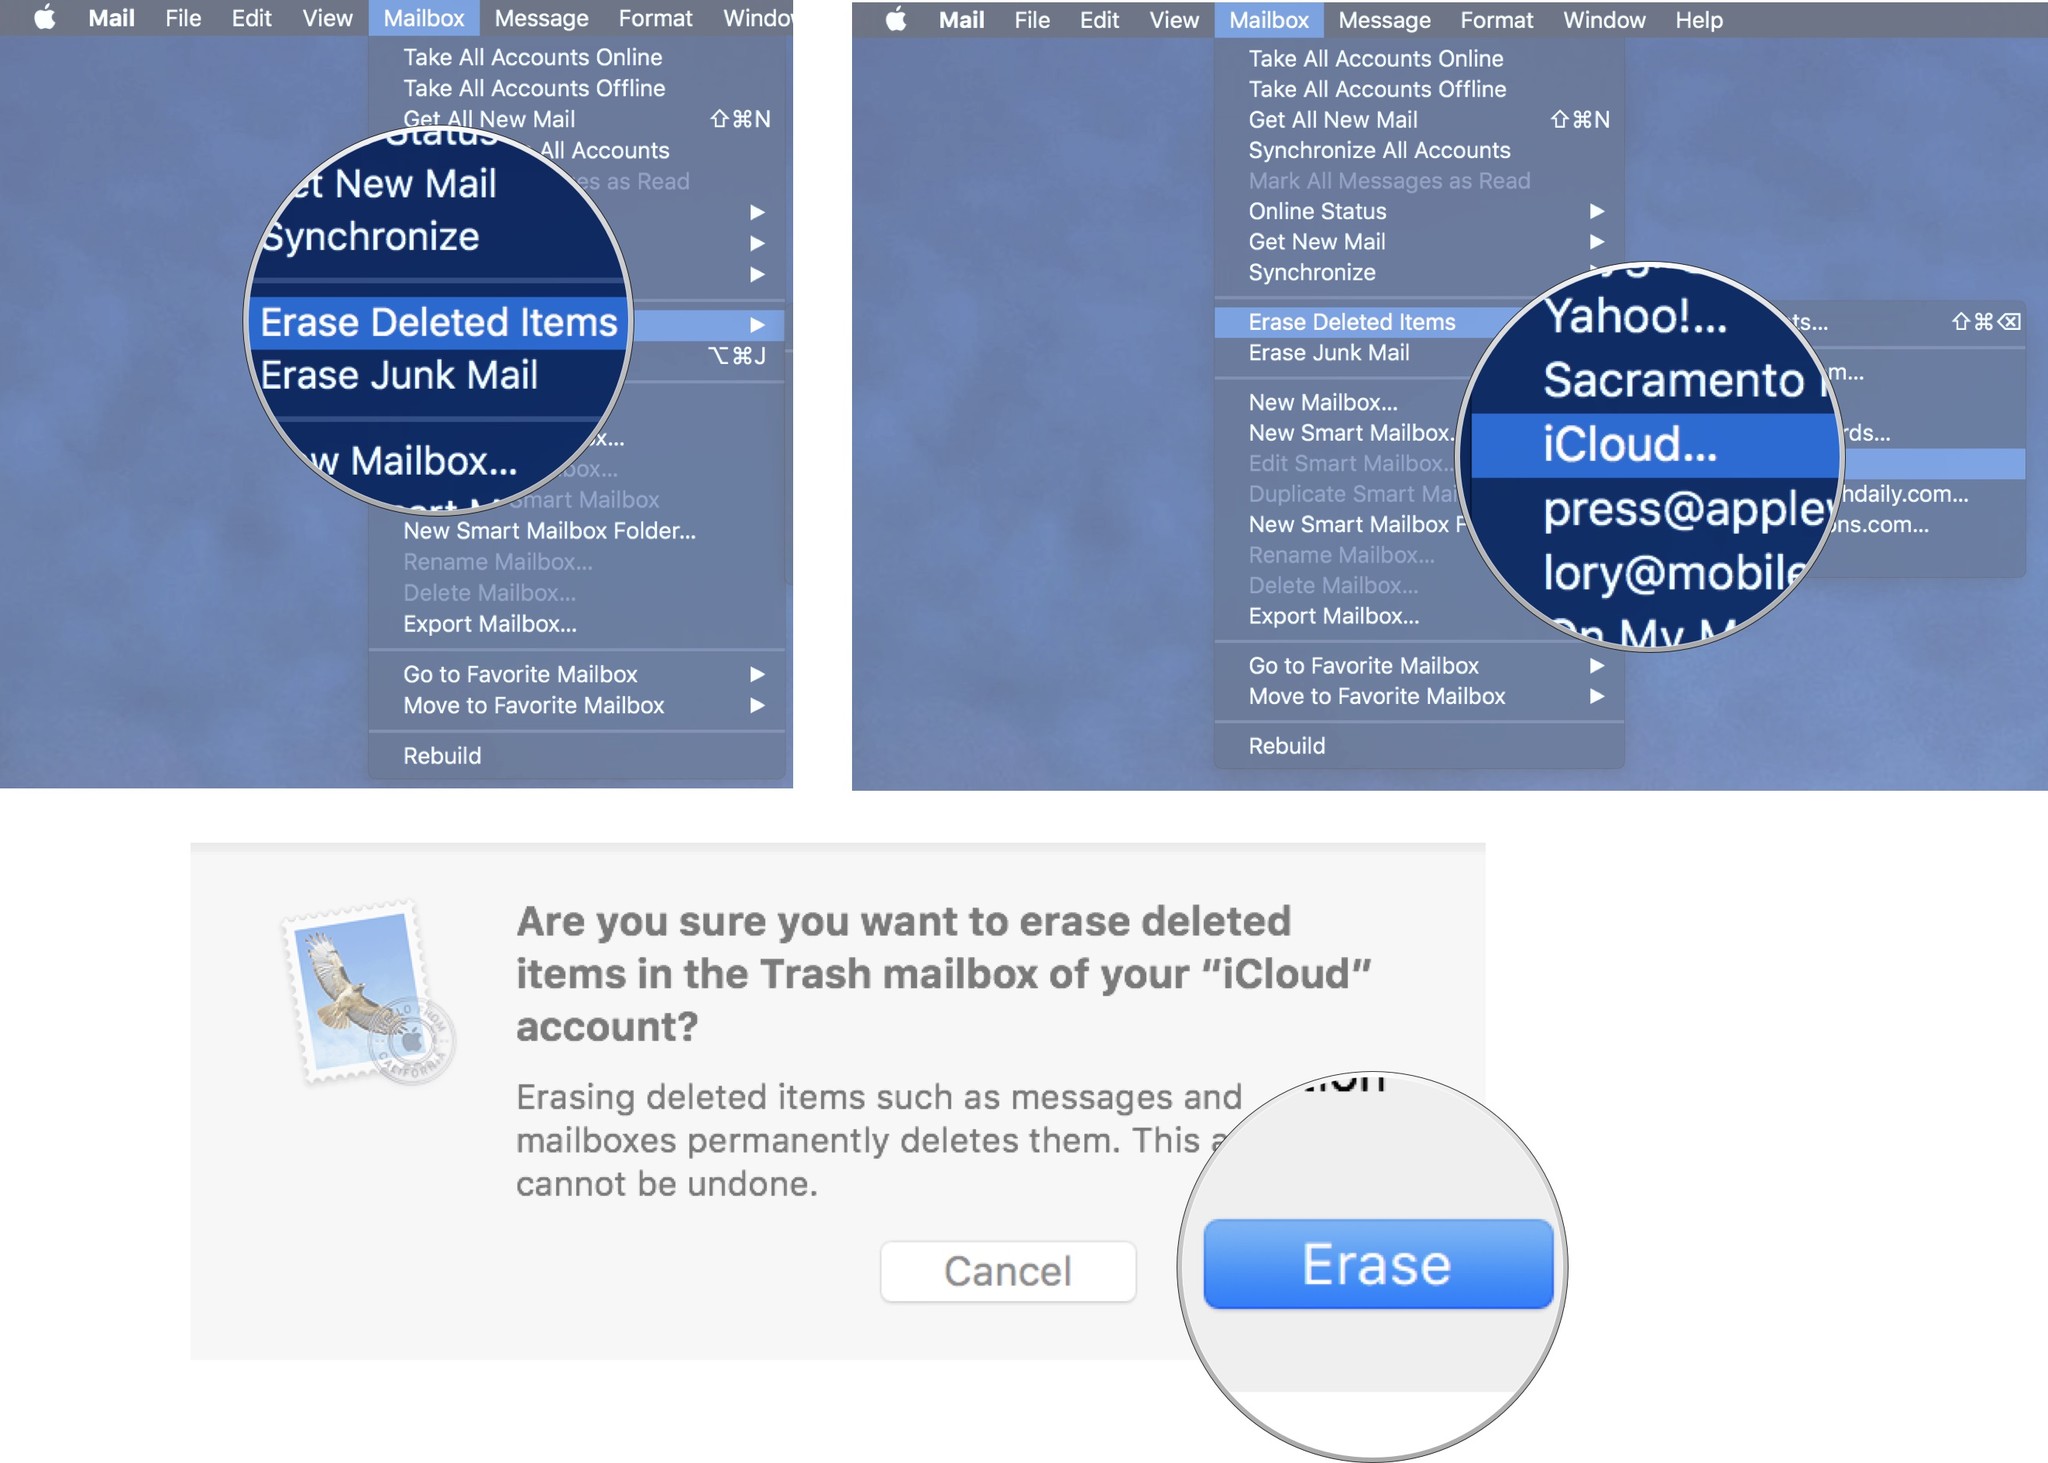
  3. Select Erase Deleted Items from the drop down menu.
  4. Select iCloud.
  5. Click on Erase when prompted to confirm that you want to erase the deleted items in your iCloud mailbox.

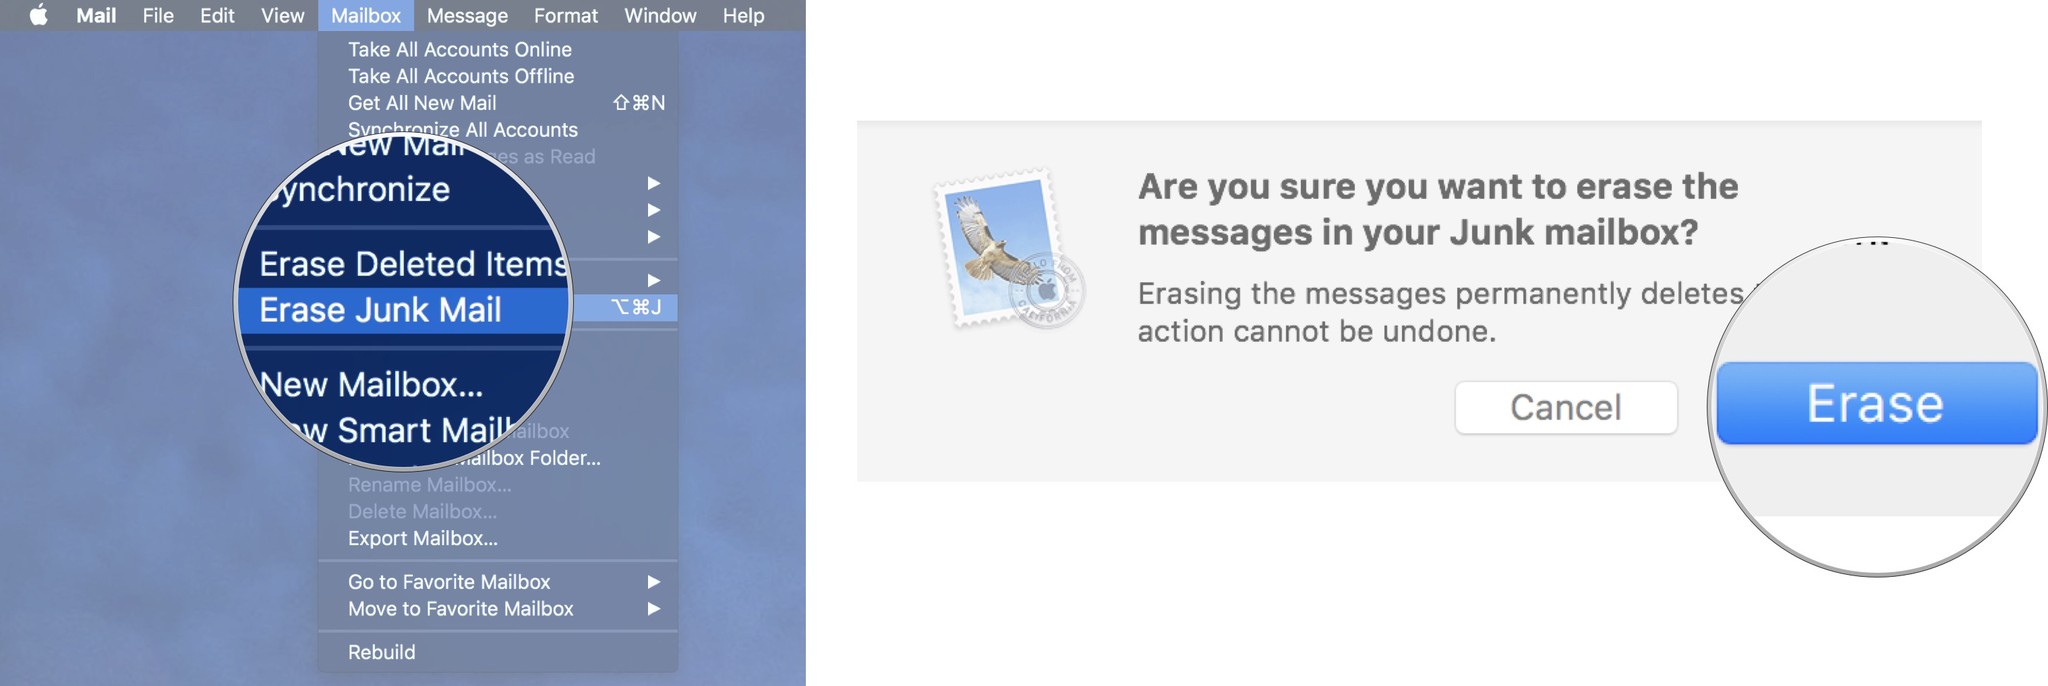
  6. Select Erase Junk Mail.
  7. Click on Erase when prompted to confirm that you want to erase the junk mailbox.

Any questions?

Do you have any questions about how to disable or customize the Optimized Storage features on your Mac? Let me know in the comments and I'll help you out.


from iMore - The #1 iPhone, iPad, and iPod touch blog https://ift.tt/2wUAvsw
via IFTTT
Thursday, 27 August 2020

How to find missing videos and photos in iCloud Photos

If you've enabled iCloud Photos on your iPhone or iPad, you may have noticed that some of your content isn't showing up. I first noticed this a few days ago while searching for a video I know I had taken on my iPhone a few days prior. For some reason, it wasn't showing up on my iPad, which also has iCloud Photos enabled. Digging deeper, some photos that I actually took on my iPhone were also missing. As it turns out, there's a few steps you can take to get content syncing properly to and from iCloud Photos.

What happened to my albums after turning on iCloud Photos?

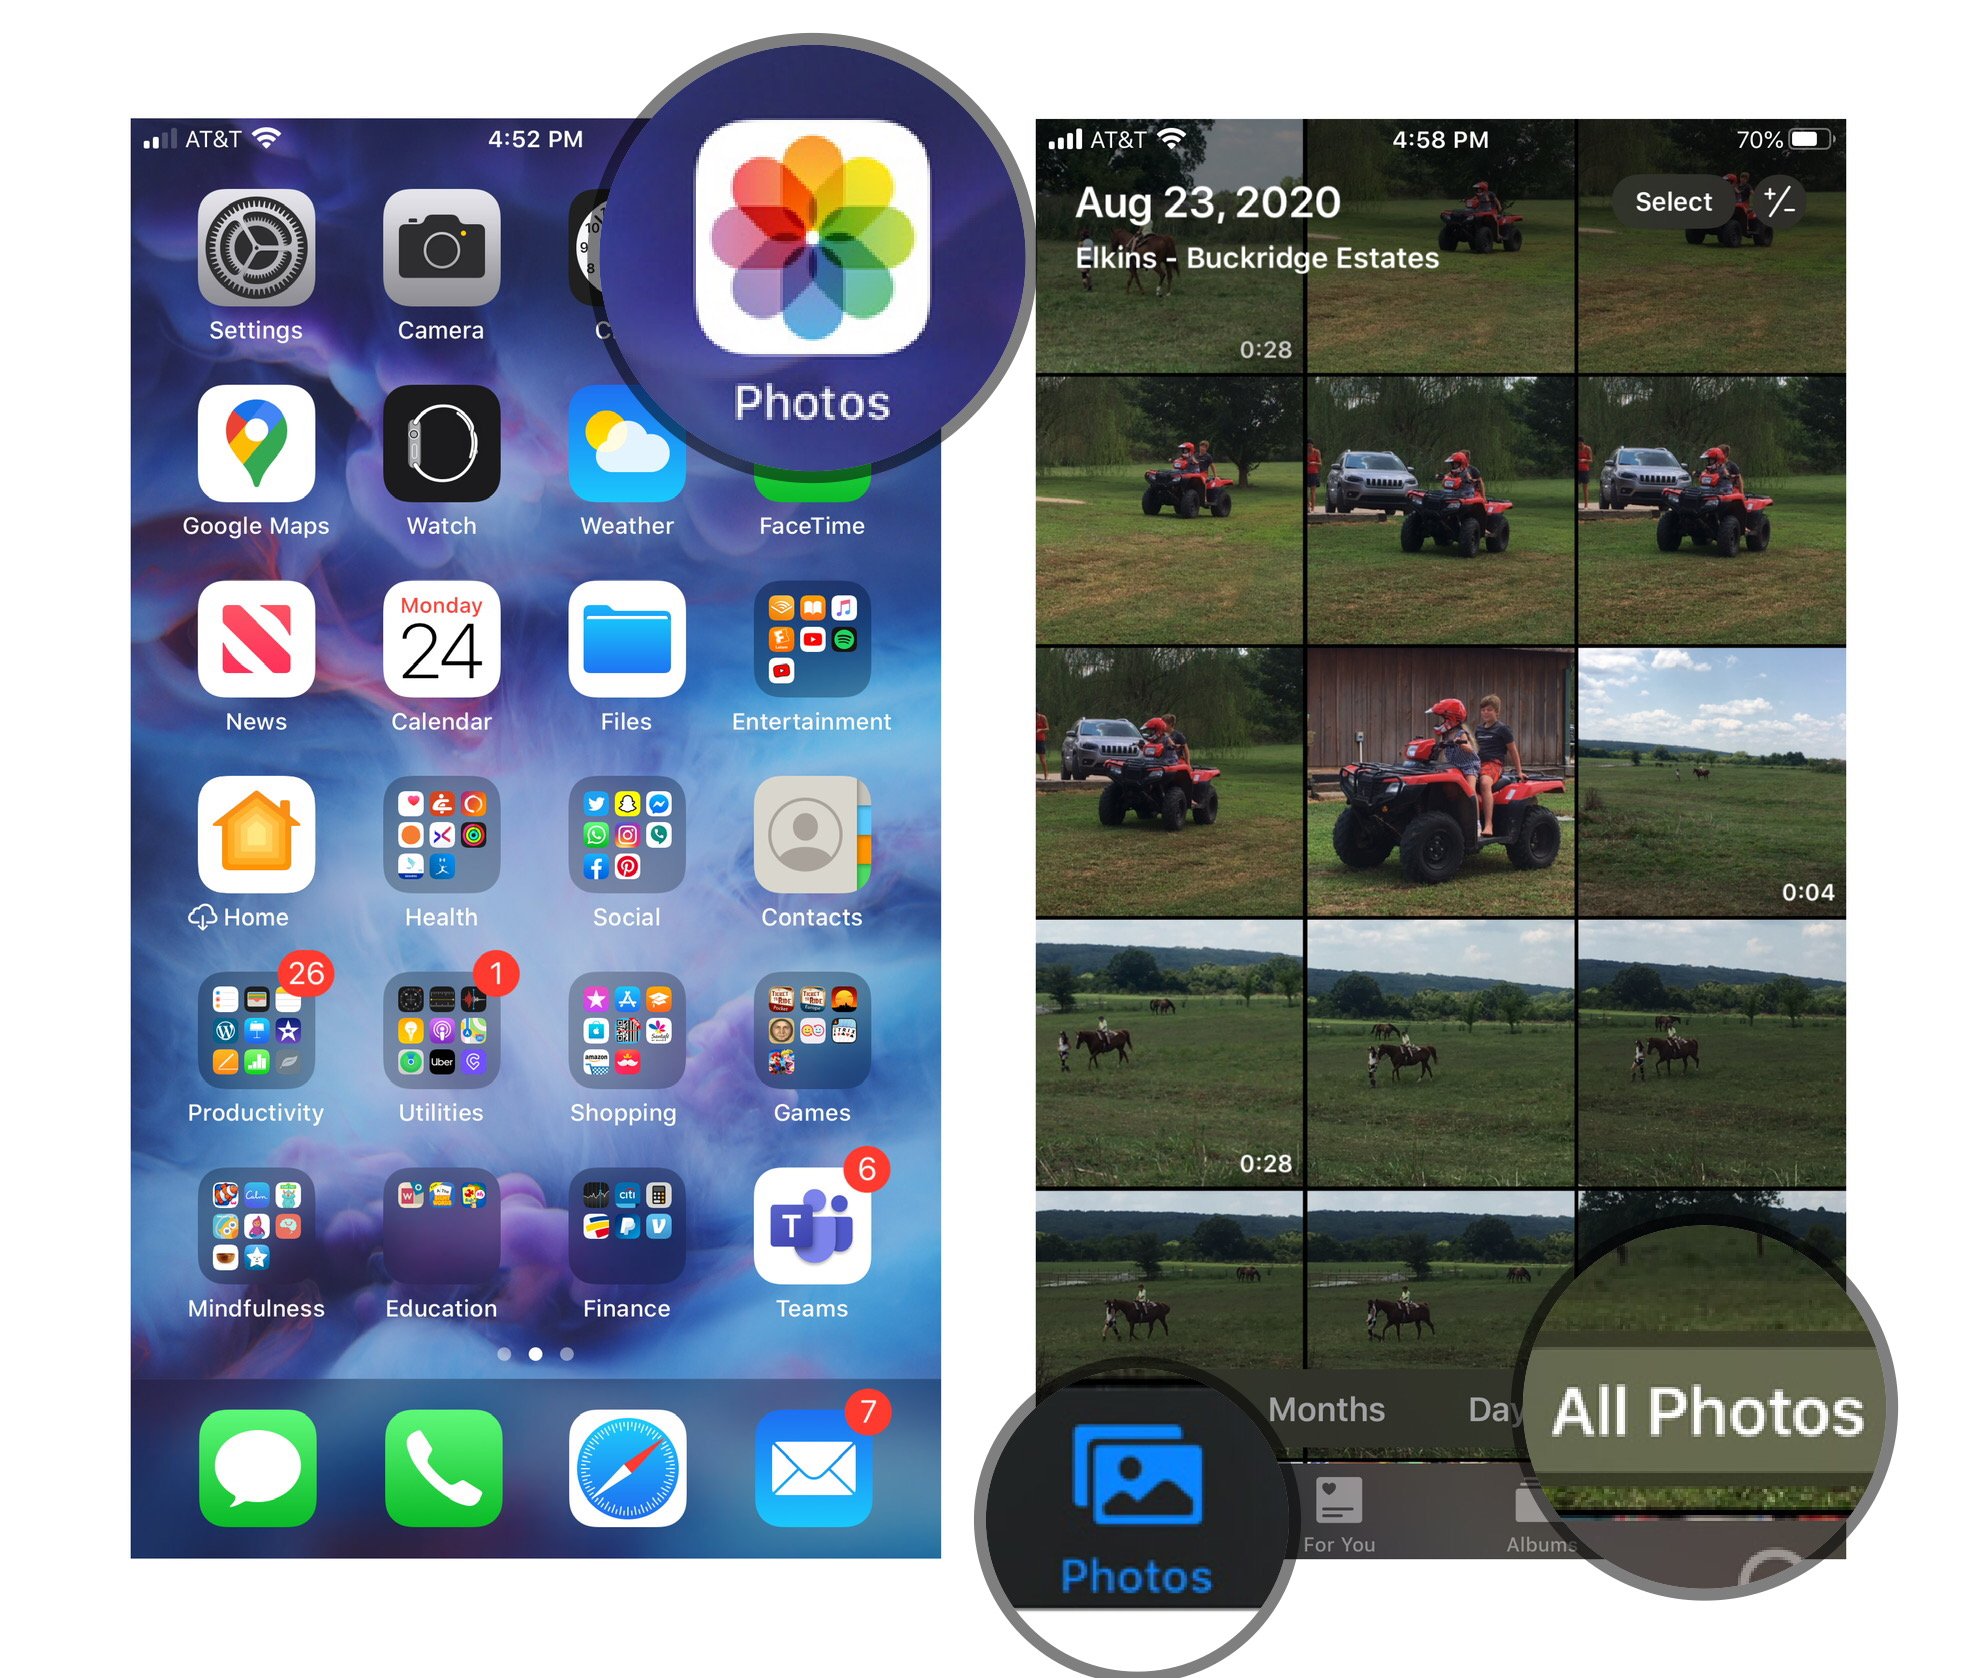
After you turn on iCloud Photos in your iPhone's settings panel, you may notice that some albums have disappeared and others have suddenly been added in the Photos app. Don't worry! Your photos and videos are still there, but iCloud Photos organizes them a little differently. For example, the photos that were in your My Photo Stream and Camera Roll albums can now be found in the All Photos album:

  1. Launch the Photos app on your iPhone or iPad.
  2. Tap Photos on the bottom left.
  3. Select the All Photos view.
  4. All of your photos and videos are organized here according to date.

If you think that some photos and videos are still missing, there are additional steps you can take to sync them properly.

How to check your Recently Deleted folder

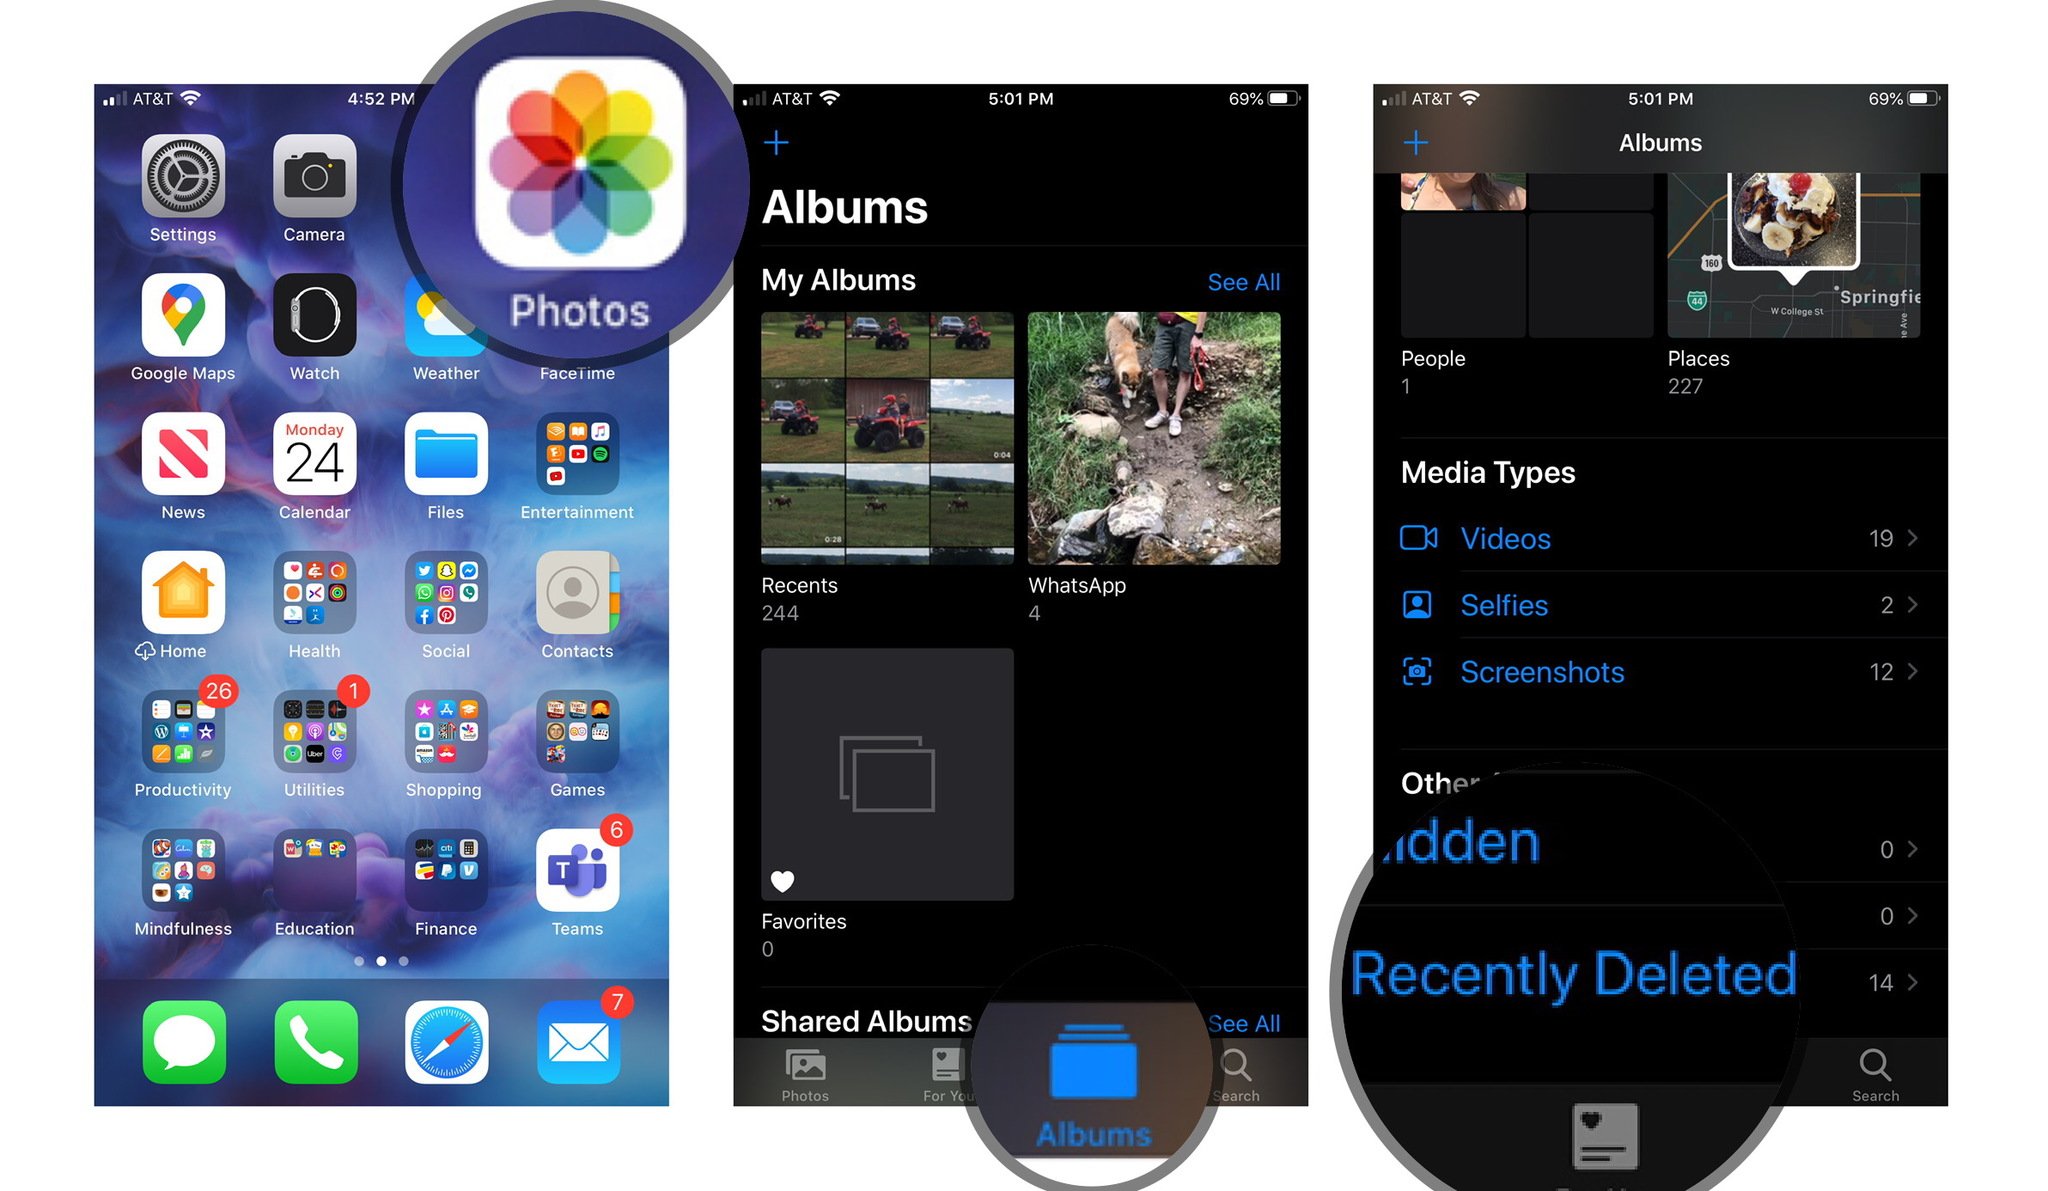
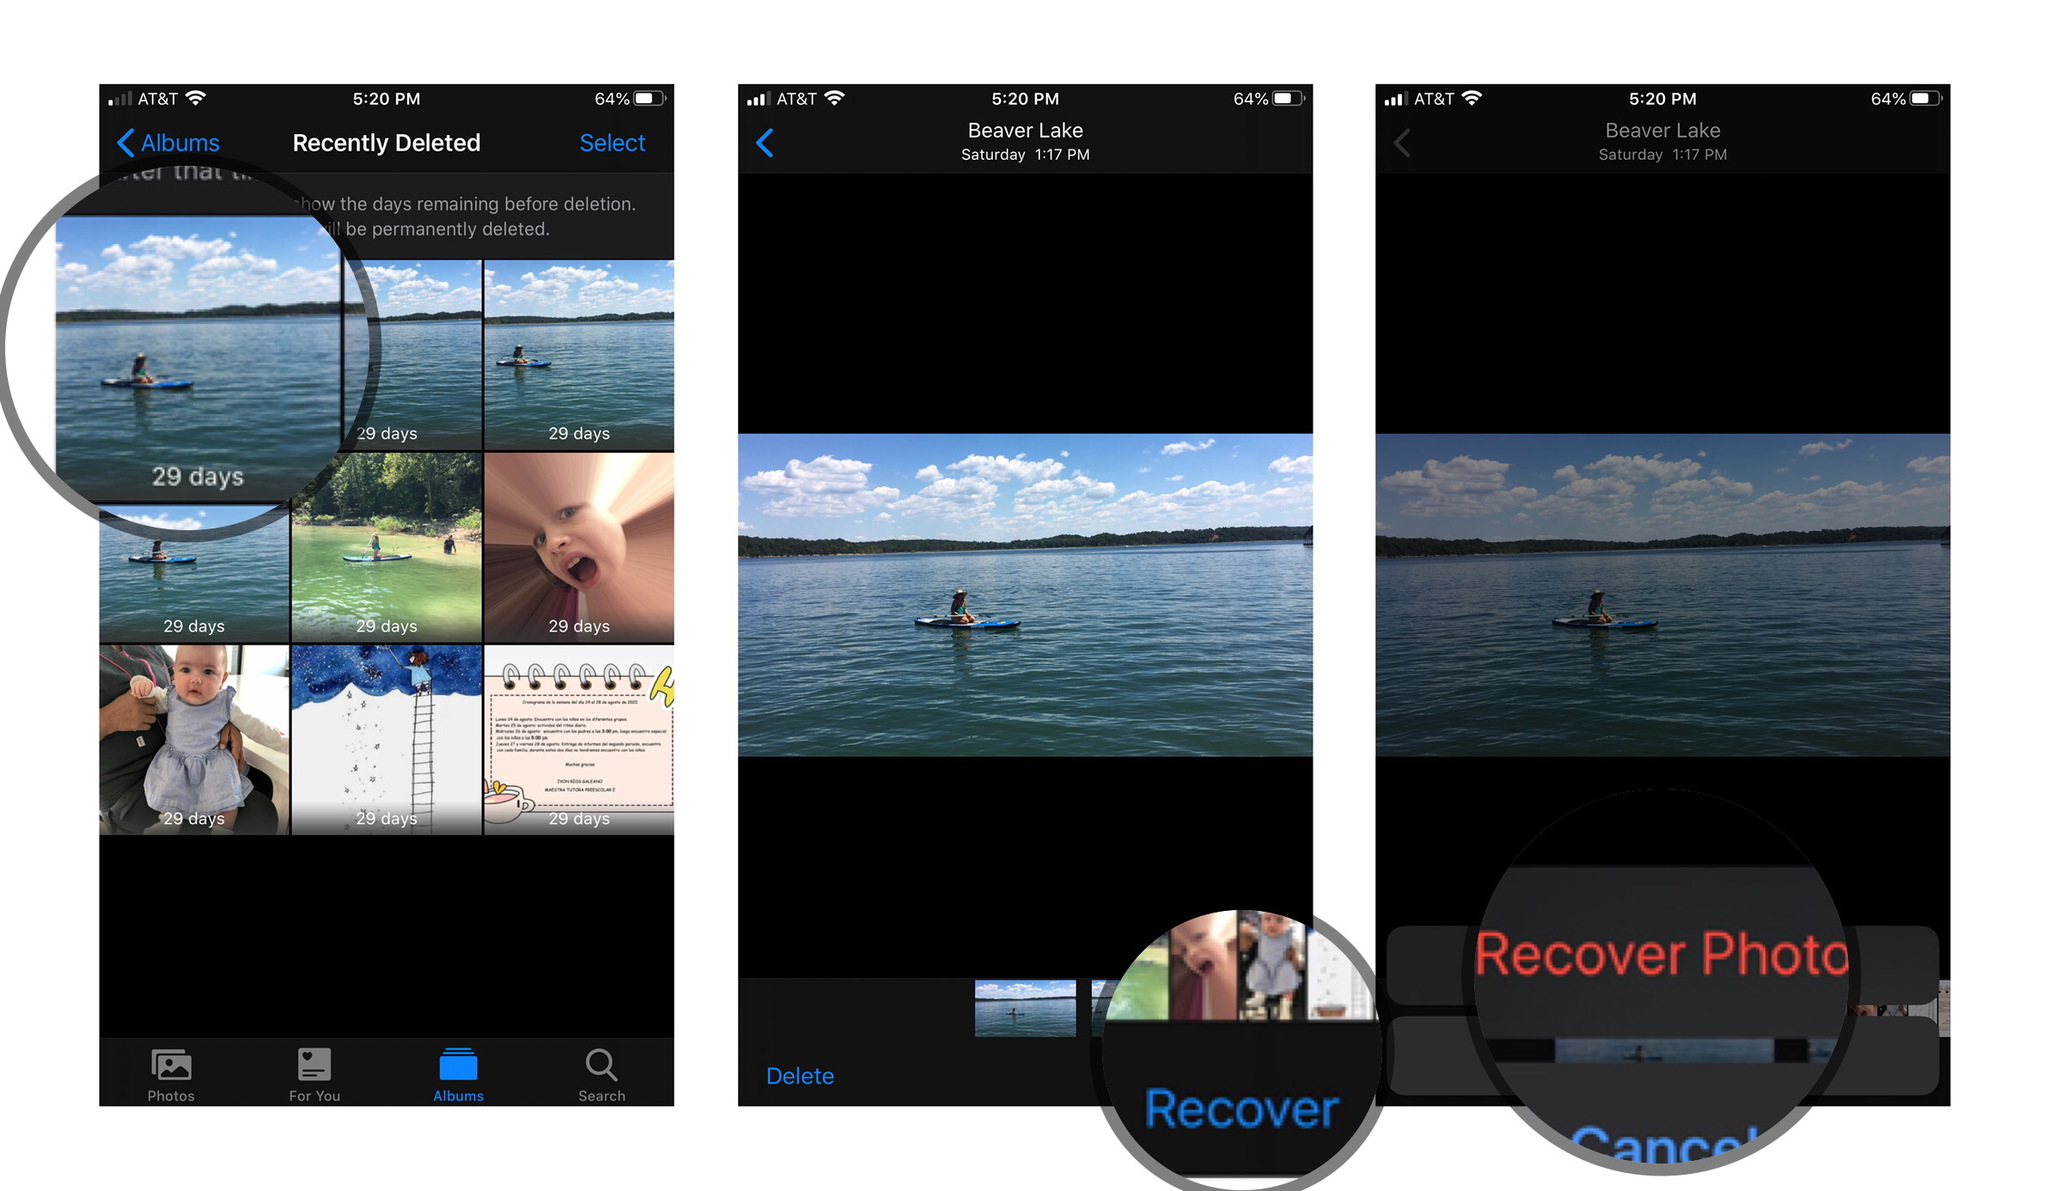
The most common reason why some photos and videos disappear is because they were accidentally deleted. You can check this easily:

  1. Launch the Photos app on your iPhone or iPad.
  2. Tap Albums.
  3. Scroll down and tap Recently Deleted.

  4. If you find any photo or video that was unintentionally deleted, simply tap it and then tap Recover.
  5. Tap Recover one more time to confirm.

Any recovered images will be returned to the All Photos album.

How to sign in with the same Apple ID on all devices

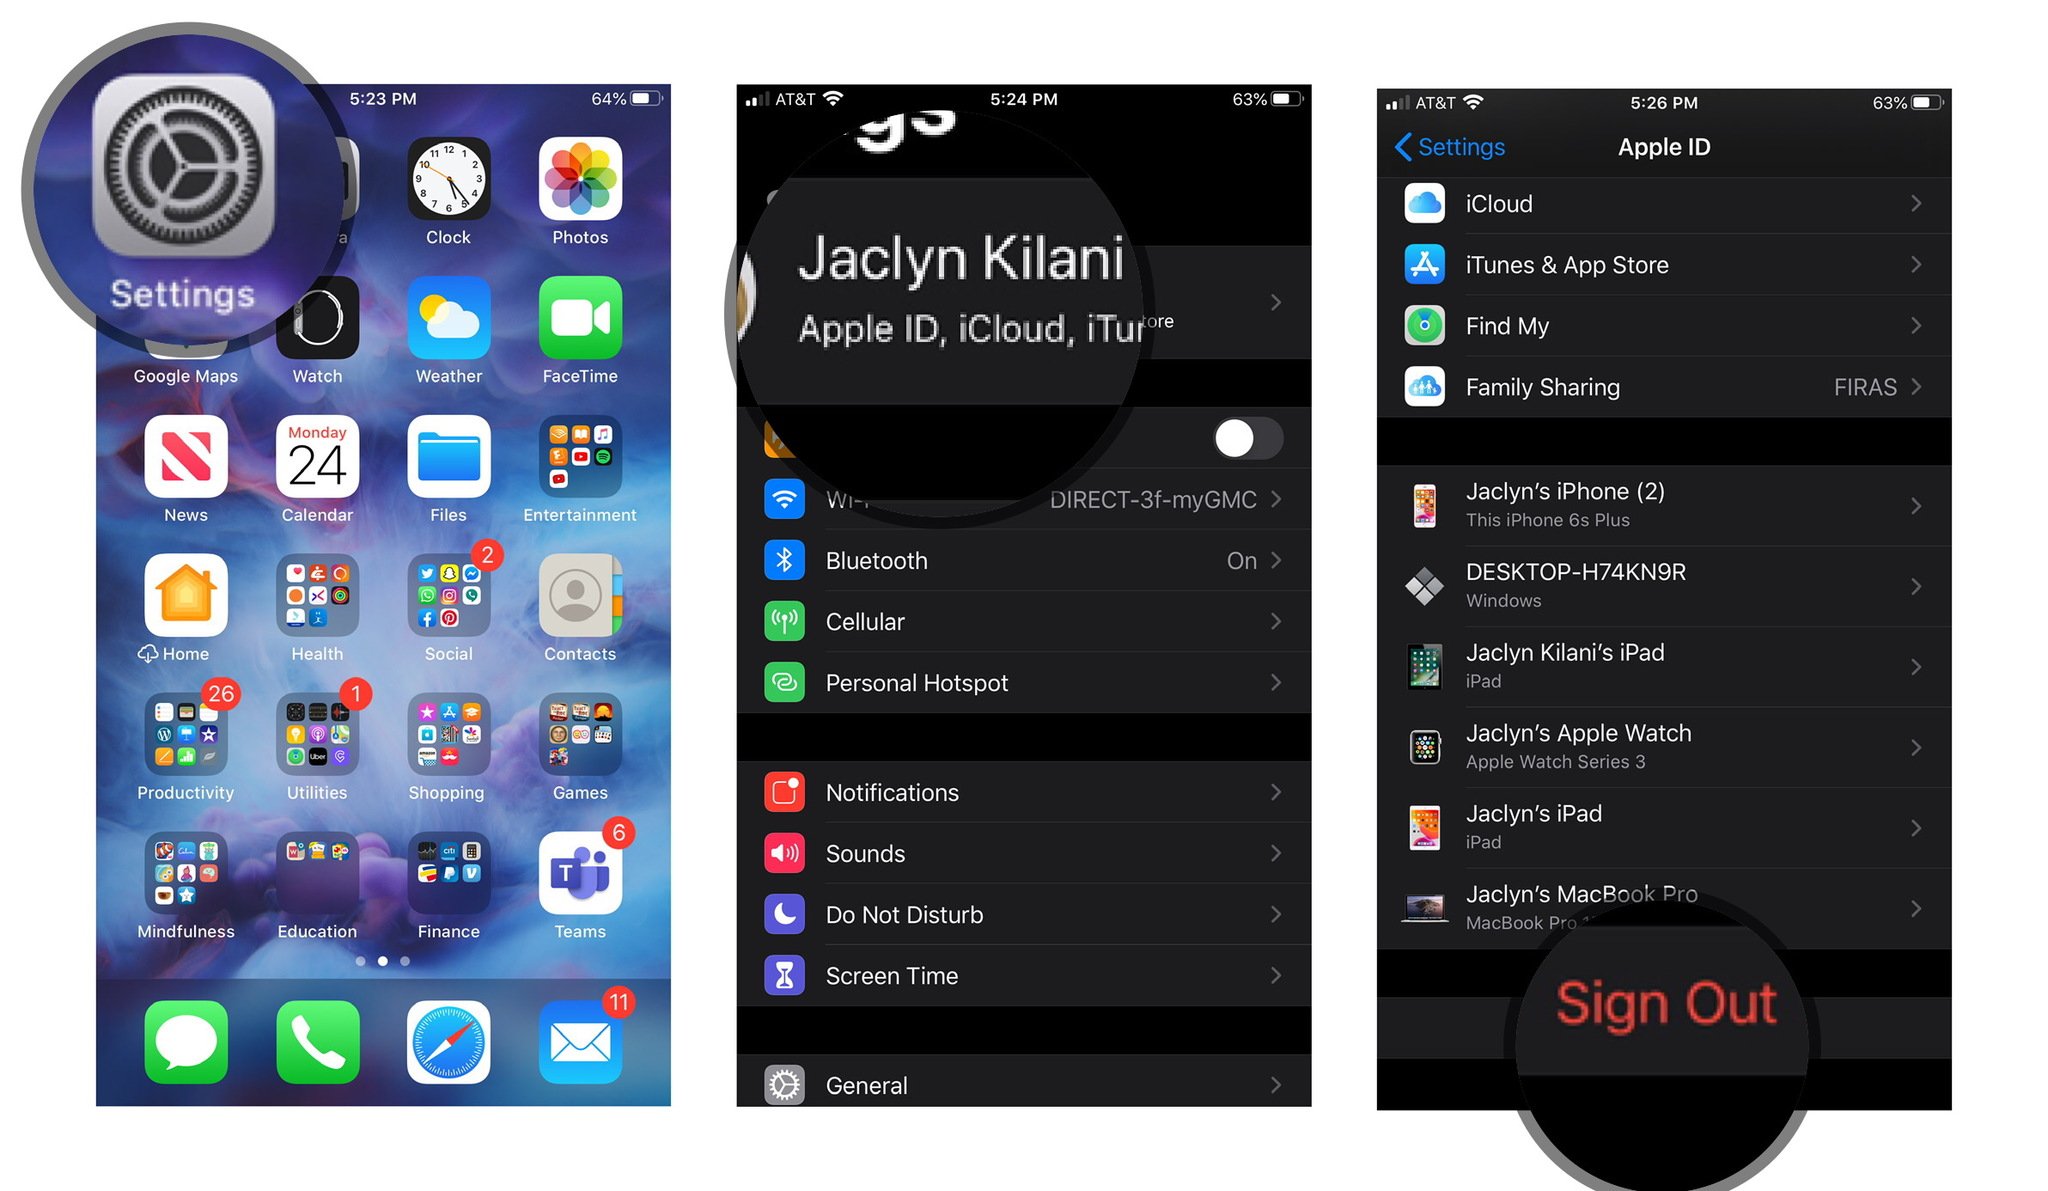
If you have different devices that are synced with different Apple IDs, then your photos and videos will not sync on all devices. Make sure they are all signed on with the same Apple ID for content to sync properly between devices. To check Apple ID, do the following:

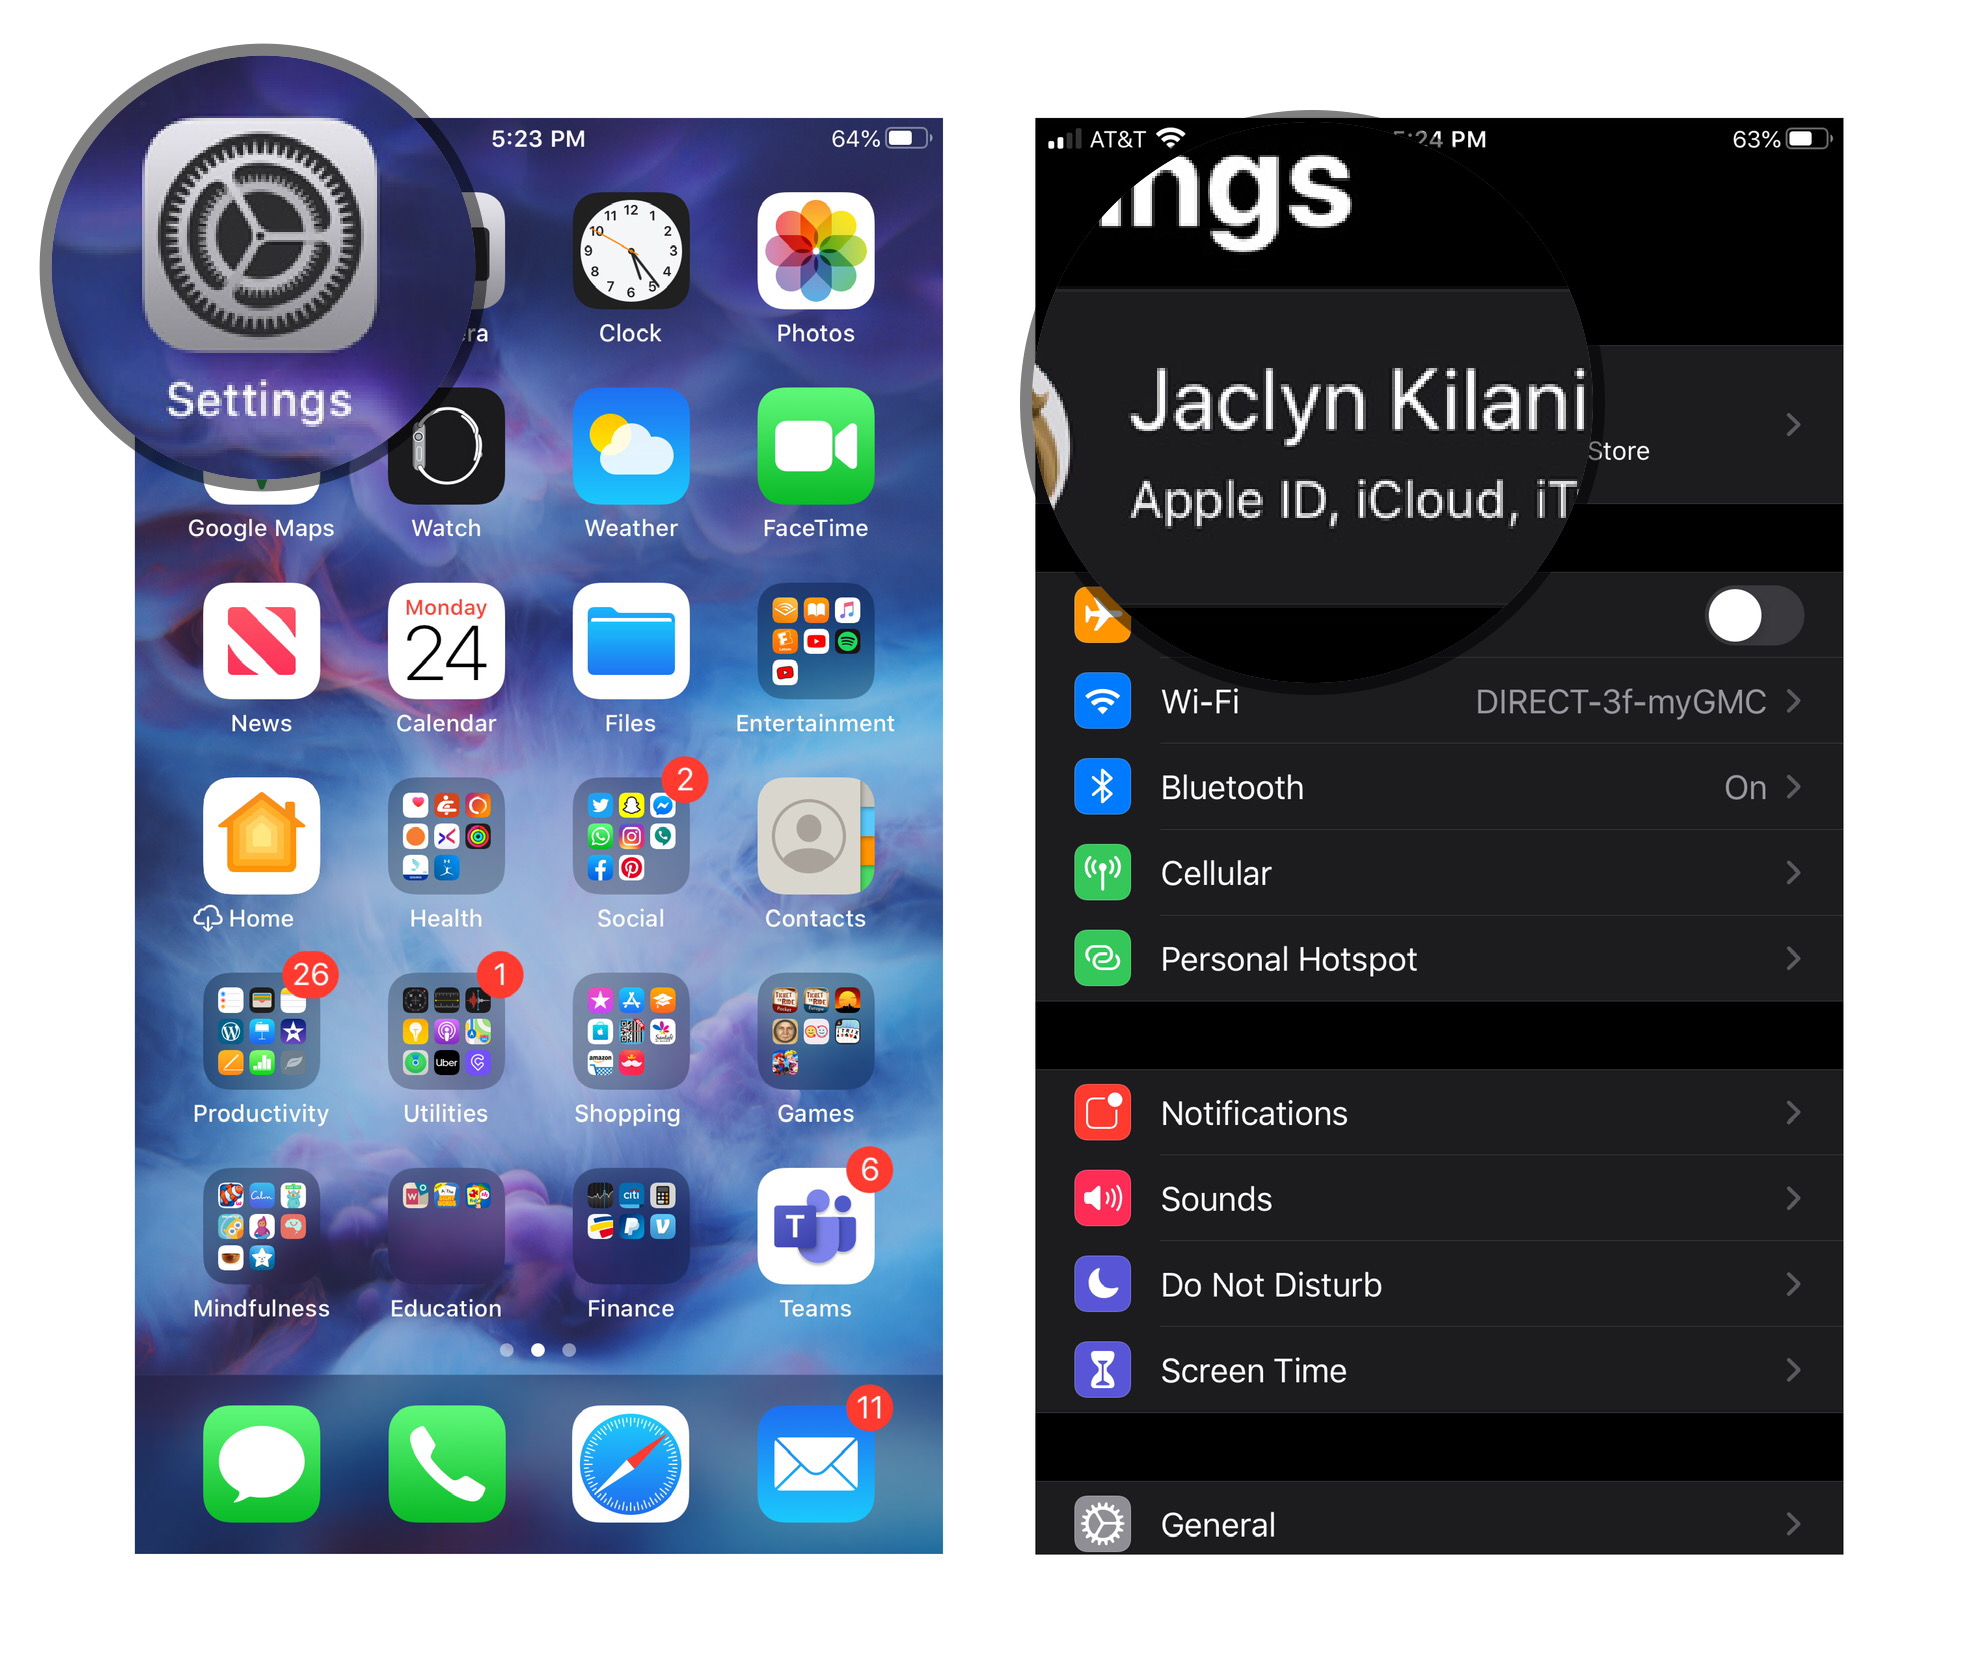
  1. Launch the Settings app on your iPhone or iPad.
  2. Tap Your name right at the top, where it also says Apple ID, iCloud, iTunes, and App Store.
  3. The name and email associated with your Apple ID will display at the top. Make sure this is the same on all devices.

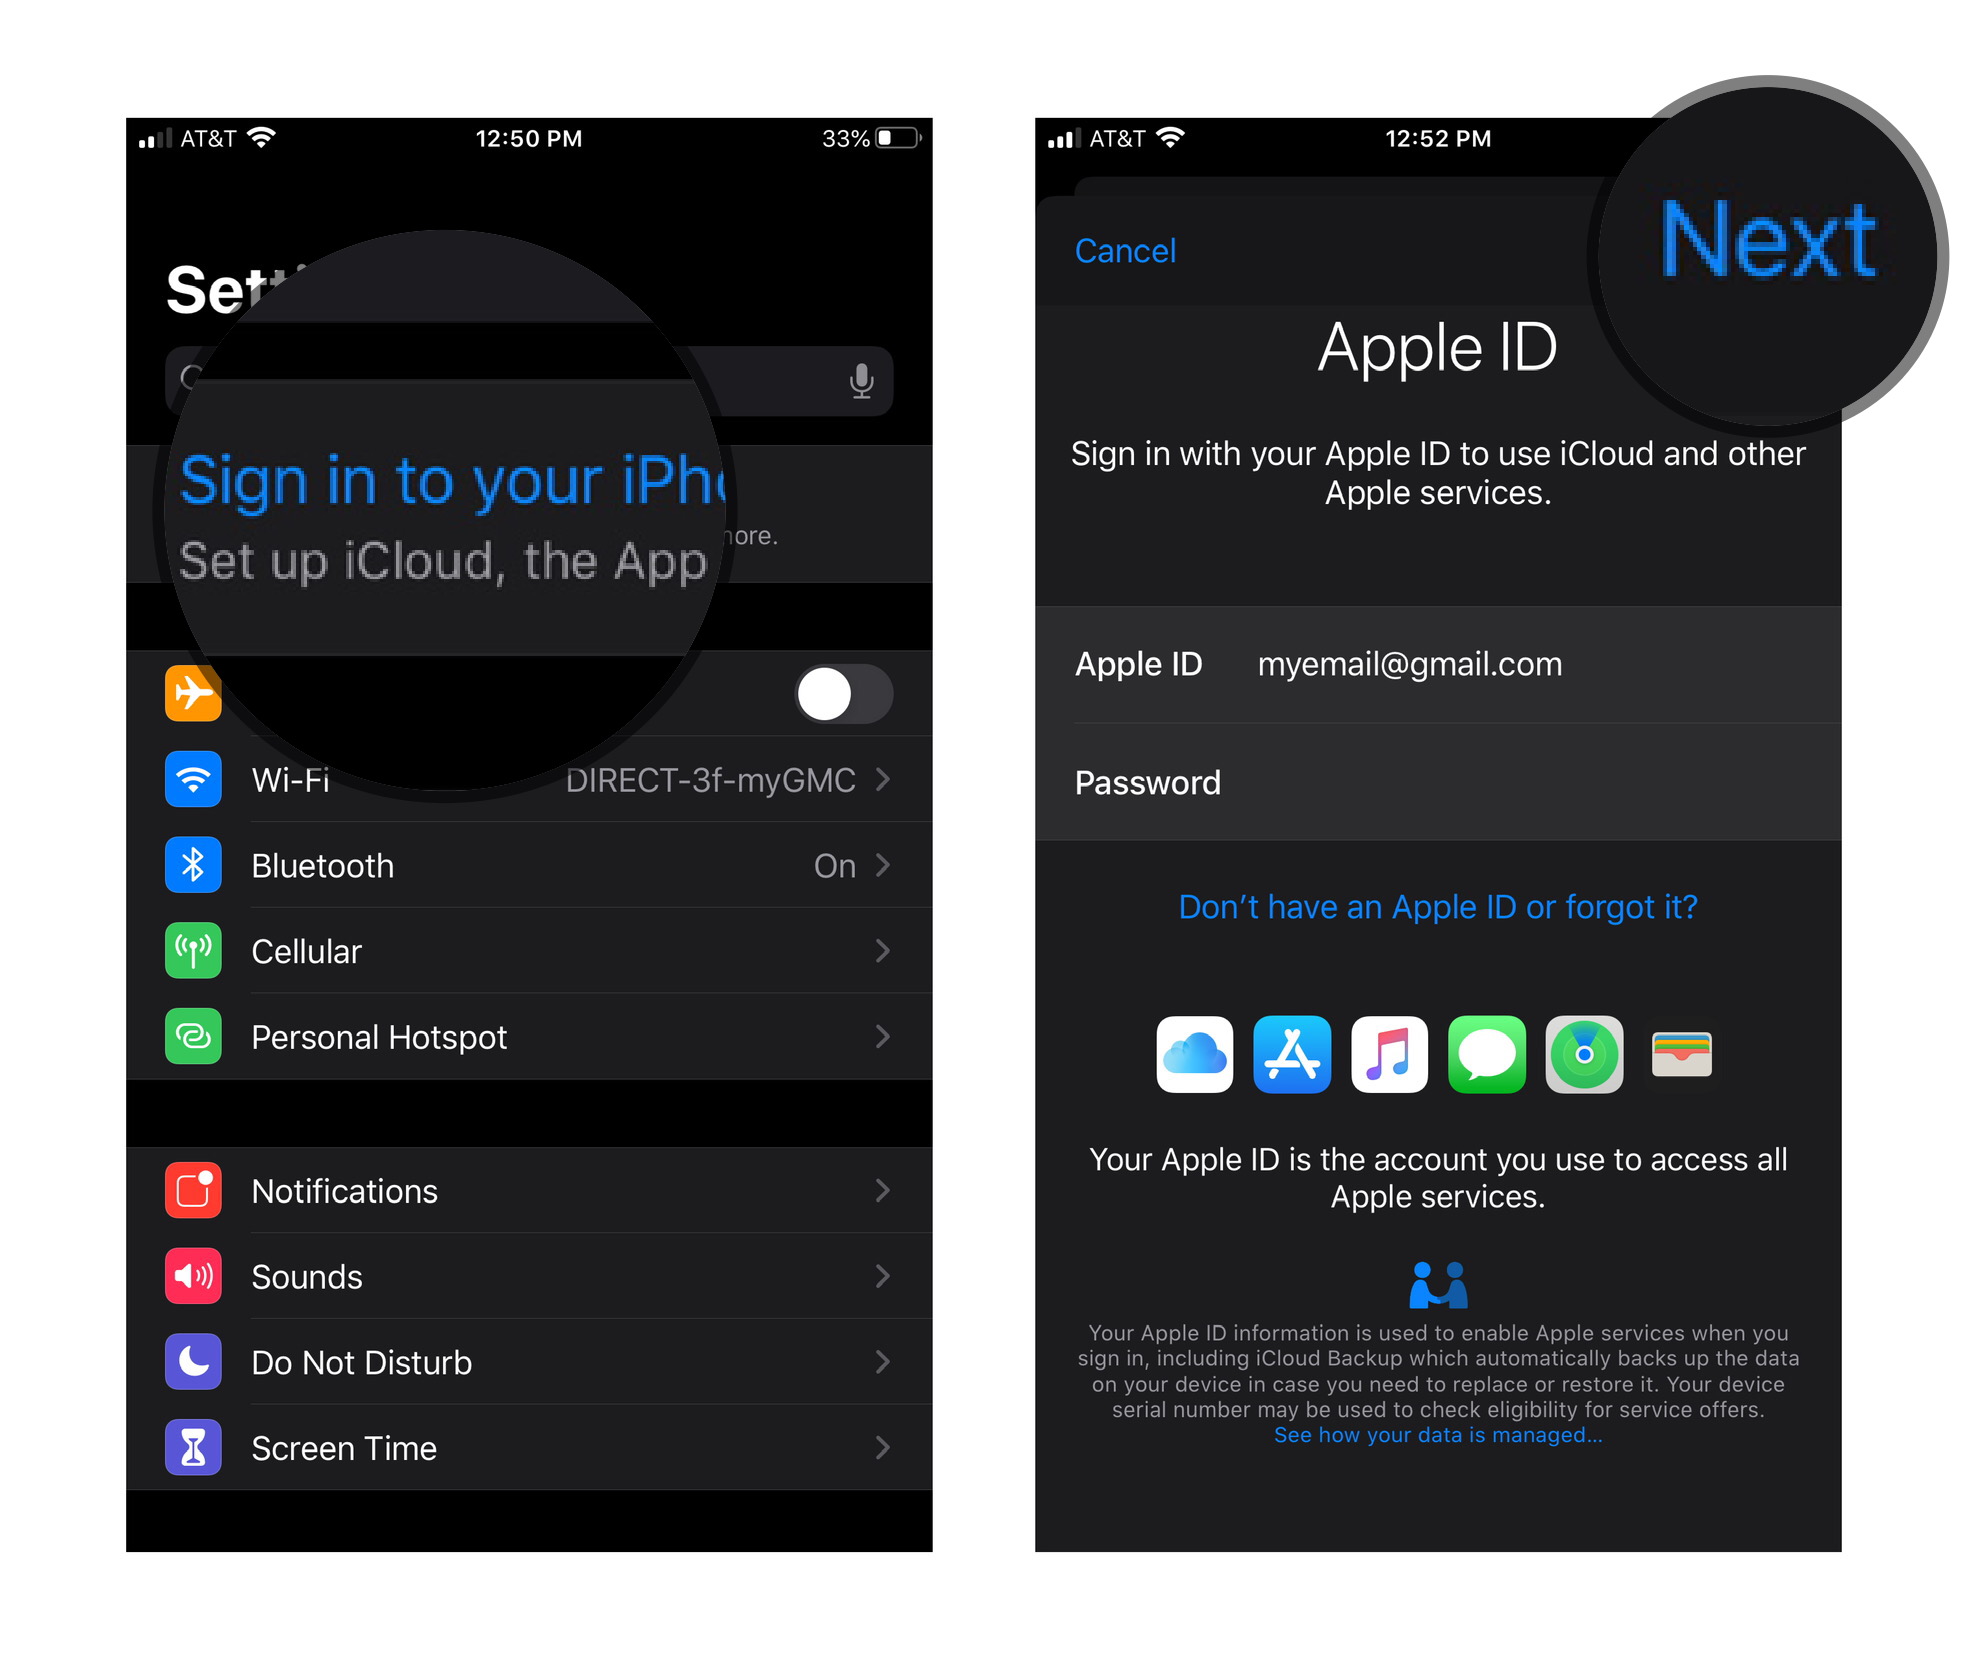
If you have multiple devices signed in with different Apple IDs, you'll need to sign out and sign in with the same Apple ID across all devices:

  1. Launch the Settings app on your iPhone or iPad.
  2. Tap Your name right at the top, where it also says Apple ID, iCloud, iTunes, and App Store.
  3. Scroll all the way down and tap Sign Out.
  4. Confirm by tapping Sign Out again.

  5. Now scroll back up and tap Sign in to your iPhone.
  6. Enter the same Apple ID email and password you use on your other devices and tap Next.

Once all devices are signed into the same Apple ID, the same iCloud Photos content will sync across each device. It may take awhile for everything to sync, so be patient. Sometimes it's better to step away and check again the next day to make sure everything has synced properly.

How to check your iCloud storage limit

If your iCloud Storage limit has been exceeded, then photos and videos will stop syncing across devices. You can check if the storage limit has been reached:

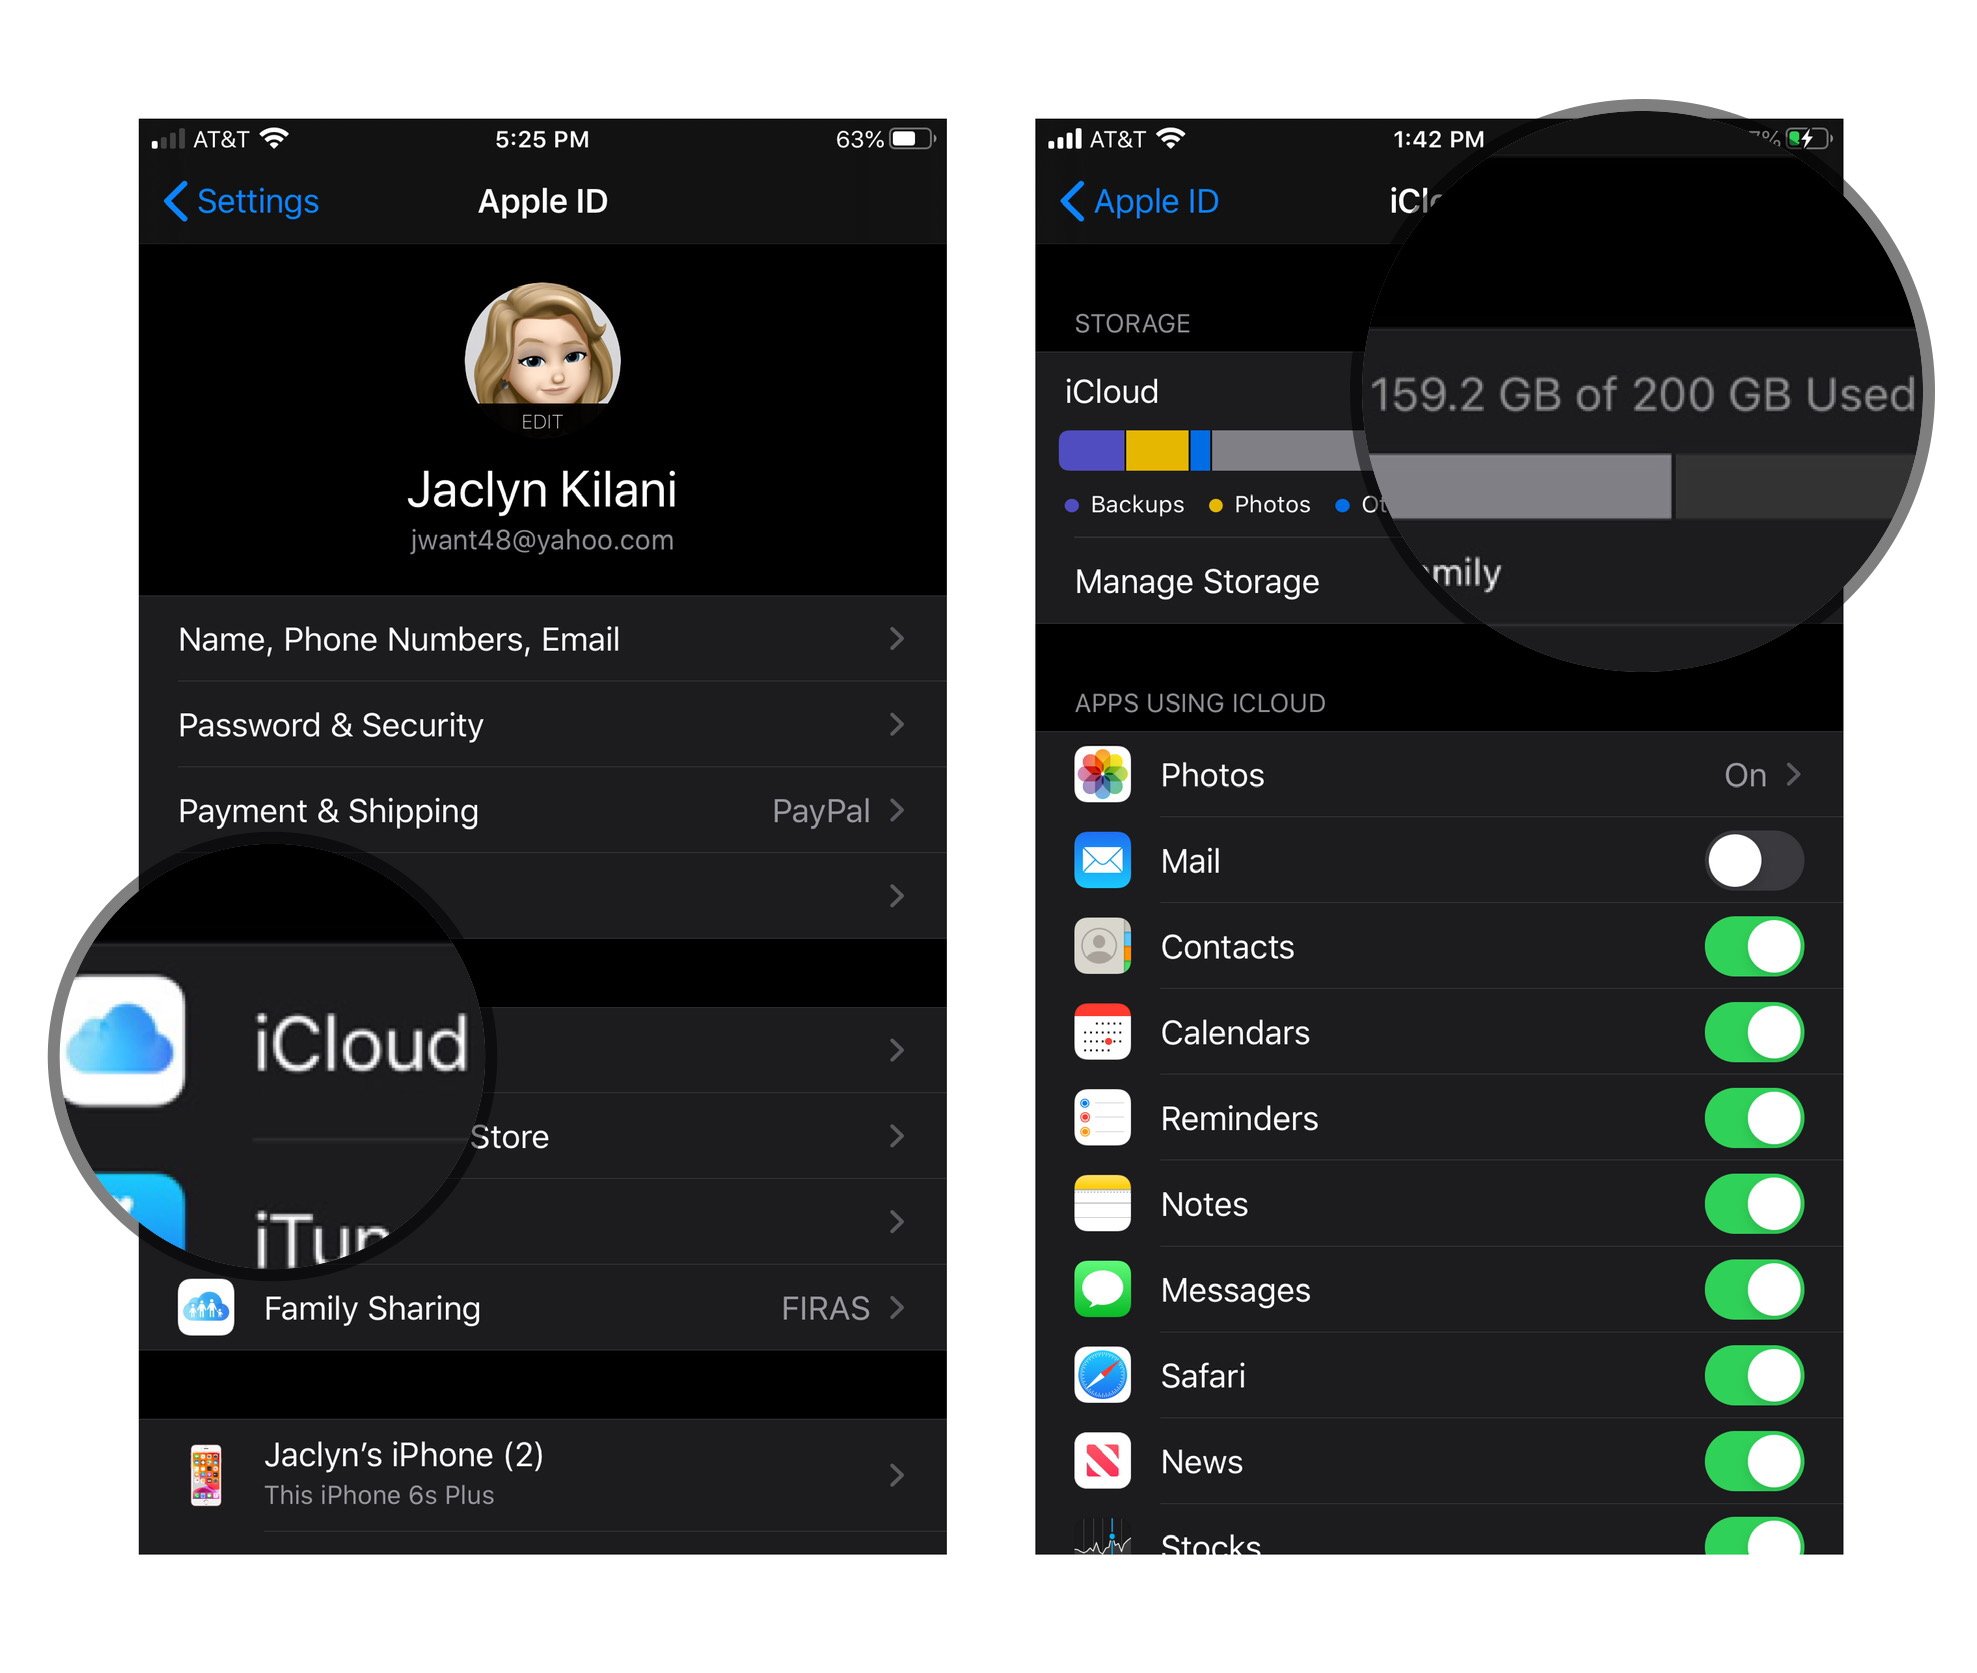
  1. Launch the Settings app on your iPhone or iPad.
  2. Tap Your name right at the top, where it also says Apple ID, iCloud, iTunes, and App Store.

  3. Tap iCloud
  4. Here you can see how much iCloud storage has been used.

If your iCloud storage limit has been reached, your photos and videos will no longer sync properly. In this situation, you can either manage your storage usage to make more space, or upgrade your iCloud storage plan.

How to unhide photos and videos

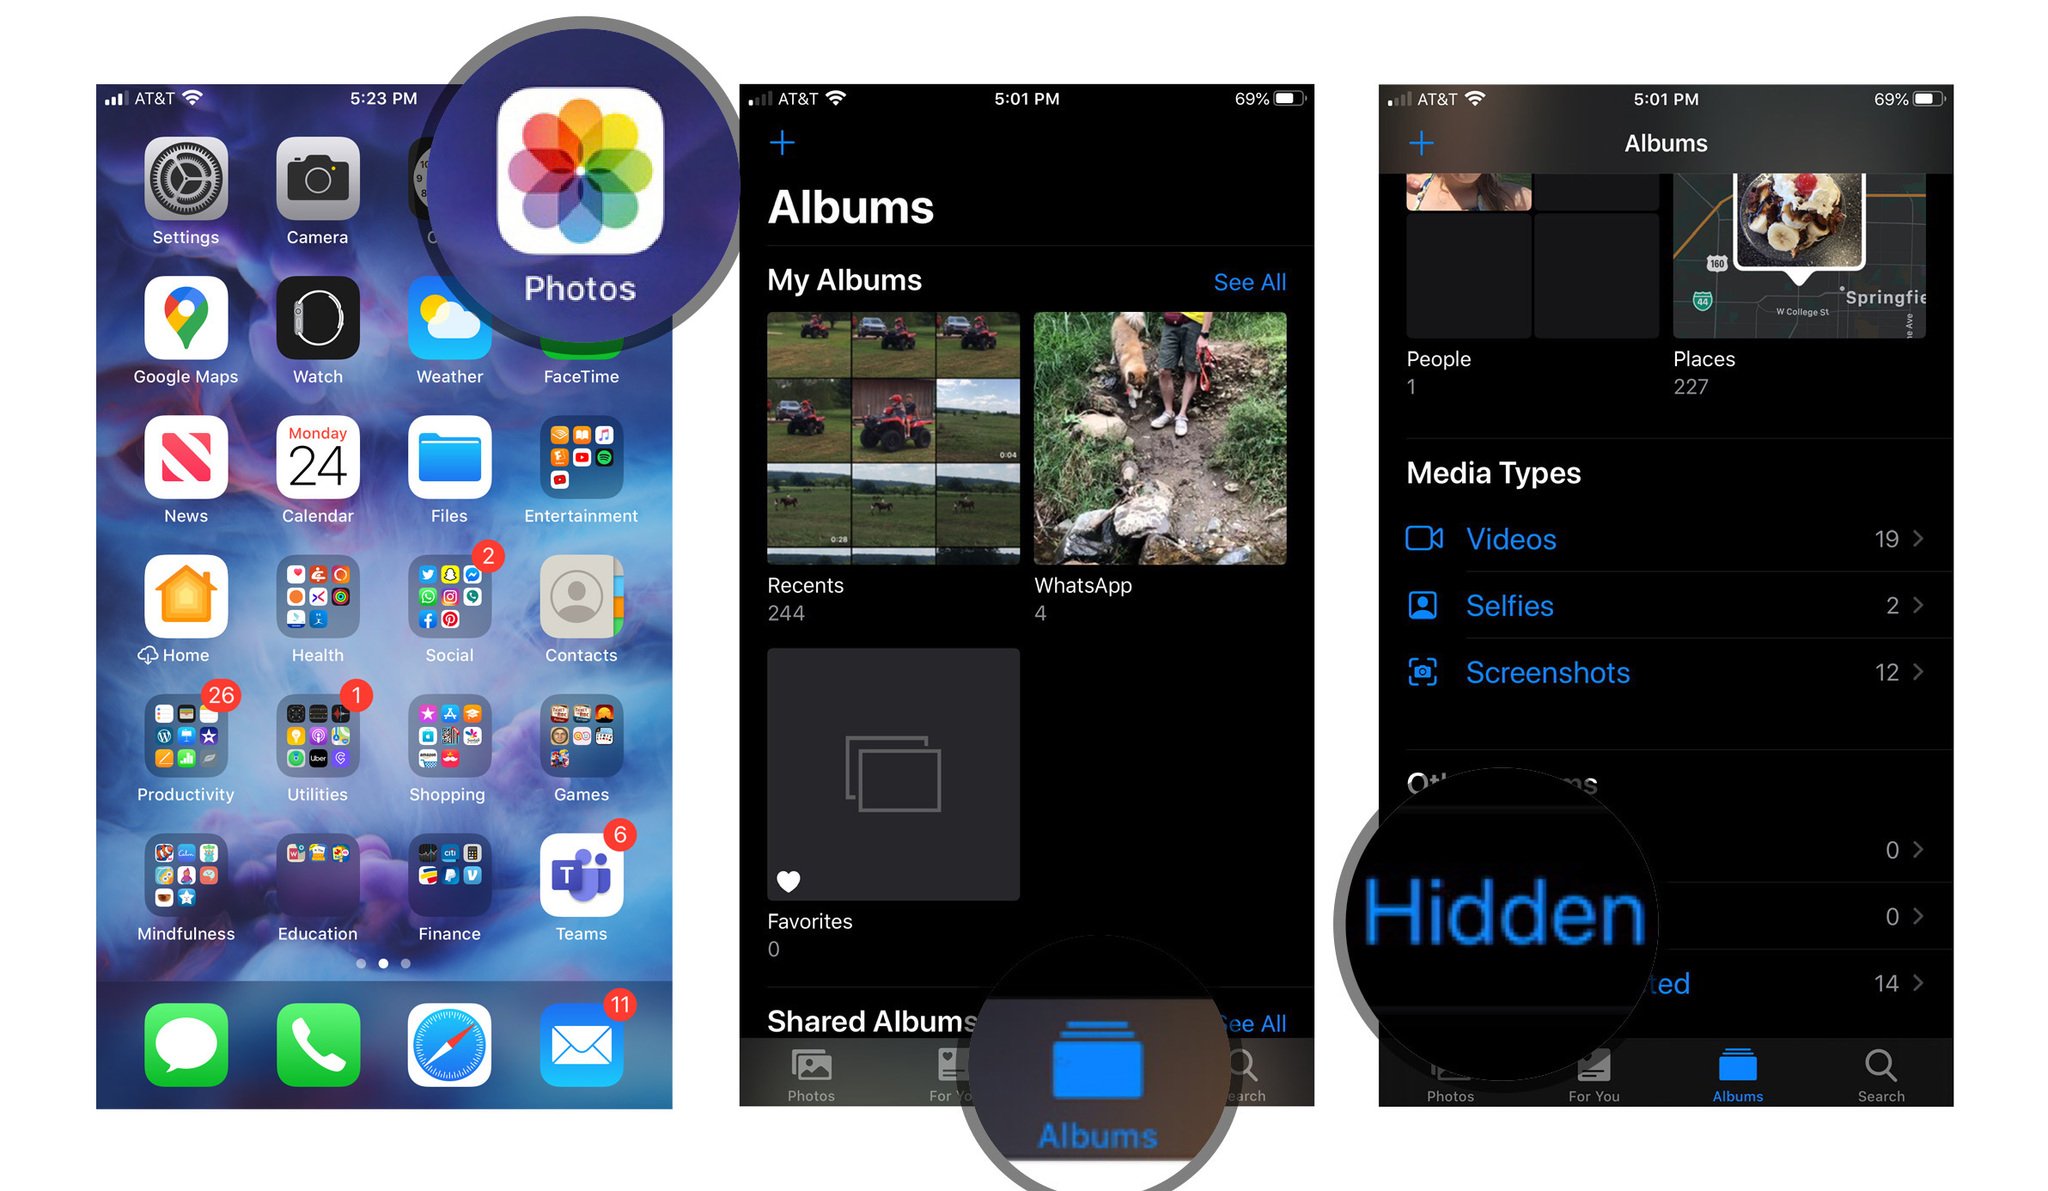
If photos or videos get hidden from the All Photos view, you'll only be able to see them if you go the Hidden folder. Here's how:

  1. Launch the Photos app on your iPhone or iPad.
  2. Tap Albums
  3. Scroll down and tap Hidden under Other Albums.

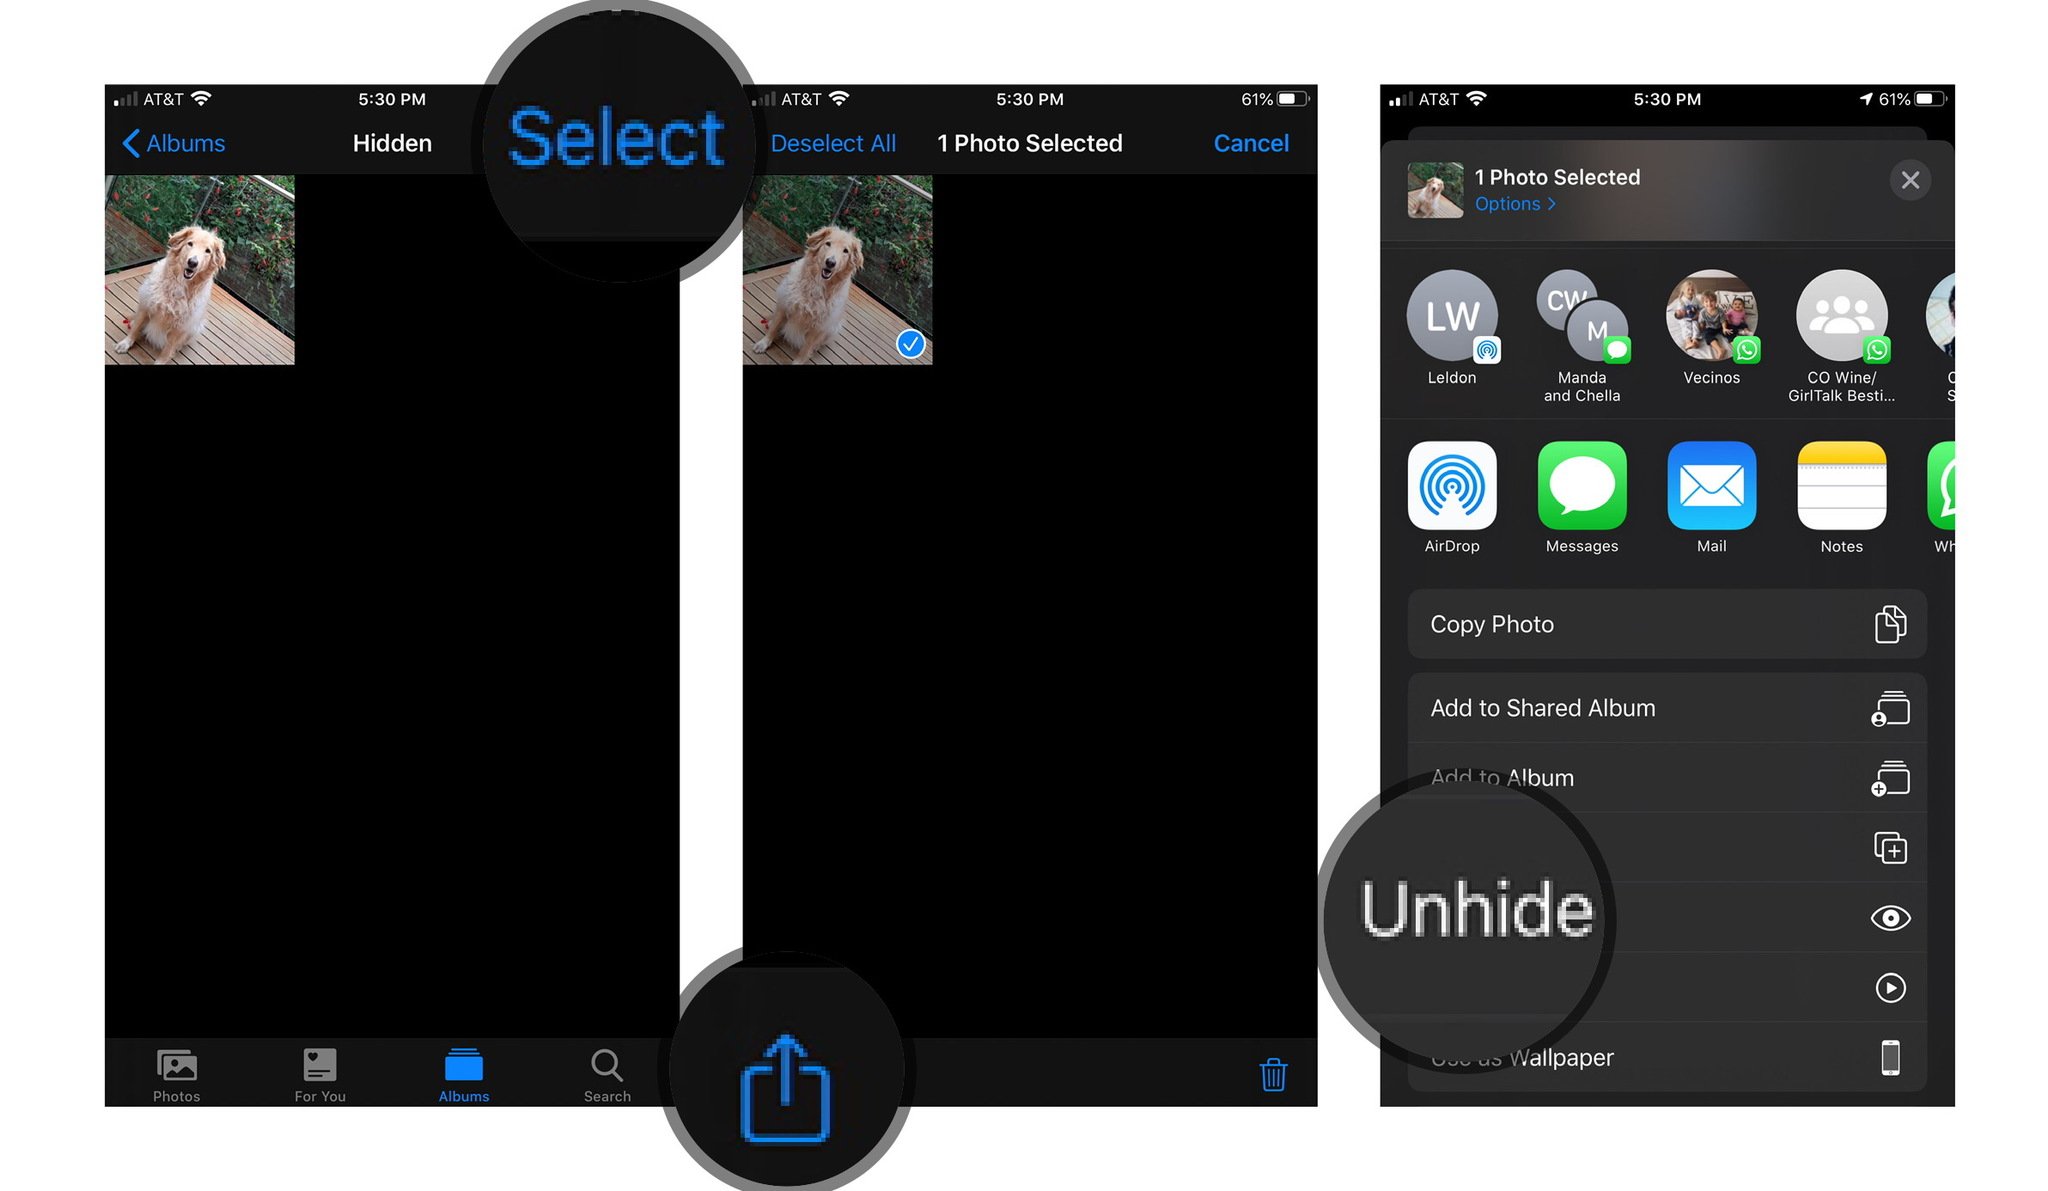
  4. To unhide a photo or video, tap Select.
  5. Tap the Share icon in the bottom left.
  6. Scroll down and tap Unhide.

This will unhide photos and videos across all devices.

Take these steps to solve syncing issues with iCloud Photos. If you have any other solutions or questions that we didn't address here, let us know in the comments below!


from iMore - The #1 iPhone, iPad, and iPod touch blog https://ift.tt/2FUzrec
via IFTTT

Three new docuseries that explore our world will hit Apple TV+ this fall

Three docuseries are hitting Apple TV+ back to back.

What you need to know

  • Three new docuseries are coming to Apple TV+ this fall.
  • "Tiny World," "Becoming You," and "Earth at Night in Color" will premiere between September and December.
  • They will feature two narrators from the Marvel Universe - Paul Rudd and Tom Hiddleston.

Apple TV+ will be premiering three new documentary series this fall, each of which looks at the world from a different perspective.

Reported by Variety, "Tiny World," "Becoming You," and "Earth at Night in Color" will hit the streaming service beginning with "Tiny World" in October.

"Tiny World" will explore the earth through the eyes of the tiniest creatures. The series will feature six episodes starting on October 2nd and be narrated by Ant-Man himself, Paul Rudd.

"Tiny World," narrated by Paul Rudd, premieres its first six episodes the streaming platform on Oct. 2. The nature series aims to look at the world "through the eyes of the tiniest creatures and witness the extraordinary things they do to survive." Produced by Plimsoll Productions, the documentary series was written and executive produced by Tom Hugh Jones. Dr. Martha Holmes and Grant Mansfield executive produced the series on behalf of Plimsoll.

The second series, "Becoming You," explores the first 2,000 days of 100 different children's lives. The series will be narrated by Olivia Colman and begin streaming its six episodes on November 13th.

"Becoming You," narrated by Olivia Colman, premieres its first half dozen episodes on Nov. 13. The series looks at how a child's first 2,000 days shape the rest of their lives. "Told through the eyes of over 100 children across the world, from Nepal to Japan and Borneo, each episode offers a thought-provoking look at how children learn to think, speak and move from birth to five-years-old," according to Apple TV Plus. "It underscores how different our journeys can be but ultimately tells the story of our shared humanity and community when it comes to raising children."

The final docuseries, "Earth at Night in Color," will be narrated by Loki (Tom Hiddleston). The six-episode series will debut on December 4th and follow a number of animals in their natural habitat throughout the night.

Lastly, "Earth at Night in Color," narrated by Tom Hiddleston, debuts six episodes on Dec. 4. The series was filmed across six continents, from the Arctic Circle to the African grasslands and "follows the moonlit dramas of animals at night, revealing new insights and never before seen behaviors." The Offspring Films documentary series is exec produced by Alex Williamson and Isla Robertson, and produced by Sam Hodgson.

These three series will follow "Long Way Up," a new motorcycle series that will star Ewan McGregor and Charley Boorman. That series will debut on Apple TV+ on September 18th.

Exclusive content

Apple TV+

$5 per month at Apple

100% exclusive content for the price of a cup of coffee.

With TV+, you can watch well-produced, big-budget TV shows from famed directors, and starring award-winning actors and actresses across all your Apple devices and with up to six members of your Family Sharing group.


from iMore - The #1 iPhone, iPad, and iPod touch blog https://ift.tt/3jjc10s
via IFTTT

Gonski to leave ANZ and hand reins over to former Optus CEO O'Sullivan

The current chairman said 'the time is right' to exit the blue bank.

from Latest news https://ift.tt/3hyQj8r
via IFTTT